

Escalation Predictor Reports in Salesforce
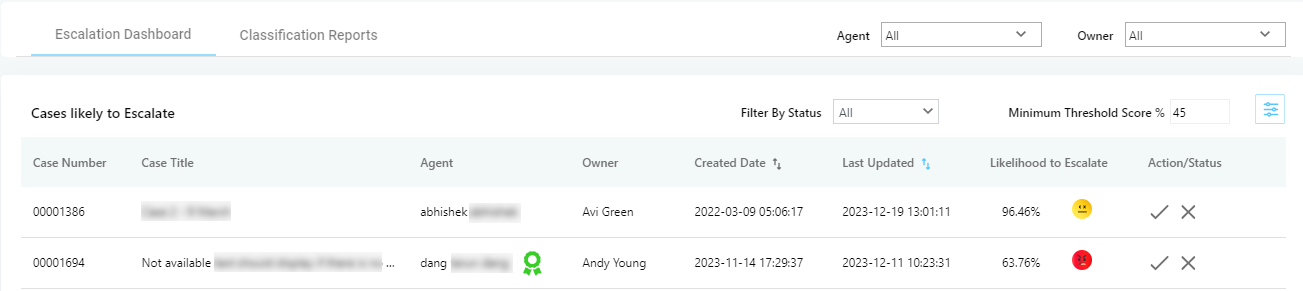
Escalation Dashboard in Salesforce expresses the probability of escalation through a number—where 0% means the case will not escalate and 100% guarantees an escalation—and one of these three emoticons: ![]() (irate user),
(irate user), ![]() (usual user), and
(usual user), and ![]() (content user). Clicking the emoticon on a row expands the row, showcasing the terminologies contributing to case sentiment.
(content user). Clicking the emoticon on a row expands the row, showcasing the terminologies contributing to case sentiment.

Escalation Dashboard
Similar to the Escalation dashboard in SearchUnify, Escalation Dashboard in Salesforce is segmented into two sections: Cases Likely to Escalate and Escalated Cases. The data of both sections can be filtered using the four options:
-
Owner Filter allows you to pull up cases by owner. Select an owner’s name to find all the cases the owner has created. The pulled up cases are segmented into two parts: Escalated Cases and Cases Likely to be Escalated.
-
Agent Filter allows you to pull up cases by agent. Select an agent’s name to find all the cases the agent has worked on. The pulled up cases are segmented into two parts: Escalated Cases and Cases Likely to be Escalated.
-
Filter by Status allows you to pull up cases in one of the three states: All, Acknowledged, and Rejected.
-
Minimum Threshold Score % allows you to pull up cases with the same or higher value of escalation percentage as mentioned by you.

Cases Likely to Escalate
The first section in the Escalation Dashboard report is Cases Likely to Escalate. The list features eight different columns like:
-
Case Number. Salesforce case number.
-
Case Title. Case subject in Salesforce.
-
Agent. Name of the support agent currently assigned to the case.
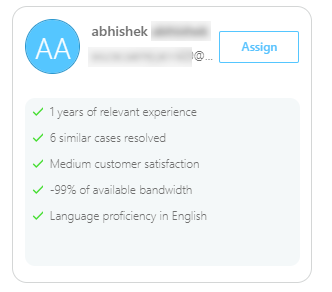
Against the name of the Agent, a ribbon icon
 is shown. Clicking on it opens a pop-up with agent recommendations best suited to handle a case. Along with the agent name and email address, other details that show up in recommendations, including:
-
Relevant experience of an agent
-
Number of similar cases that an agent solved
-
Customer Satisfactions rating of an agent
-
Current bandwidth that an agent has.
-
Language(s) that an agent has proficiency in.
Click Assign to allot the case to an agent from the recommendations. The color of the ribbon turns blue
 when a recommendation is accepted.
 -
-
Owner. Name of the person who raised the case.
-
Created Date. Date and time on which the case was created
-
Last updated. Date and time on which the case was last updated
-
Likelihood to Escalate. Probability that the case will see an escalation.
Several factors contribute to identify the escalation percentage. These factors include; priority, case creation date, type, case modified date, etc. These factors would vary from case to case. A certain weight is defined for different factors, based on which the escalation percentage is counted. For instance, ‘priority' can get 20%, ‘case creation date’ 10% percent, and ‘type’ 10% percent. Note. The percentage is updated automatically every 24 hours. Also, if there is any change in the percentage score (increased or decreased), they are also displayed when the score is updated.
-
Action/Status. Record of what has been done to prevent an escalation. It has two values: Acknowledged and Rejected. Select Acknowledged if you are taking steps to prevent an escalation. Select Reject if you notice a false flag and think the case isn't going to escalate.

You can sort the cases based on two factors:
-
Created Date.Select a date range and see the list of cases that were created in the selected date range.
-
Updated Date. Select a date range and see the list of cases that were last modified in the selected date range.

Escalated Cases
The second section in this report features a list of Escalated Cases, meaning the cases that have already been escalated. The list is segmented into six different columns: Case Number, Case Title, Agent, Owner, Created Date, and Escalated Date.

You can sort the cases based on two factors:
-
Created Date.Select a date range and see the list of cases that were created in the selected date range.
-
Escalated Date. Select a date range and see the list of cases that were escalated in the selected date range.

Classification Reports
The details of classification reports are explained in Case Distribution Reports: Review Case Distribution Patterns.
An additional report in Classification Reports section is Case Owner. Scroll down to spot the Case Owner section. The report has four columns:
-
Contact Name. Name of the case owner
-
Contact Email. Email address of the case owner
-
Case Logged. The total number of cases that the case owner has created
-
Escalation. Percentage of cases that were escalated for the case owner