

Use Salesforce As a Content Source
SearchUnify can index the data stored in your Salesforce org, including the data on Service Cloud, Sales Cloud, and Community Cloud.
You can choose to index all the objects and make them searchable, or you can limit indexing to selected objects. Within an object, you can choose to index all the fields or some fields.
Note: You cannot add a Salesforce org more than once as a content source and connect the content sources with a search client. The recommended method is to index multiple objects from an org. Then you can make object A searchable on a search client and object B searchable on another search client.
This article shows how to set up your Salesforce org for indexing.
Prerequisites
Licenses
- Salesforce Platform license.
- Knowledge User license if you are attempting to index articles
- Right set of permissions; see the Permissions Chart for details
Permissions Chart
| Type | Sub-Type | Name | Use |
| Profile-Level Permission | Administrative Permissions | API Enabled* | Mandatory to call Salesforce APIs by making a user an API user. |
|
View Setup and Configuration* OR Assign Permission Sets* OR Manage User* |
Either is mandatory to crawl Salesforce permissions or access control settings. | ||
| View All Data | Index feed items. 1. Used only when the goal is to index feed items. |
||
| Manage Data Categories | Index data categories. 1. Preferred: In Default Visibility Settings, select the default visibility for the categories in Category Group Visibility to All Categories. 2. Acceptable: If Category Group Visibility is set to Custom, then before sharing with us, assign the user the role, permission sets, and profile needed to index data categories. |
||
| General User Permissions | Manage Articles* |
Mandatory permission for indexing and removing article drafts. 1. Used when the goal is to index articles and drafts. 2. Used when the goal is to update the index by removing archived articles and drafts. |
|
| Manage Cases | Index cases. | ||
| Standard Object Permissions | Read | Index only the objects with the Read permission. | |
| Article Type Permissions | Read |
Index only the articles with the Read permission |
|
| Community Members | Community Member |
Index navigational topics on a community. 1. Before sharing the user, ensure that its profile is a member of the community. |
Establish a Connection
-
Navigate to Content Sources and click Add New Content Sources.

- Give your content source a name.
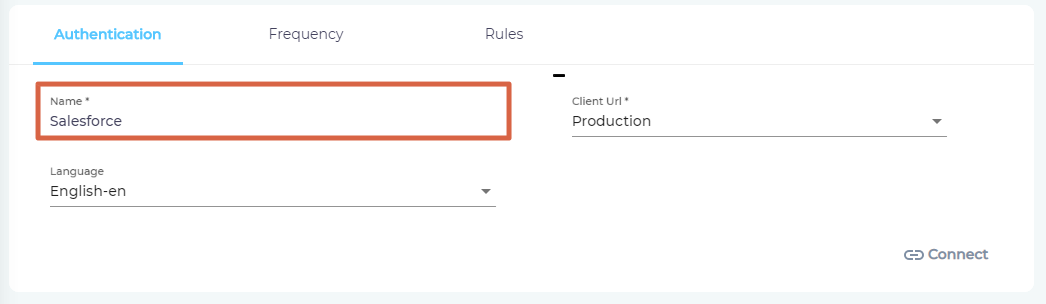
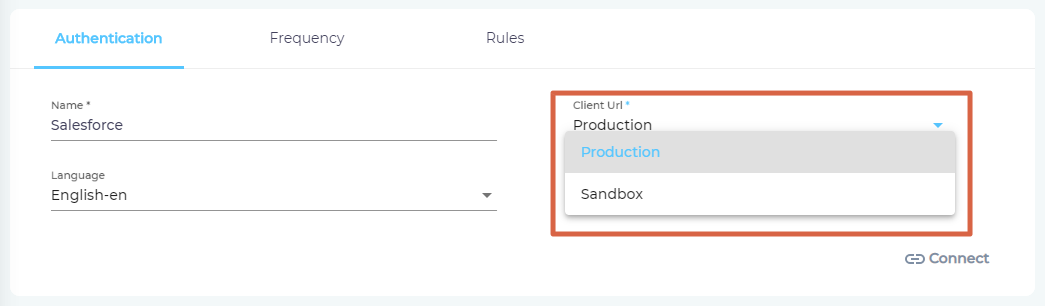
- In Client Url, select Sandbox to index data from a sandbox org and select Production to index data from a production org.
- Select the content languages. If your knowledge base hosts articles in more than one language, then specify them all in Language. After selecting the languages, click Connect.
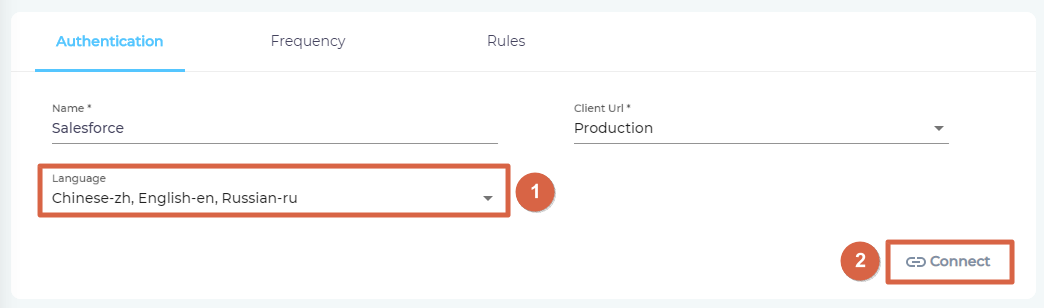
- If you are already logged into Salesforce in another tab, you will be greeted by a "Connection Succeeded" message. Click Next.

Note: It's essential to establish a connection again when the user who did it the first time is deleted from the Salesforce org. Establishing a connection isn't necessary after changing your password Salesforce.
Re-Connect
An admin can edit a Content Source for multiple reasons, including:
-
To reauthenticate
-
To fix a crawl error
-
To change frequency
-
To add or remove an object or a field for crawling
When a Content Source is edited, either a Connect or a Re-Connect button is displayed.
-
Case 1: When the Connect button is displayed:
-
When the Connect button is displayed if the Content Source authentication is successful. Along with the button, a message is displayed There are no crawl errors and the Content Source authentication is valid.
-
-
Fig. The Connect button is displayed on the Authentication tab.
-
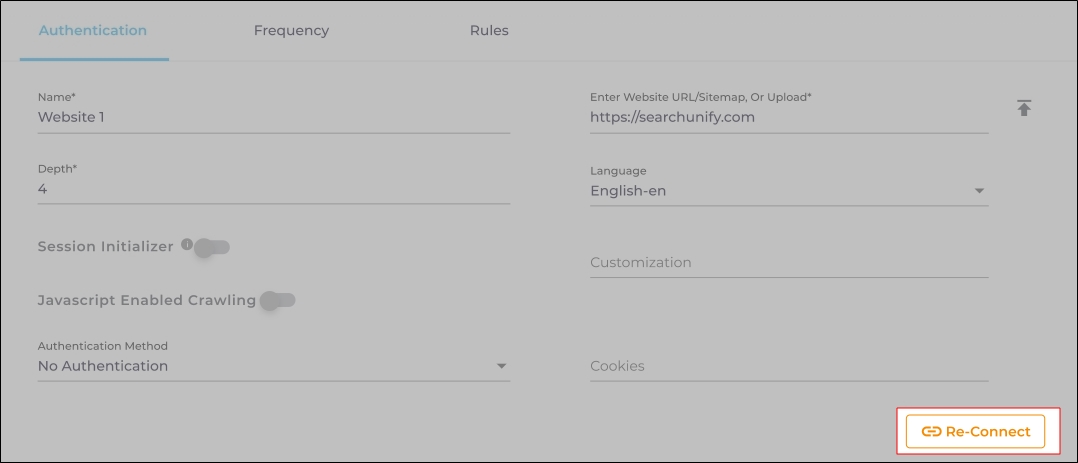
Case 2: When the Re-connect button is displayed:
-
The Re-connect button is displayed when the authentication details change or the authentication fails for any reason.
-
In both cases, the Content Source connection must be authenticated again. To reauthenticate a Content Source, enter the authentication details, and click Re-Connect.
-
-
Fig. The Re-Connect button is displayed on the Authentication tab.
Set Up Crawl Frequency
The first crawl is always performed manually after configuring the content source. In the Choose a Date field, select a date to start the crawl; only data created after the selected date will be crawled*. For now, leave the frequency set to its default value, Never, and click Set.

Fig. The Frequency tab when "Frequency" is set to "Never".
Install the SearchUnify Connected App
After connecting your Salesforce org with SearchUnify (during Establish a Connection), you must install the SearchUnifySF connected app in Salesforce. This ensures that Salesforce can correctly authorize the SearchUnify Salesforce integration during crawling and refresh-token workflows.
-
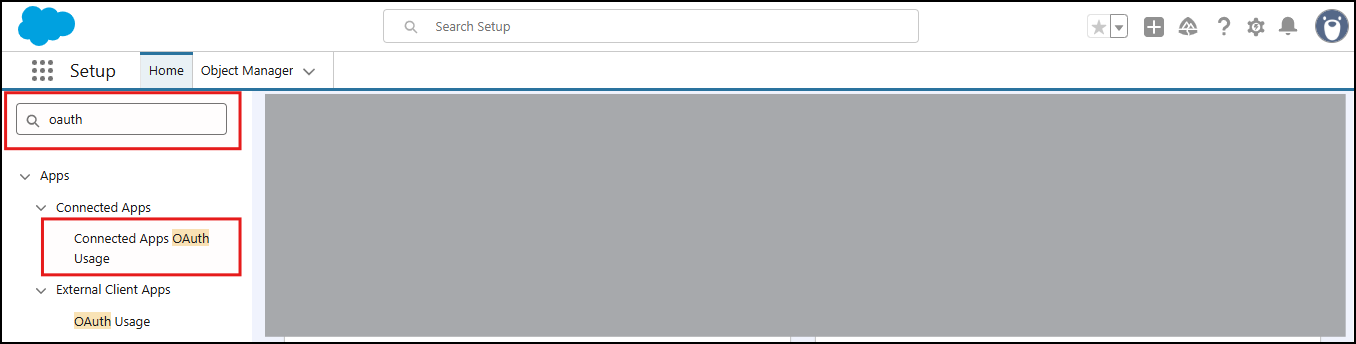
Log in to your Salesforce org using a System Administrator account.
-
From Setup, use the Quick Find Box to search OAuth, and open Connected Apps OAuth Usage.
-
In the list of connected apps, locate SearchUnifySF.
-
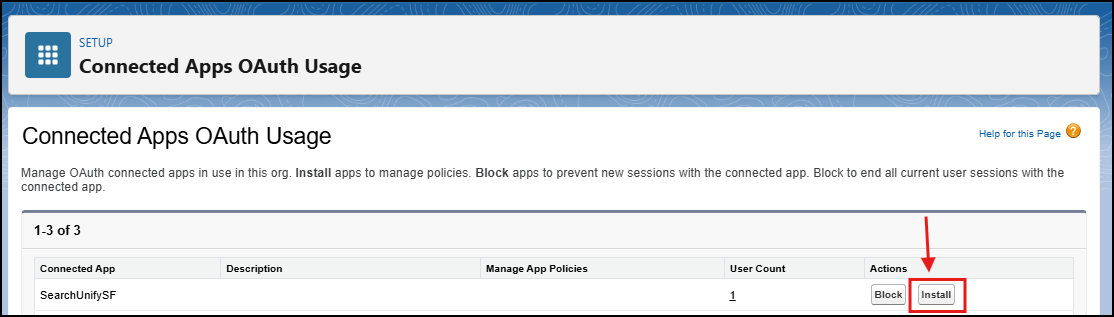
If the status shows that the app isn’t installed, click Install next to SearchUnifySF.
-
Follow the on-screen Salesforce prompts to complete the installation.
-
Return to SearchUnify and continue with the next steps in the content source setup.
Note: If you face authorization issues or crawl failures after the Salesforce connection is established, verify that SearchUnifySF is installed from Connected Apps OAuth Usage and retry the connection in SearchUnify. (docs.searchunify.com)
Select Content Fields for Indexing
Two Appinium objects, ViewTrac and LearnTrac, are supported out-of-the-box. The content is shown to the searchers according to the permissions defined using the Media-sharing rules under Appinium. Assign permission sets for objects carefully. In the LearnTrac app, permissions are set at the document level. Any change on permissions requires a manual crawl.
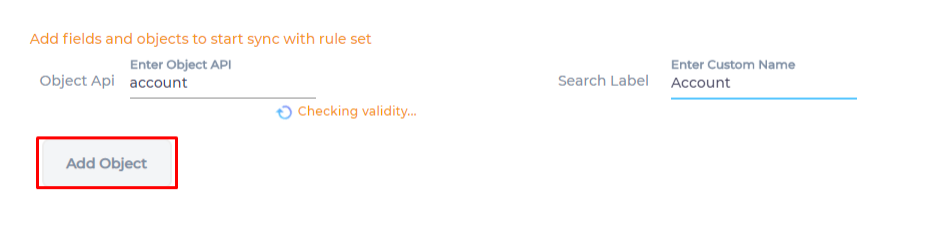
- You can pick object and fields for indexing. SearchUnify supports standard and custom object fields. To select an object, enter its Object API name. The list of valid object API names can be found in the second column of Object Manager. (Log into Salesforce to view.)
Note:
SearchUnify supports the indexing of record fields. Crawl them if your knowledge base is hosted on a Salesforce org.
To index article drafts, enter
knowledge__kav_draftin the Object API field.In order to crawl the
feeditemobject, add anetwork scopecondition first.
After adding or removing fields from an object, use the object crawling option because object crawls are safer. When an object crawl fails, the overall index isn't impacted.
File types supported for attachments data are pdf, doc, docx, ppt, pptx, potx, csv, xsl, txt, rtf, evtx, log.
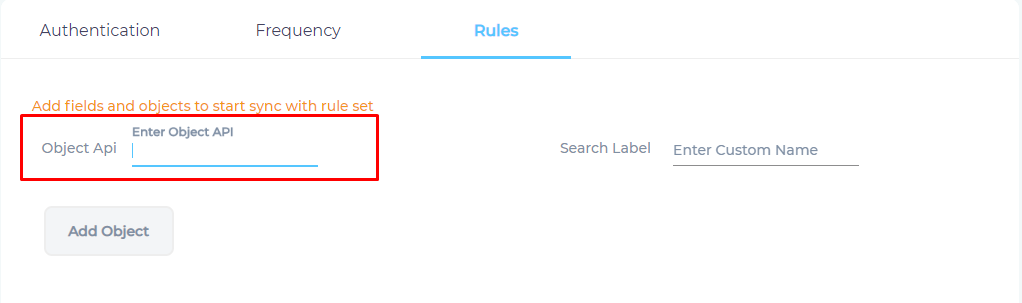
- The Add Object button is activated only if the name API name is valid. Otherwise a warning is displayed.

-
After entering a valid API name, enter a label and click Add Object.
If you cannot add an object, then verify the object name. Misspelled and incorrect object names throw an error.
You cannot add objects in three other scenarios:
-
You don't have access to the object-to-be-added in Salesforce.
-
Users credentials that were used to authenticate the org have expired.
-
SearchUnify APIs are down.
-
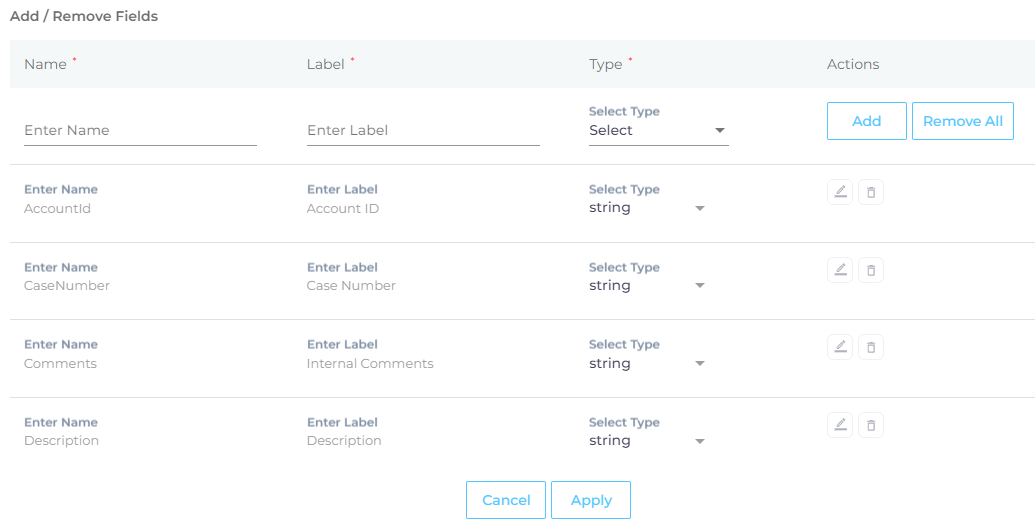
- After adding the objects, select object fields (content fields) for indexing. Click
 to view object fields.
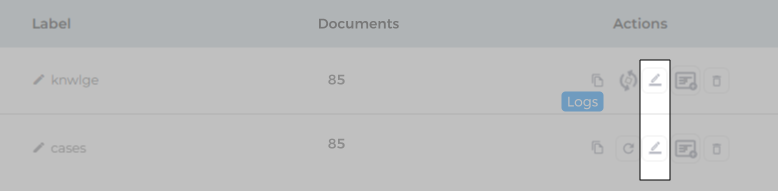
-
Add fields—such as createdDate and accountDescription—one at a time. You can change a field's Label and Type.
Note: When a crawled field is deleted from Salesforce, then crawling fails because each time SearchUnify tries to update the index, an error shows up. If you haven't been able to crawl Salesforce, then tally the indexed fields of each object in SearchUnify with the fields in your Salesforce org.
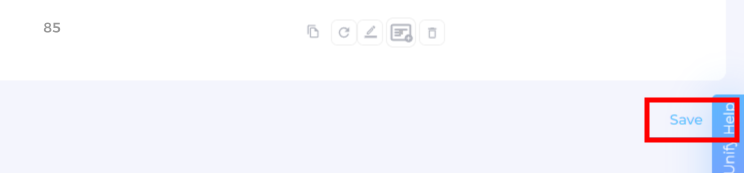
- Repeat the previous step with all the objects and click Save.
After the First Crawl
Return to the Content Sources screen and click ![]() in Actions. The number of indexed documents is updated after the crawl is complete. You can view crawl progress by clicking
in Actions. The number of indexed documents is updated after the crawl is complete. You can view crawl progress by clicking ![]() (View Crawl Logs) in Actions.
(View Crawl Logs) in Actions.
Once the first crawl is complete, click ![]() in Actions to open the content source for editing, and set a crawl frequency.
in Actions to open the content source for editing, and set a crawl frequency.
-
In Choose a Date, click
 to fire up a calendar and select a date. Only the data created or updated after the selected date is indexed.
-
The following options are available for the Frequency field:
-
When Never is selected, the content source is not crawled until an admin opts for a manual crawl on the Content Sources screen.
-
When Minutes is selected, a new dropdown appears where the admin can choose between three values: 15, 20, and 30. Picking 20 means that the content source crawling starts every 20 minutes.
-
When Hours is selected, a new dropdown is displayed where the admin can choose between eight values between 1, 2, 3, 4, 6, 8, 12, and 24. Selecting 8 initiates content crawling every 8 hours.
-
When Daily is selected, a new dropdown is displayed where the admin can pick a value between 0 and 23. If 15 is selected, the content source crawling starts at 3:00 p.m. (1500 hours) each day.
-
When Day of Week is selected, a new dropdown is displayed where the admin can pick a day of the week. If Tuesday is chosen, then content source crawling starts at 0000 hours on every Tuesday.
-
When Day of Month is selected, a new dropdown appears where the admin can select a value between 1 and 30. If 20 is chosen, then content source crawling starts on the 20th of each month.
It is recommended to pick a date between the 1st and 28th of the month. If 30 is chosen, then the crawler may throw an error in February. The error will be “Chosen date will not work for this month.”
-
When Yearly is selected, the content source crawling starts at midnight on 1 January each year.
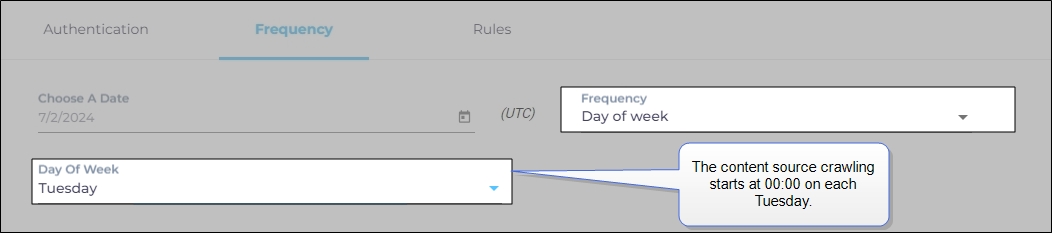
Fig. The content source crawling starts at 00:00 on each Tuesday.
-
- Click Set to save the crawl frequency settings.

-
Click Save.
A crawl usually fails for six reasons: (1) Salesforce APIs are down, (2) the authenticated user has been deleted from Salesforce, (3) the authenticated user doesn't have access to the object or field he is trying to crawl, (4) the credentials used to connect Salesforce with SearchUnify have expired, (5) a custom field has been removed from SearchUnify, and (6) there is an error in the formula in Manage Fields.
Manage Archived Articles
Archived articles are automatically removed from the SU index if the archiving rate is less than 200 articles per hour. However, if the archiving rate in your org exceeds that limit and you don't want the archived articles to be searchable, place a request with your CSM to delete the extraneous articles.
Crawl Attachments
Files in Salesforce are stored in an object named contentdocument. The files can be linked to objects, such as case, knowledge, and feeds. You can turn your files searchable in two ways.
In the first method, the files appear as independent search results. End-users can see sample-file.pdf and sample-file.doc in results after searching sample-file.
In the second method, the files don't appear in results but the object they are attached with turn up in results. On searching sample-file, end-users find only sample-object to which sample-file.pdf and sample-file.doc are attached. Then, they can open the object and download the file.
Crawl the files as a separate object (contentdocument) to adopt the first method.
Crawl Depth
In Salesforce knowledge, when Category_nested field is crawled, you get an option to configure crawl depth through Number of Levels in Data Category Group Hierarchy in the Facets column of Search Clients > Edit > Content Sources.
You can select a value between 1 and 5 in Number of Levels in Data Category Group Hierarchy has a value. The selected value is used and shown on the checked facet on a search client.
Data Deletion and SU Index
From the perspective of a support manager, Knowledge articles in Salesforce are of three types:
-
Online articles are generally available to the public. These articles can be found through search.
-
Draft articles are generally only available internally. These articles can also be found by people with the right role.
-
Archived articles is generally old content which no one wants to see in search results.
SearchUnify cleans its index regularly so that users can find content corresponding to their role. All archived articles are removed from the index so that they aren't in the search results. Similarly, when a draft is published, its status is changed in the index so that everyone can find the newly-published article. Sometimes the opposite happens and a published article is moved back into drafts. This status is captured and the drafts become searchable only internally.
For SearchUnify instances on Q2 '24 release, index cleaning for deleted documents runs with every frequency crawl. New articles are also added to the index during frequency crawls. Deleted data from the Salesforce org is removed from the SearchUnify index in every frequency crawl.
For all objects except knowledge, the data deleted from the Salesforce org is removed from the SearchUnify index within three years.
However, because of an API limitation in Salesforce, archived feedback cannot be deleted from the index. So it's possible that a user can find archived feedback, already removed in the org, in search results.
Troubleshooting