

Use a Website as a Content Source
Index your website's data in SearchUnify by adding your website as a content source. SearchUnify Super Admins and Admins can upload a sitemap to index a website or configure a highly customized crawling plan that allows them to:
-
Crawl and index multiple public and gated (except those behind a CAPTCHA wall) websites simultaneously
-
Crawl only the selected website sections or pages
-
Control the crawl depth
-
Crawl and index websites in more than 20 different languages
-
Crawl and index JavaScript websites
-
Crawl and index WordPress websites
Note.
SearchUnify crawls HTML files and font files. JavaScript, CSS files, and images are excluded by default.
Establish a Connection
-
Navigate to Content Sources and click Add New Content Sources.

-
On the Authentication screen, enter the following details:
Name. Give your content source a label.
Website URL/Sitemap, or Upload Sitemap. Enter your website or sitemap URL, or upload a .txt or a .xml sitemap file.
Depth. Select crawl depth. When Depth is one, SearchUnify crawls the links in your sitemap. When Depth is two, SearchUnify follows the hyperlinks on the webpages and crawls them as well. The recommended value of Depth is less than 10.
Language. Select the language of your website content.
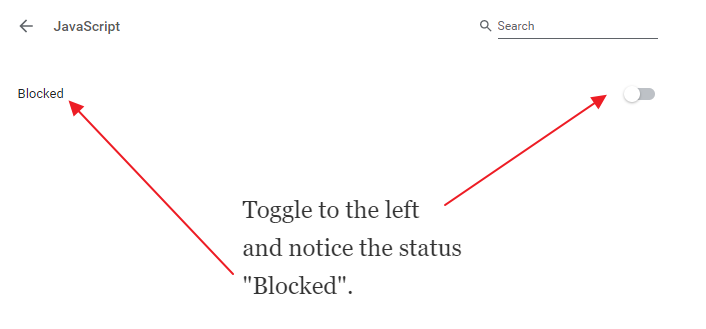
Javascript Enabled Crawling. Some websites rely on JavaScript to function while others, such as Wikipedia, can function without it. If your website is dependent on JavaScript, then toggle it on to crawl and index JavaScript-dependent websites.

A way to find out if a website depends on JavaScript for its regular functions is to go to Chrome://settings/content/javascript, and turn off JavaScript. Reload the website. If you receive an error message or the website starts behaving erratically, then turn on JavaScript Enabled Crawling.
Uploading a sitemap offers several advantages. The primary two are:
- Accelerated Recrawls. SearchUnify crawler identifies the URLs in a sitemap with the attribute
<lastmod>and crawls only the pages updated or created since the last crawl. This type of crawling can be several times faster on a large website. Related: Generate a Sitemap from URL (loc) and Last Modified (lastmod) Attributes (Requires a login to the SearchUnify Community) - Customer Filters. Admins can add custom attributes, such as
<author>,<priority>for each URL in the sitemap. After crawling, these customer attributes can be used as filters on a search client. To index a filter, use the format{{sitemap}}{{filterName}}in Rules.
SearchUnify is capable of handling complex sitemaps which contain more than just a list of plain URLs. One such feature is the tag <lastmod>.
⚠ WARNING.
SearchUnify doesn't crawl a website when the links in the sitemap.xml or TXT file don't match with real web addresses. Five common issues are:
- Redirects. If a link redirects, it will not be crawled.
- HTTPS and HTTP. If a website is secure, then crawling will proceed only when sitemap.xml or TXT file contain secure links; starting with HTTPS. If a website is insecure, then HTTP links work. In both cases, the specified and actual web addresses should match.
- Trailing Spaces. Any space after the end of a URL causes the indexing to stop.
- Comments. If there are any comments in the TXT file or sitemap.xml, remove them before the upload.
- Empty Lines. Indexing can stop abruptly if empty lines are found in the beginning, middle, or end of a TXT file or sitemap.xml.
Authentication Method
Five authentication methods are available for the Website content source:
-
No Authentication for accessing public websites.
-
Basic authentication for indexing gated websites.
-
Form authentication for indexing gated websites.
-
Multi-Step authentication for indexing gated websites where login is spread over multiple steps.
-
HTAccess authentication for indexing gated websites that use .htaccess files.
For detailed information on each method, please refer to Select an Authentication Method for Website
Re-Connect
The Authentication screen is displayed when an already-created Content Source is opened for editing. An admin can edit a Content Source for multiple reasons, including:
-
To reauthenticate
-
To fix a crawl error
-
To change frequency
-
To add or remove an object or a field for crawling
When a Content Source is edited, either a Connect or a Re-Connect button is displayed.
-
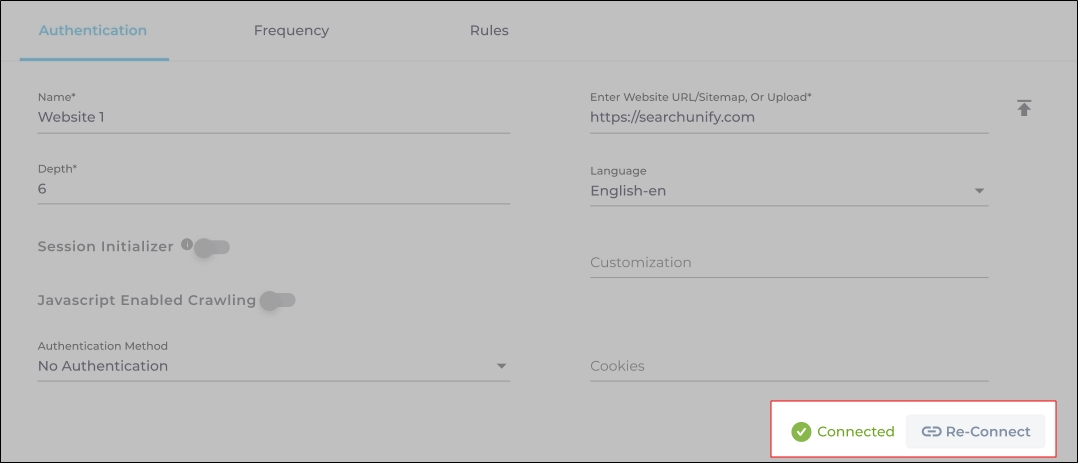
Case 1: When the Connect button is displayed:
-
When the Connect button is displayed if the Content Source authentication is successful. Along with the button, a message is displayed There are no crawl errors and the Content Source authentication is valid.
-
-
Fig. The Connect button is displayed on the Authentication tab.
-
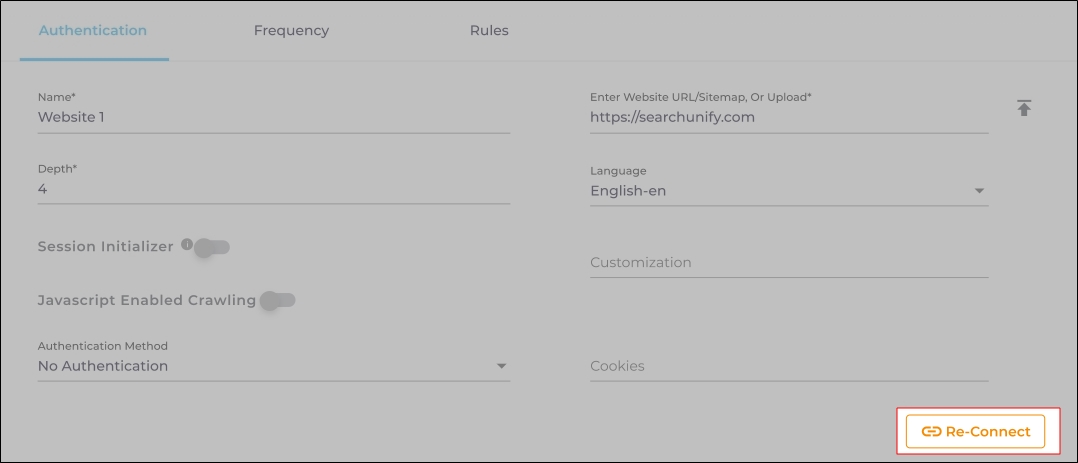
Case 2: When the Re-connect button is displayed:
-
The Re-connect button is displayed when the authentication details change or the authentication fails for any reason.
-
In both cases, the Content Source connection must be authenticated again. To reauthenticate a Content Source, enter the authentication details, and click Re-Connect.
-
-
Fig. The Re-Connect button is displayed on the Authentication tab.
Set Up Crawl Frequency
For this content source, the Choose a Date feature is grayed out. That's because during each crawl all the data is indexed from scratch. You can select the crawl frequency after configuring the content source. For now, click Set.
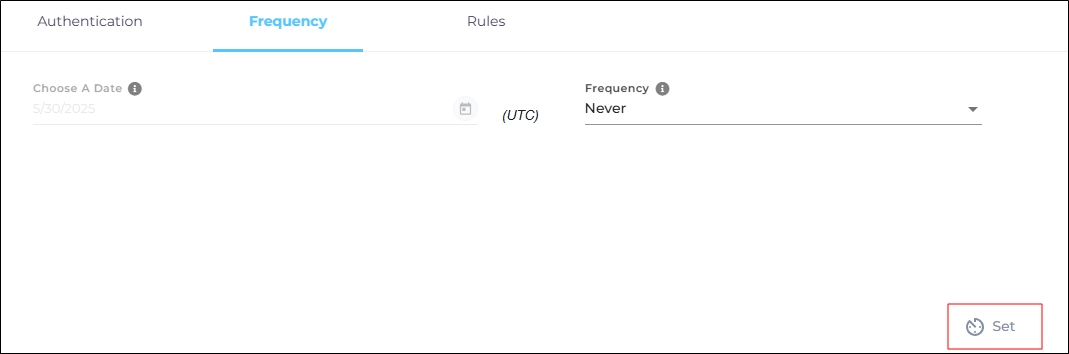
Fig. The Frequency tab when "Frequency" is set to "Never".
Add Objects and Fields for Indexing
SearchUnify indexes a website by capturing and storing the data inside HTML elements. Recognizing that websites may have different sections or pages that require separate crawling and indexing, SearchUnify gives the flexibility to users to add multiple Content types for different sections/pages of the website.
⚠ IMPORTANT
A website is not indexed if no HTML element is specified.
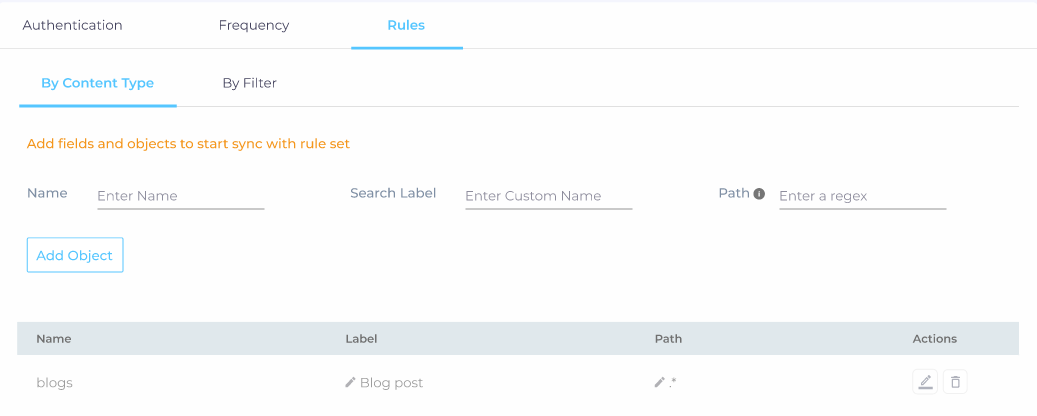
The admins can write CSS selectors to specify the elements for indexing. The CSS selectors are stored in an Object, which we will create next. To begin with, navigate to the Rules tab and you will land on By Content Type subtab.
-
Enter object details in Name, Label, and Path. The name and the label do not have to be valid HTML tags. You can add different objects for different sections and pages of a website content source.
NOTE. If you leave the Path field empty, then the entire website will be crawled and only one object with empty path can be added.
-
Click Add Object to add more object(s), or to say specify the sections/pages that you want to index. The paths should be added in the format shown in the below image.
To effectively crawl specific sections of your website, you can use regular expressions (regex) to define the paths of interest. For example, if your website contains sections like https://yourwebsite.com/java, https://yourwebsite.com/css, and https://yourwebsite.com/node, you can specify these sections for individual crawling by using regex patterns such as /java/.*, /css/.*, and /node/.*. Each .* in the regex pattern matches any sequence of characters within that directory, ensuring that all related documents are included in the crawl.
To apply these patterns, add them as separate entries in your crawler's configuration. This allows you to see document counts and data for each section individually, facilitating more targeted analysis or content management.
Remember to adjust the regex patterns according to the specific URLs of your website's communities or other sections you wish to include in the crawl. By doing so, you can fine-tune the scope of your crawling efforts to match your specific needs.
-
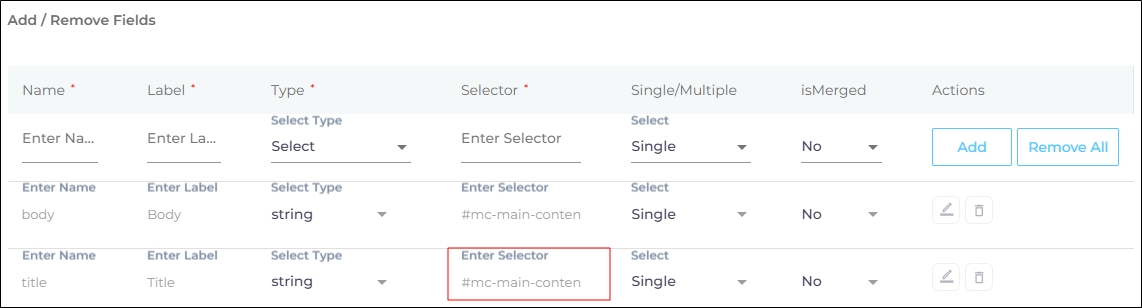
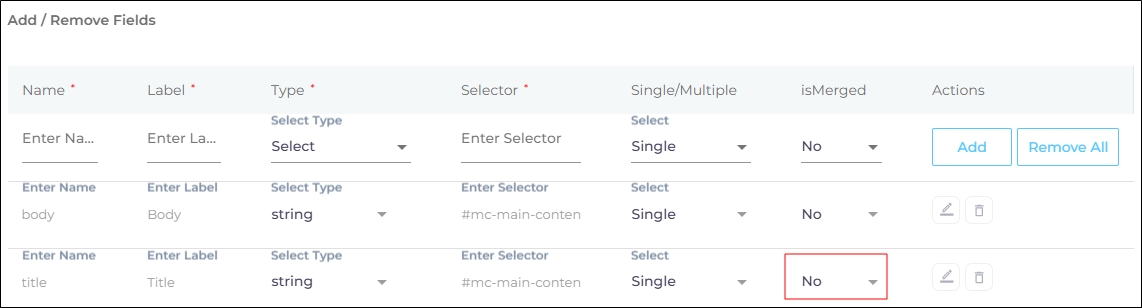
Click ADD to add content fields for indexing.
-
Selector is the most important field. It's used to find content for indexing. If a selector is misidentified, then the values contained in the selector will not be indexed. On a webpage, all HTML tags, classes, and IDs are valid selectors.
To index paragraphs on a website, enter p in the Selector field. Don't use angle brackets on HTML selectors. The right way is p, h2, ol, and title instead of <p>, <h2>, <ol>, and <title>.
The right way to enter IDs is to prefix them with an # (octothorpe). So <hometoc> is incorrect, but #hometoc is correct. As for classes, each class name is prefixed by a . (dot) in Selector.
-
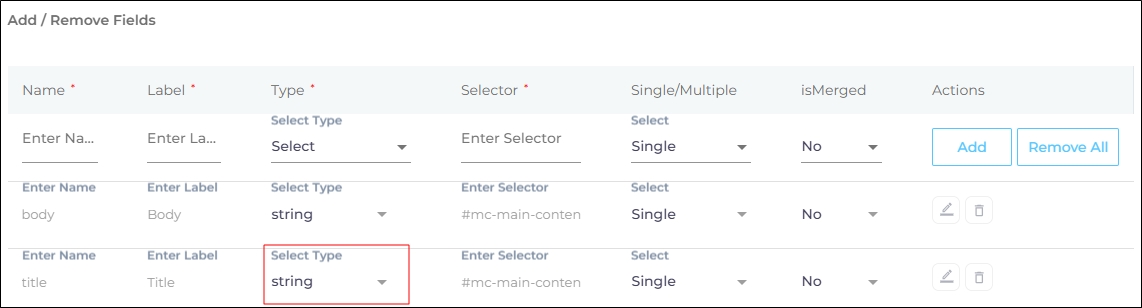
Assign the Selector a Type. The default Type is string. Always stick with the default unless the value is time or date.
-
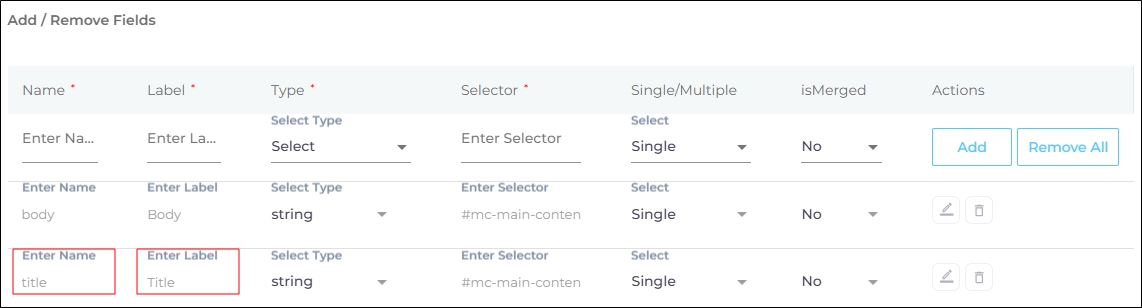
Give the selector a Name and Label. Both are used in the backend. You can be creative here.
-
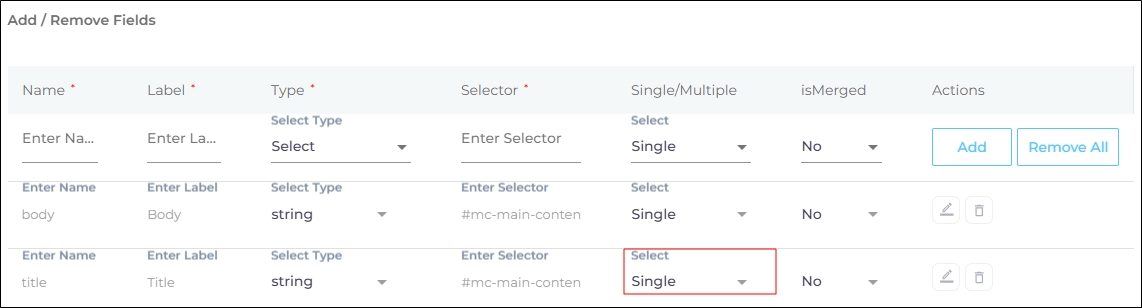
An HTML element can occur once or several times on a webpage. In almost all cases, the title is found only once. At the same time, a page usually has multiple paragraphs surrounded by p tags. Single/Multiple is for those elements that occur more than once, such as p, h2, and i. When Single is selected, then the data stored in multiple HTML elements is collated. Think of a five-paragraph where. If you pick Single, then all the five paragraphs are collated as they should be. But if you pick Multiple, then each paragraph is stored separately. Multiple can be selected in those scenarios when a web page lists items. For example, a list of books where each title is surrounded by the same pair of i tags. In that case, Multiple is the way to go.
-
Select "Yes" in Is Merged if you want to field to appear as a filter.
-
Press Add and then Apply.
-
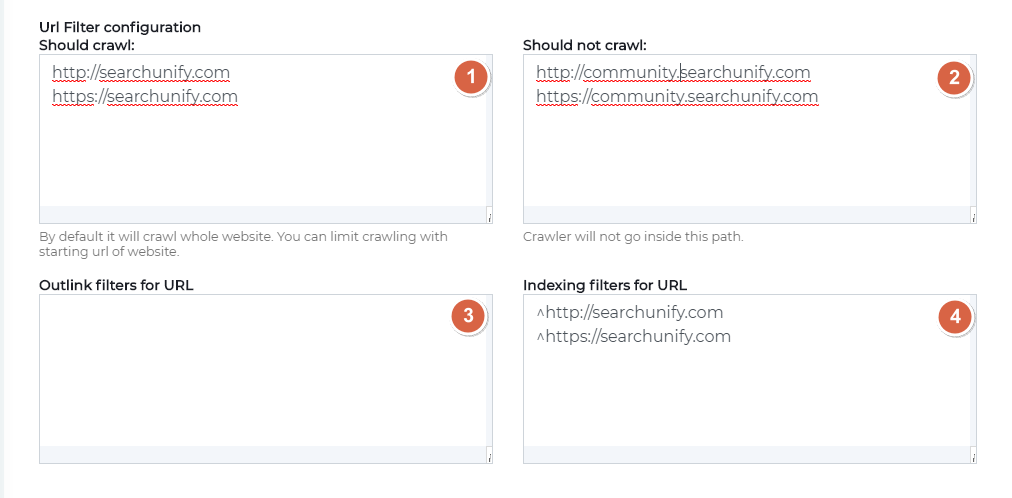
Switch to the By Filter subtab. Next, the four fields in URL Filter Configuration enable admins to highly customize crawling.
-
Should crawl.This feature is used to send crawler to select pages. Extremely useful if you have a thousands of pages in sitemap but don't want to crawl them all. List your webpages pages in Should Crawl or enter a regular expression specifying the pages for crawling. Should Crawl accelerates crawling when it's used properly. While using, make sure that you enter both the secure and insecure addresses of the webpage mentioned in Authentication.
-
Should not crawl. This feature is used to specify the webpages where the crawler shouldn't go. The exact opposite of what Should Crawl does. Use this feature when it's simpler to exclude URLs than include them. Think of it this way. Out of 10000 URLs, you don't want the crawler to visit 20. You can either specify the remaining 9800 URLs in Should Crawl or 20 URLs in Should Not Crawl. At least in this particular scenario, Should Not Crawl saves much time.
NOTE. Already crawled documents remain in search until the next crawl. To remove the already-crawled archived documents, read Remove Archived Article from Search Results.
-
Outlink filters for URL. This feature is used to crawl selected pages on depth two. Think of it this way: A Home Page links to an Our Products page and Our Products links to 50 different pages. You don't want them all in your index. A way to configure indexing is to first turn off Limit Crawling to Sitemap in Authentication and then enter the URLs of the products to be indexed. In spite of dozens of URLs, you can insert a regular expression that covers them all. https://su.com/product1 and https://su.com/product2 are equivalent to https://su.com/product* in Outlink Filters for URL.
NOTE: It is to be used only if you have entered a sitemap in Authentication.
-
Indexing filters for URL. This feature is used to index select pages. While Should Crawl determines the pages to be crawled, Indexing filters for URL determines which pages are to be stored in SearchUnify's database or index. Ensure that you have specified Should Crawl correctly. If the crawler cannot get to page.html, then mentioning page.html in Indexing Filters for URL will not add it to the SearchUnfiy database. You can enter the URLs of the pages to be indexed or a regular expression.
-
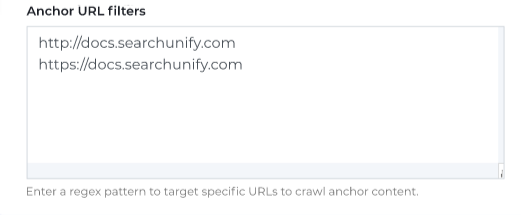
Anchor URL filters. Currently, a website crawler may enter an infinite crawling loop, especially when a sitemap "S.xml" links to other sitemaps (A.xml, B.xml, C.xml), and one of them, let's say C.xml, links back to "S.xml". This results in URLs from S.xml being crawled multiple times: once as S.xml and again as part of C.xml. Anchor URL Filters provide an elegant solution. By entering the main sitemap, S.xml, into the Anchor URL Filter field, you can ensure that S.xml is crawled only once, regardless of how many times the crawler encounters it.
-
-
Press Save to save the settings.


You have successfully added Website as a content source. Perform a manual crawl to start indexing the website data in SearchUnify.
Related
Find and Replace
Users on the Q2 '24 release or a later version will notice a new button next to each object on the Rules screen. It resembles a magnifying glass and is labeled "Find and Replace." You can use this feature to find and replace values in a single field or across all fields. The changes will occur in the search index and not in your content source.
Fig. The "Find and Replace" button on the Rules tab in the Actions column.
Find and Replace proves valuable in various scenarios. A common use case is when a product name is altered. Suppose your product name has changed from "SearchUnify" to "SUnify," and you wish for the search result titles to immediately reflect this change.
-
To make the change, click
 .
. -
Now, choose either "All" or a specific content source field from the "Enter Name" dropdown. When "All" is selected, any value in the "Find" column is replaced with the corresponding value in the "Replace" column across all content source fields. If a particular field is chosen, the old value is replaced with the new value solely within the selected field.
-
Enter the value to be replaced in the Find column and the new value in the Replace column. Both columns accept regular expressions.
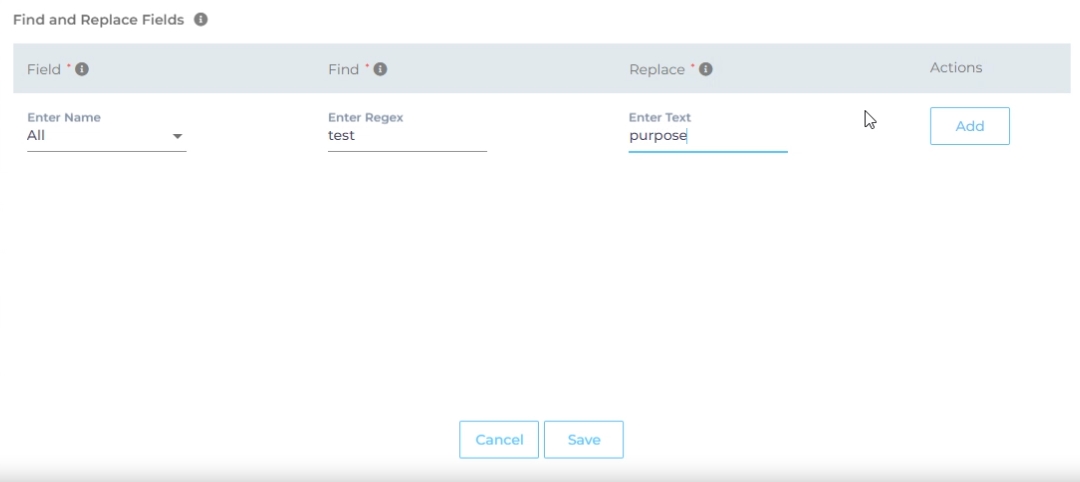
Fig. Snapshot of Find and Replace.
-
Click Add. You will see a warning if you are replacing a value in all fields.
-
Click Save to apply settings
-
Run a crawl for the updated values to reflect in the search results.
After the First Crawl
Return to the Content Sources screen and click ![]() in Actions. The number of indexed documents is updated after the crawl is complete. You can view crawl progress by clicking
in Actions. The number of indexed documents is updated after the crawl is complete. You can view crawl progress by clicking ![]() (View Crawl Logs) in Actions.
(View Crawl Logs) in Actions.
Once the first crawl is complete, click ![]() in Actions to open the content source for editing, and set a crawl frequency.
in Actions to open the content source for editing, and set a crawl frequency.
-
For this content source, the Choose a Date feature is grayed out. That's because during each crawl all the data is indexed from scratch. You can select the crawl frequency after configuring the content source. The following options are available for the Frequency field:
-
When Never is selected, the content source is not crawled until an admin opts for a manual crawl on the Content Sources screen.
-
When Minutes is selected, a new dropdown appears where the admin can choose between three values: 15, 20, and 30. Picking 20 means that the content source crawling starts every 20 minutes.
-
When Hours is selected, a new dropdown is displayed where the admin can choose between eight values between 1, 2, 3, 4, 6, 8, 12, and 24. Selecting 8 initiates content crawling every 8 hours.
-
When Daily is selected, a new dropdown is displayed where the admin can pick a value between 0 and 23. If 15 is selected, the content source crawling starts at 3:00 p.m. (1500 hours) each day.
-
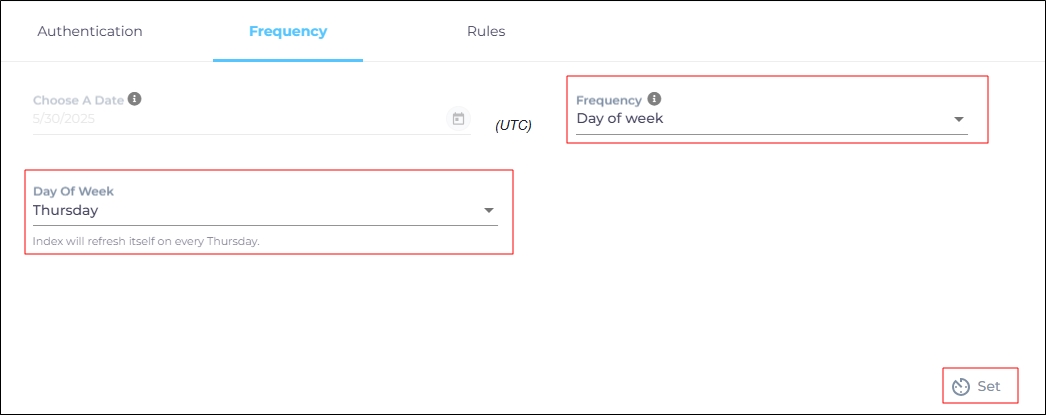
When Day of Week is selected, a new dropdown is displayed where the admin can pick a day of the week. If Tuesday is chosen, then content source crawling starts at 0000 hours on every Tuesday.
-
When Day of Month is selected, a new dropdown appears where the admin can select a value between 1 and 30. If 20 is chosen, then content source crawling starts on the 20th of each month.
It is recommended to pick a date between the 1st and 28th of the month. If 30 is chosen, then the crawler may throw an error in February. The error will be “Chosen date will not work for this month.”
-
When Yearly is selected, the content source crawling starts at midnight on 1 January each year.
-
-
Click Set to save the crawl frequency settings.
-
Click Save.