Use Create Formula for Document- and Role-Based Access Control
This article guides you through the Create Formula screen, beginning with document-based access control, which is available for all content sources, and then covering role-based access control, which is exclusive to Salesforce.
Document-Based Access Control
With document-based access control, you can restrict visibility in search results, even for content sources that do not support role-based access control due to the absence of user login requirements.
This feature enables you to set documents as public or hidden based on specific field properties, such as title, URL, author name, and creation date.
Role-Based Access Control
By default, access restrictions on Salesforce cases, articles, and other objects are applied to indexed files. If a case is restricted for a user inside the Salesforce console, it will also remain inaccessible in search results.
However, in certain situations, admins may need to override these default settings. In such cases, they can use Create Formula’s role-based access control to customize access permissions.
NOTE.
If Salesforce is one of your content sources, you can use Independent Conditions to extend role-based access control settings to other content sources.
Popular Use Cases
Create Formula is a powerful feature that allows admins to customize search results based on specific criteria.
-
Exclude specific documents – Remove all documents containing a specific word (e.g., "Python") from search results.
-
Filter by object – Display search results from only one specific object.
-
Restrict by domain – Limit search results to documents hosted on a specific domain.
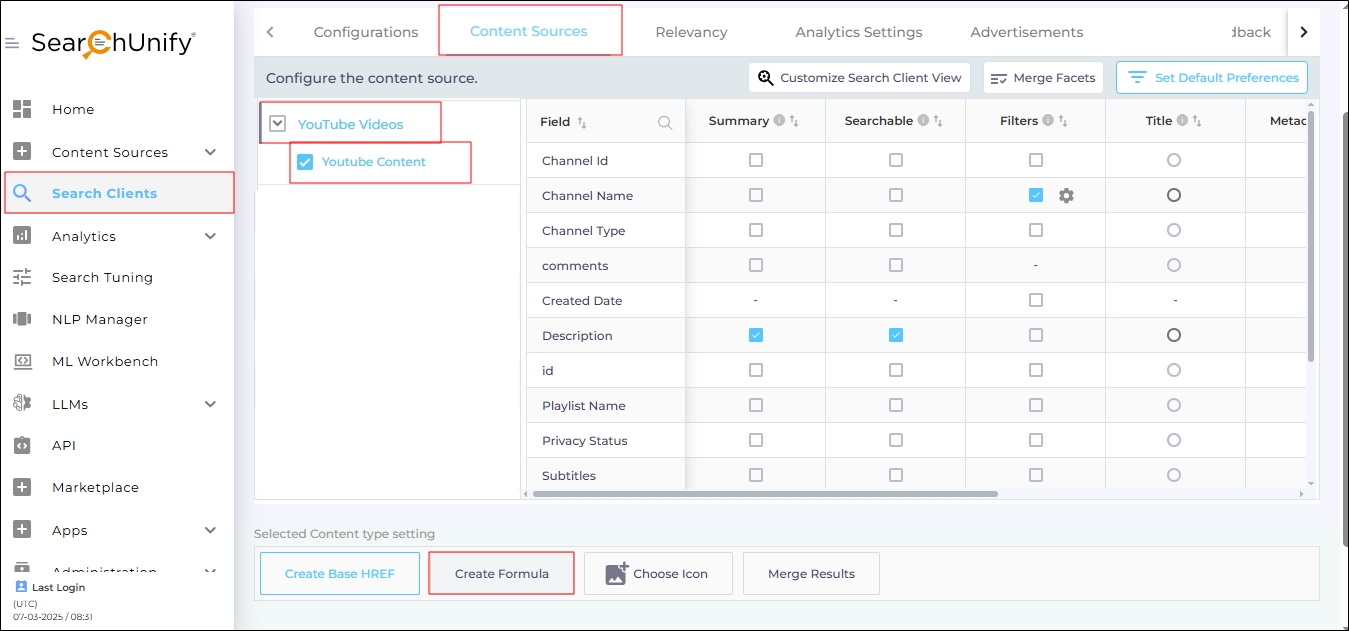
Navigate to Create Formula
-
Navigate to Search Clients.
-
Open a search client for editing and go to the Content Sources tab.
-
Expand a content source and select a content type.
-
Click Create Formula.
Fig. A snapshot of the Create Formula tab in Search Clients.
Apply Formulas on Objects and Fields
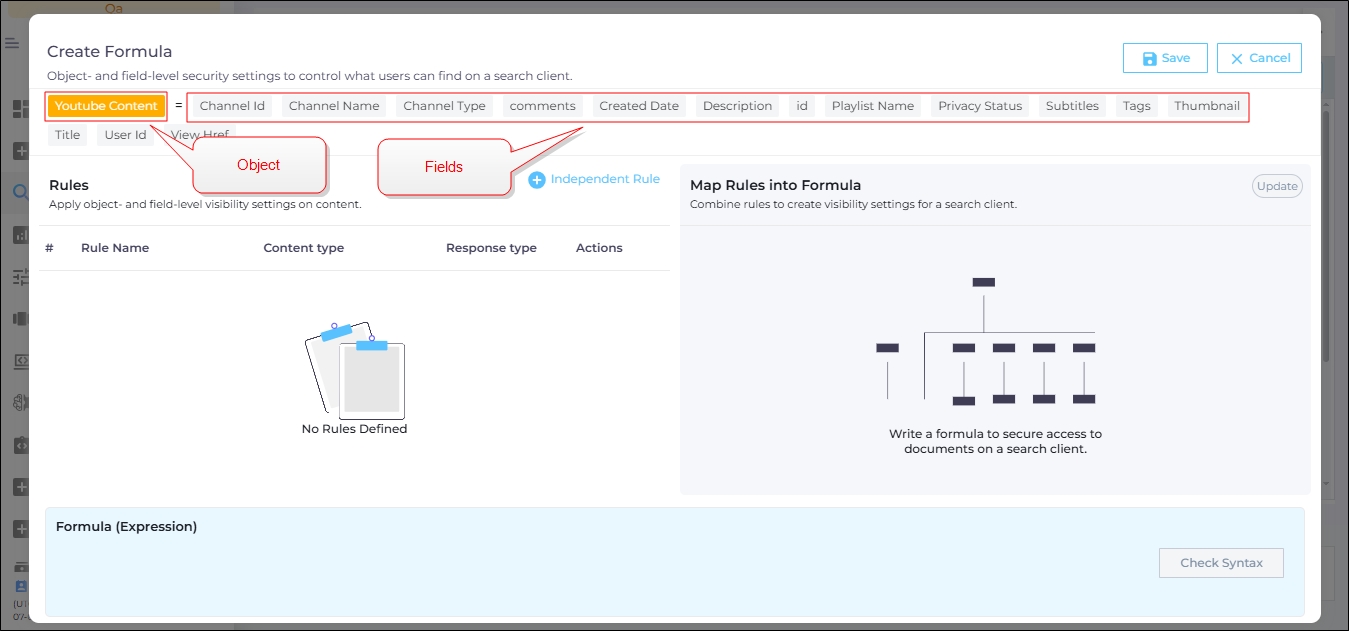
When you click on Create Formula, a dialog opens, where:
-
The content type or object is highlighted in orange
-
The fields of the object are highlighted in gray
Fig. A snapshot of the Create Formula dialog.
You can apply document-based access control on:
- Entire objects, or
- Individual content fields.
The next example illustrates the key concepts.
Exclude Archives from Search
In this example, we will exclude archived documents from search results.
To exclude the archived documents, first determine what separates the archived documents from other documents.
In our content source, the URL structure defines archived documents. All archived files are stored in the Archives folder: https://mycompany.com/Archives.
Any document outside this folder is not archived.
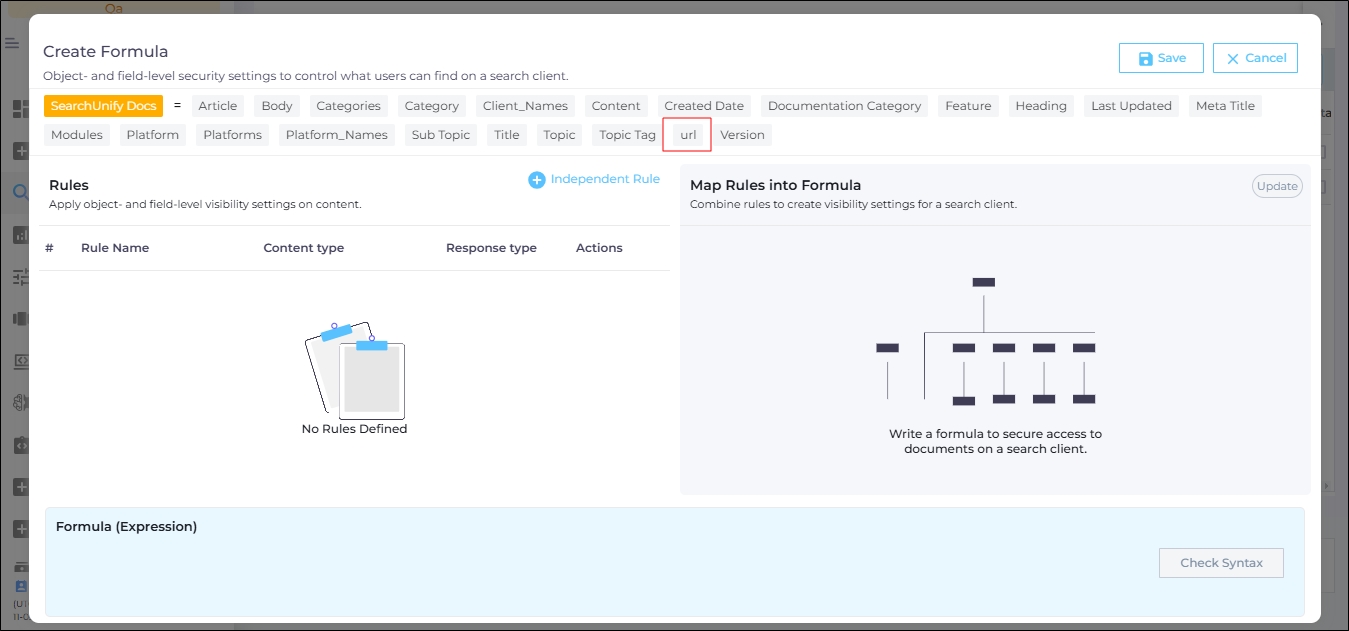
Since URLs distinguish archived documents, we will apply a formula to the field that stores URLs. The field name varies by content source. In case of a website, the field name is "url", but in YouTube it is "view_href". In your content source, the field name may be different.
Since we are filtering based on URL, select the corresponding field name.
Fig. A snapshot of the Create Formula dialog.
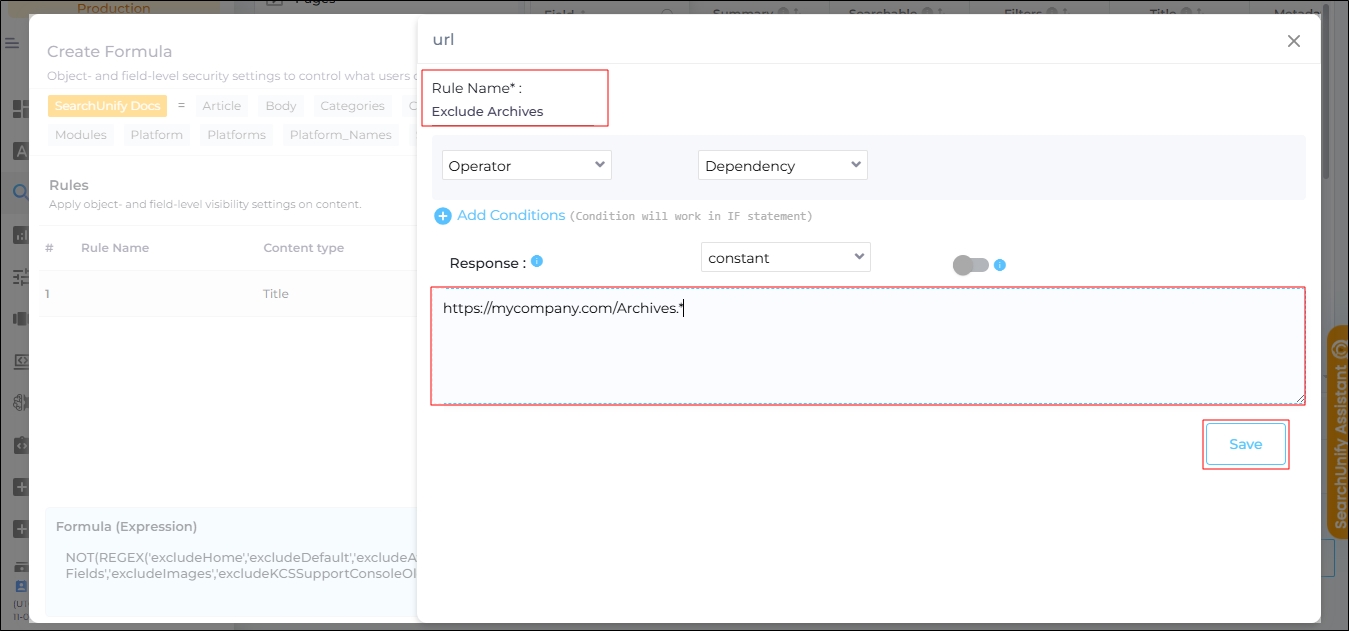
A dialog will open with several fields. Currently we need to enter data into only two fields.
-
Action Name is a label. Here we write the name of the rule.
In our example, we'll write "Exclude Archives" because we want to include all the Archived documents.
-
Response is a value based on which the formula works.
In our example, the value is https://mycompany.com/Archives.*.
The .* at the end of the URL makes it a regular expression (regex), meaning that any URL starting with https://mycompany.com/Archives is considered archived.
Examples of Matched URLs:
https://mycompany.com/Archives/release-notes-2020.htm
https://mycompany.com/Archives/release-notes-2024.htm
Fig. A snapshot of formula creation in Create Formula.
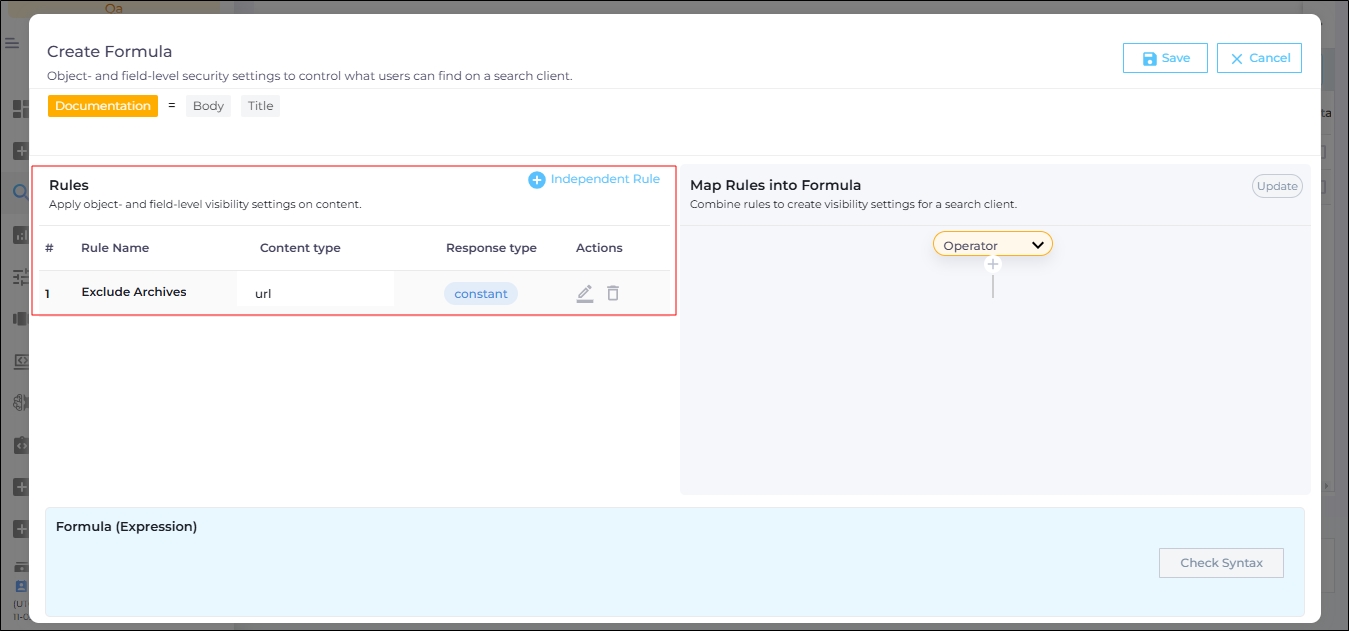
The rule is now added and will be visible in the Rules tab.
Fig. A snapshot of the Rules section in the Create Formula dialog.
Navigate to the Map Rules into Formula tab, which allows you to combine rules using logical expressions.
-
We want the partial URL in the Response field to be treated as a regular expression.
-
We also want all matching documents to be excluded from search results.
-
The appropriate formula for this condition is: NOT(REGEX('Exclude Archives'))
Use the dropdowns in the Map Rules into Formula tab to create this formula.
Click Check Syntax in the Formula (Expression) field to ensure the formula is valid.
If there are no errors, click Save to apply the rule.
Fig. A snapshot of the Map Rules into Formula section in the Create Formula dialog.
Save the search client settings to exclude all archived docs from the selected object from the search results.
Exclude Two Year Old Documents from Search
To improve our understanding of how Create Formula works, let's understand it with one more example.
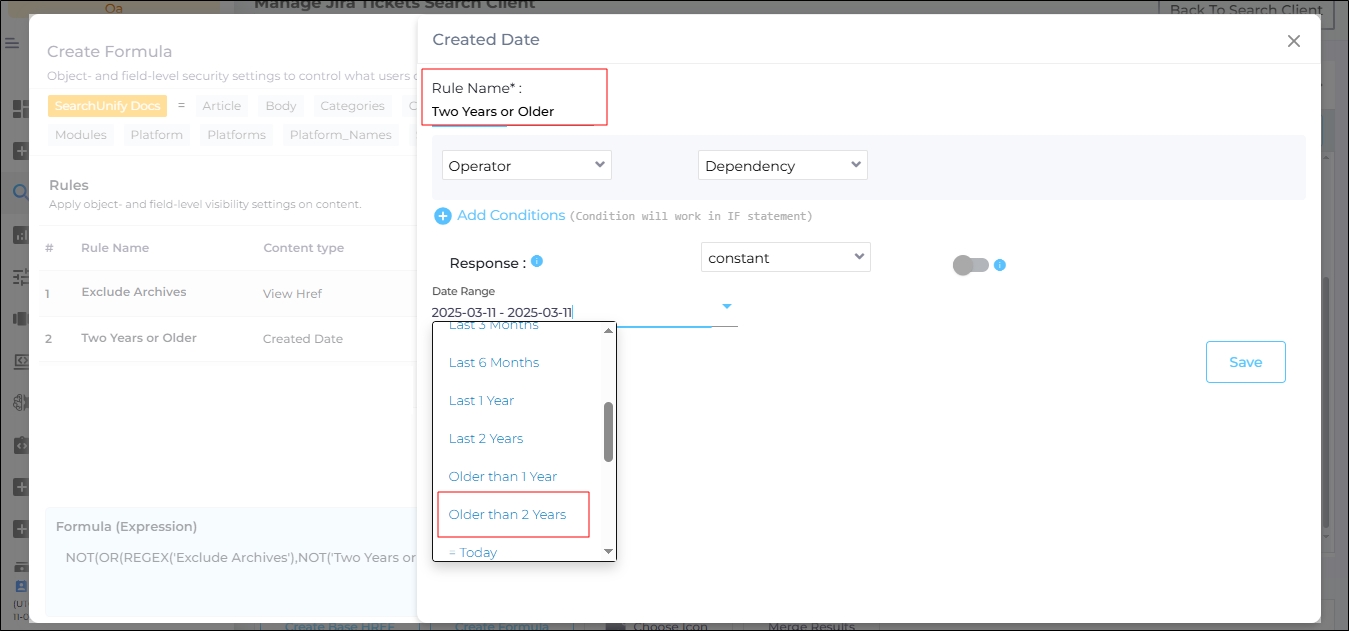
In the previous example, we excluded all archived documents from the search results. In this example, we'll increase the scope and exclude all the documents that are either archives or two years or older.
The information about when a document is published is stored in a field. In many content sources, the field is called "created_date." We'll create a rule with the "created_date".
Fig. A snapshot of the Create Formula dialog.
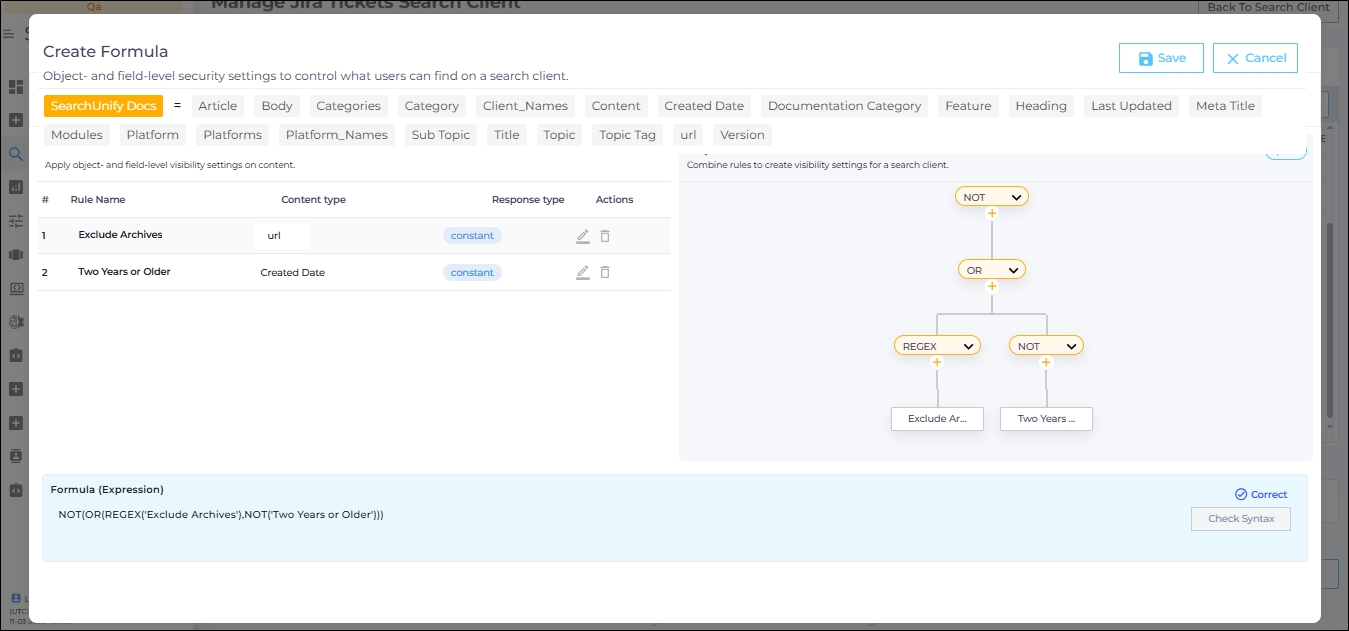
Now we'll update the formula to NOT(OR(REGEX('Exclude Archives'),NOT('Two Years or Older'))).
It means that Create Formula will exclude (NOT) all those documents from the search results which are either archived (REGEX('Exclude Archives')) or (OR) two years or older (NOT('Two Years or Older')). Here's what the formula looks like on the Map Rules into Formula screen.
Fig. A snapshot of the Create Formula dialog.
To exclude documents that are archived and two years or older, use the AND operator. Both conditions must be met for the document to be hidden. It means that one year old archived documents will show up in search results.
Role-Based Access Control (Salesforce)
Role-based access control is solely available for Salesforce content sources. Instead of an admin specifying explicitly, Responses are picked based on certain user properties. The entire process has three steps, as opposed to two in document-based access control. The extra step is Add Conditions, which can be completed in three parts:
- Define User Properties
- Select an Operator
- Write a condition
Each of the steps is explained next.
User Properties
Six user properties are supported:
- UserId
- UserType
- AccountId
- ProfileId
- ContactId
- PermissionSet
Fig. A snapshot of the User Properties dropdown.
Operators
The user properties are then compared with values using operators, of which six are available.
- Equals: Equation is true when User Property equals to the specified value.
- Not Equals: Equation is true when User Property is not equal to the specified value.
- And: Equation is true when two or more User Properties are true.
- OR: Equation is true at least of the User Properties is true.
- Includes: Equation is true when a User Property includes the specified value.
- Dependency in: Equation is true when a User Property equals the Response value of another Action.
Fig. Fig. A snapshot of the Operator dropdown.
Conditions
With user properties and operators, you can create simple as well as complex creations. One simple condition is in the next image which hides the documents created in May 2021 only to External users. It's entirely identical to the previous condition, except that User Type is defined.
Next either through Map Rules Into Formula or Formula (Expression), obtain the equivalent of NOT(Exclude May 2021).
Fig. A snapshot of the Create Formula dialog.
Independent Conditions
Independent Conditions are used to extend role-based access control settings, based on Salesforce, to other content sources.
Example
An organization uses Salesforce Community and another to host docs, let's say Confluence. It wants to hide a document, Bug Fixes: 2021-12-04, on Confluence from external users. Document-based access control would have sufficed if the goal was to hide it from all the users. But that's not the case here. We want everyone, but external users, to be able to find the document. However, access control based on a user's profile is available only in Salesforce. It's exactly for such situations that Independent Conditions offers a way out.
The following example shows how you can hide a Confluence document based on its title from external users. The users are identified from Salesforce data.
Open a search client, connected with both Confluence and Salesforce Community, for editing. Next go to Content Sources, find Salesforce Community, click Create Formula, and then Independent Conditions.
Give the condition a descriptive title in Action Name. In Add Condition, set User.UserType == External. Finally, insert True in Response.
Save the settings. Then open the Confluence content source. In our case, the content source is named Docs Site.
NOTE.
Although this example is about Confluence, the same steps can be applied to any content source other than Salesforce.
Next, give the action a name, select Equals from Operator and choose Hide from External (the independent condition from Salesforce Community) from Dependency. In Response, write the title of the document that has to be hidden.
Here's a summary of what's happening here:
Hide Bug Fixes Doc(Confluence) callsHide From External(Salesforce Community Independent Condition)Hide From External(Salesforce Community Independent Condition) returnsTrueif the user isExternal- When the condition is
True,Hide Bug Fixes Doc(Confluence) returnsBug Fixes: 2021-12-04from Response
Voilà! We have just applied user-based access control on a non-Salesforce platform with Independent Conditions.


