Use Khoros As a Content Source
This article explains how to index the ideas, blogs, reviews, groups, and other content types on your Khoros-powered brand community.
PERMISSIONS.
- To crawl a Khoros community, category, or board, you should have access to the community and admin access in SearchUnify and Khoros.
- Empty Khoros communities cannot be crawled.
- Write to
support@khoros.comto subscribe to event subscription for
- MessageMove. When messages move within boards, that change reflects in the SearchUnify index.
- MessageDelete. Deleted messages are removed from the index.
- MessageCreate. The new message is added into the SearchUnify index when a message is created.
MessageUpdate. When a message is updated, the same is updated in the SearchUnify index.
- SearchUnify respects board-level access. It shows results to users if the parent board is accessible to the user in the Khoros community.
- Content permissions are adhered to as long as the search client is installed in a Khoros community. For search clients installed on platforms other than Khoros, search is limited to open boards.
Attachments can only be crawled if you select either Community user authentication or OAuth and Community user authentication combined. SearchUnify supports the extensions like pdf, doc, docx, ppt, pptx, csv, txt, xsl, potx to fetch the attachment data. Attachment data will be indexed in the File field.
Archived and spam messages are deleted each hour.
Establish a Connection
- Find Khoros from the search box and click Add.
-
Name. Give your content source a name.
-
Client URL. Enter the URL of Khoros instance.
-
Language. Select the community content language.
-
Authentication Method. Select an authentication method from the five options: 1) No Authentication, 2) Community User, 3) Api user, 4) OAuth, and 5) htaccess.
NOTE.
If your Khoros community is secured by .htacess, it is mandatory to select htacess from authentication type along with other methods. Else, SearchUnify won't crawl any data.
-
Htaccess Username. Enter your htaccess username.
-
Htaccess Password. Enter your htaccess password.
-
- Click Connect.
Under the Authentication tab, enter the required details:
Once the connection has been set up successfully, you will be prompted to the next action, Set Frequency.
Re-Connect
An admin can edit a Content Source for multiple reasons, including:
-
To reauthenticate
-
To fix a crawl error
-
To change frequency
-
To add or remove an object or a field for crawling
When a Content Source is edited, either a Connect or a Re-Connect button is displayed.
-
Case 1: When the Connect button is displayed:
-
When the Connect button is displayed if the Content Source authentication is successful. Along with the button, a message is displayed There are no crawl errors and the Content Source authentication is valid.
-
Fig. The Connect button is displayed on the Authentication tab.
-
Case 2: When the Re-connect button is displayed:
-
The Re-connect button is displayed when the authentication details change or the authentication fails for any reason.
-
In both cases, the Content Source connection must be authenticated again. To reauthenticate a Content Source, enter the authentication details, and click Re-Connect.
-
Fig. The Re-Connect button is displayed on the Authentication tab.
Set Up Crawl Frequency
The first crawl is always performed manually after configuring the content source. In the Choose a Date field, select a date to start the crawl; only data created after the selected date will be crawled*. For now, leave the frequency set to its default value, Never, and click Set.
Fig. The Frequency tab when "Frequency" is set to "Never".
Select Fields for Indexing
You can index your entire community data or you can select the subset of your community data that you want to index. The platform supports all the eight Khoros interaction styles out-of-the-box: blog, forum, group, qanda, review, tkb, occasion, and contest.
Support for Group Hubs, nested categories (Category_nested and Category_flat), and a native-filter Topics with No Result (renamed to Replied) was introduced in Colubridae '21. If your Khoros content source has been set up after that, you will see those fields in all Khoros objects. However, if the content source was configured before C'21, then a way to view those fields is to create a new Khoros content source from scratch.
SearchUnify can now crawl and index nested comments within documents. Include a new comment__body__s field in the Khoros content source. This field is used to retrieve comprehensive comment data from Khoros for all interaction styles.
Admins can set up Group Hubs in Boards. As for Replied, it works when it has been crawled in Search Clients > Edit > Content Sources.
-
Under the Rules tab, you will land on By Content Type subtab. You will see the list of the supported interaction styles here. Click
 to see the list of pre-configured fields.
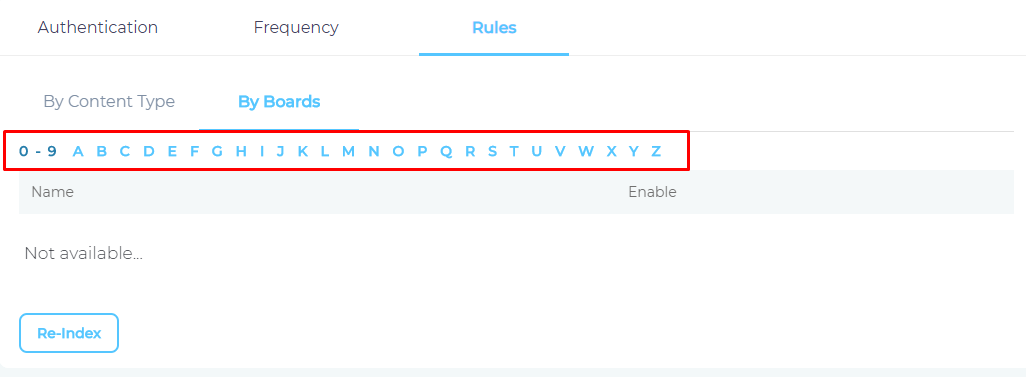
 - Switch to By Boards subtab. Find your boards with the index. A board named "Discussions" is found under "D" and a board named "Xenon" under "X." If you have added or deleted a board, use Reindex to view the latest list of boards. If no board is selected, then SearchUnify will index data from all the boards.
- Select the boards that you want to index and click Save.
Note. You can add or remove content fields per your choice. But it's inadvisable for non-admins to add or remove any fields here.
You have successfully added Khoros as a content source in SearchUnify. Perform a manual crawl to start indexing data in SearchUnify.
Related
Find and Replace
Users on the Q2 '24 release or a later version will notice a new button next to each object on the Rules screen. It resembles a magnifying glass and is labeled "Find and Replace." You can use this feature to find and replace values in a single field or across all fields. The changes will occur in the search index and not in your content source.
Fig. The "Find and Replace" button on the Rules tab in the Actions column.
Find and Replace proves valuable in various scenarios. A common use case is when a product name is altered. Suppose your product name has changed from "SearchUnify" to "SUnify," and you wish for the search result titles to immediately reflect this change.
-
To make the change, click
 .
. -
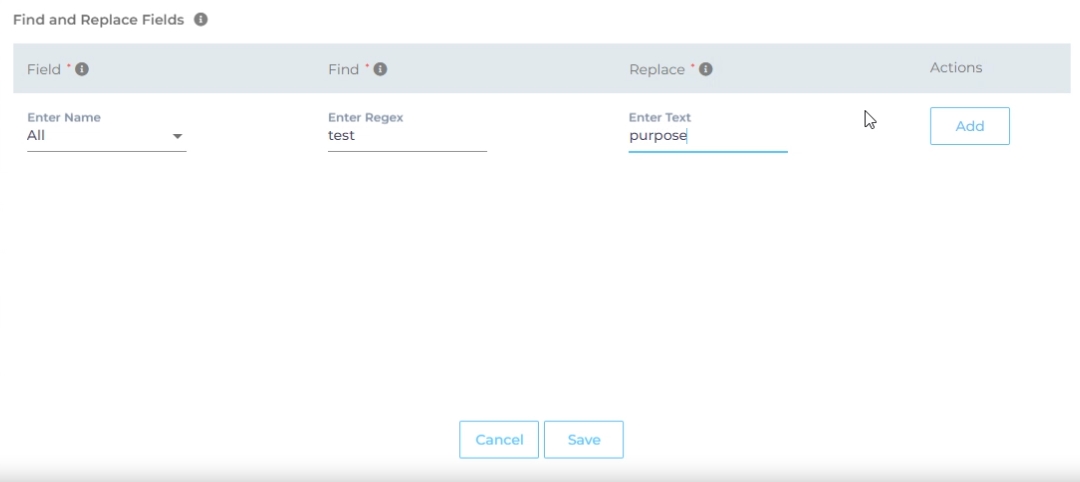
Now, choose either "All" or a specific content source field from the "Enter Name" dropdown. When "All" is selected, any value in the "Find" column is replaced with the corresponding value in the "Replace" column across all content source fields. If a particular field is chosen, the old value is replaced with the new value solely within the selected field.
-
Enter the value to be replaced in the Find column and the new value in the Replace column. Both columns accept regular expressions.
Fig. Snapshot of Find and Replace.
-
Click Add. You will see a warning if you are replacing a value in all fields.
-
Click Save to apply settings
-
Run a crawl for the updated values to reflect in the search results.
After the First Crawl
Return to the Content Sources screen and click ![]() in Actions. The number of indexed documents is updated after the crawl is complete. You can view crawl progress by clicking
in Actions. The number of indexed documents is updated after the crawl is complete. You can view crawl progress by clicking ![]() (View Crawl Logs) in Actions.
(View Crawl Logs) in Actions.
Once the first crawl is complete, click ![]() in Actions to open the content source for editing, and set a crawl frequency.
in Actions to open the content source for editing, and set a crawl frequency.
-
In Choose a Date, click
 to fire up a calendar and select a date. Only the data created or updated after the selected date is indexed.
 -
The following options are available for the Frequency field:
-
When Never is selected, the content source is not crawled until an admin opts for a manual crawl on the Content Sources screen.
-
When Minutes is selected, a new dropdown appears where the admin can choose between three values: 15, 20, and 30. Picking 20 means that the content source crawling starts every 20 minutes.
-
When Hours is selected, a new dropdown is displayed where the admin can choose between eight values between 1, 2, 3, 4, 6, 8, 12, and 24. Selecting 8 initiates content crawling every 8 hours.
-
When Daily is selected, a new dropdown is displayed where the admin can pick a value between 0 and 23. If 15 is selected, the content source crawling starts at 3:00 p.m. (1500 hours) each day.
-
When Day of Week is selected, a new dropdown is displayed where the admin can pick a day of the week. If Tuesday is chosen, then content source crawling starts at 0000 hours on every Tuesday.
-
When Day of Month is selected, a new dropdown appears where the admin can select a value between 1 and 30. If 20 is chosen, then content source crawling starts on the 20th of each month.
It is recommended to pick a date between the 1st and 28th of the month. If 30 is chosen, then the crawler may throw an error in February. The error will be “Chosen date will not work for this month.”
-
When Yearly is selected, the content source crawling starts at midnight on 1 January each year.
Fig. The content source crawling starts at 00:00 on each Tuesday.
-
- Click Set to save the crawl frequency settings.
-
Click Save.
Data Deletion and SU Index
A method to update the index in real time is to enable event subscriptions, which supplement existing crawls and synchronize data between your Khoros community and SearchUnify in real time.
Archived and spam messages ID are fetched through API and deleted each hour.
Use manual crawling, instead of frequency crawling, to update the index if messages have moved between boards.
Use manual crawling, instead of frequency crawling, to update comments, group hub information, reply count, boardName, boardId, boardTitle, replied fields in the index.


