Use YouTube As a Content Source
Index YouTube videos and make them searchable for your employees and customers. SearchUnify can index the videos uploaded on your channel and the channels that you have subscribed to.
PERMISSIONS
You have to have a YouTube account.
To index subtitles and comments on your YouTube videos, allow SearchUnify to "see, edit, and permanently delete your YouTube videos, ratings, comments, and captions" during authentication.
With Google OAuth 2.0-based authentication in new SearchUnify instances, an API rate limit of 10,000 grants per day is applicable. It might impact the crawling in SearchUnify. To manage it, try turning captions off to crawl up to 4800 videos.
We require the permission to access the following API scopes:
youtube.force-ssl is used to fetch comments and subtitles on your videos.
youtube.readonly is used to access channel, playlist, and video data.
userinfo.profile is required for OAuth connection and is used to access the basic profile information of a user.
Establish a Connection
- From the search box, find YouTube and click Add.

-
Under the Authentication tab, enter the required details.
Give your content source a Name and select the content Language. Also, enter Client ID and Client Secret of your Google account. Refer to this doc on how to Obtain Google Client ID and Client Secret.
- Click Connect.
-
A pop up will be displayed. Select the permissions. Three options are available:
-
See, edit, and permanently delete your YouTube videos, ratings, comments and captions. Check this permission to be able to crawl:
-
Channels
-
Subscriptions
-
Videos
-
Playlist Items
-
Playlists
-
-
View your YouTube account. Check this permission to be able to index:
-
Comment Threads
-
Captions
-
-
See your personal info, including any personal info you've made publicly available. This permission is already selected. This permission is essential to authenticate the YouTube content source.

-
- Select the permissions and click Continue.
The connection is successfully set up if you see a "Connection Successful" message. Click Next to proceed to Setting Frequency.

Update Permissions
SearchUnify admins can change the scopes using the Update Permissions after authenticating a YouTube content source at least once.
Update Permissions is used to change the permissions given to the SearchUnify crawler from the Google account used to authenticate the YouTube content source. For example, some admins may have given read-and-write permissions to the crawler but now want to change it to read-only.
Update Permissions is displayed after a YouTube content source has been authenticated. When a user selects Update Permissions and clicks Re-Connect, a pop-up is displayed. If the user selects a new set of permissions and authenticates the content source again, then the existing permissions are cleared and updated permissions are applied.
If there are two or more YouTube content sources authenticated with the same set of credentials and permissions are updated on one of those content sources, then the SearchUnify admin will have to reauthenticate all the other YouTube content sources.

Google hasn't verified this app
If you encounter an error where Google indicates that the app has not been verified, please disregard the warning and continue with the authentication process. This issue is slated for resolution in future updates.
Re-Connect
An admin can edit a Content Source for multiple reasons, including:
-
To reauthenticate
-
To fix a crawl error
-
To change frequency
-
To add or remove an object or a field for crawling
When a Content Source is edited, either a Connect or a Re-Connect button is displayed.
-
Case 1: When the Connect button is displayed:
-
When the Connect button is displayed if the Content Source authentication is successful. Along with the button, a message is displayed There are no crawl errors and the Content Source authentication is valid.
-
Fig. The Connect button is displayed on the Authentication tab.
-
Case 2: When the Re-connect button is displayed:
-
The Re-connect button is displayed when the authentication details change or the authentication fails for any reason.
-
In both cases, the Content Source connection must be authenticated again. To reauthenticate a Content Source, enter the authentication details, and click Re-Connect.
-
Fig. The Re-Connect button is displayed on the Authentication tab.
Set Up Crawl Frequency
The first crawl is always performed manually after configuring the content source. In the Choose a Date field, select a date to start the crawl; only data created after the selected date will be crawled*. For now, leave the frequency set to its default value, Never, and click Set.
Fig. The Frequency tab when "Frequency" is set to "Never".
Select Fields and Channels for Indexing
YouTube videos have fields, such as titles, descriptions, and channel names. You can index them all or a selection of them. This section shows how to find fields for indexing in By Content Type. After that, the process to pick channels for indexing through By Channels is described.
Related
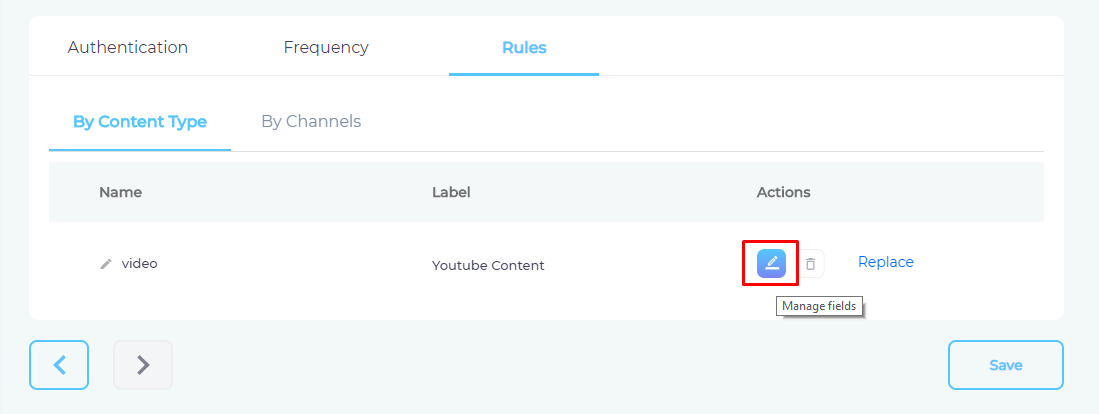
- To start selection, click
 .
. - You will discover that all available fields have been selected. The safest path forward is to click Apply. However, if you are an advanced user or a developer, you can remove fields, such as channel_id and comment, and change the Label and Type of a field. Neither change is recommended for most users.
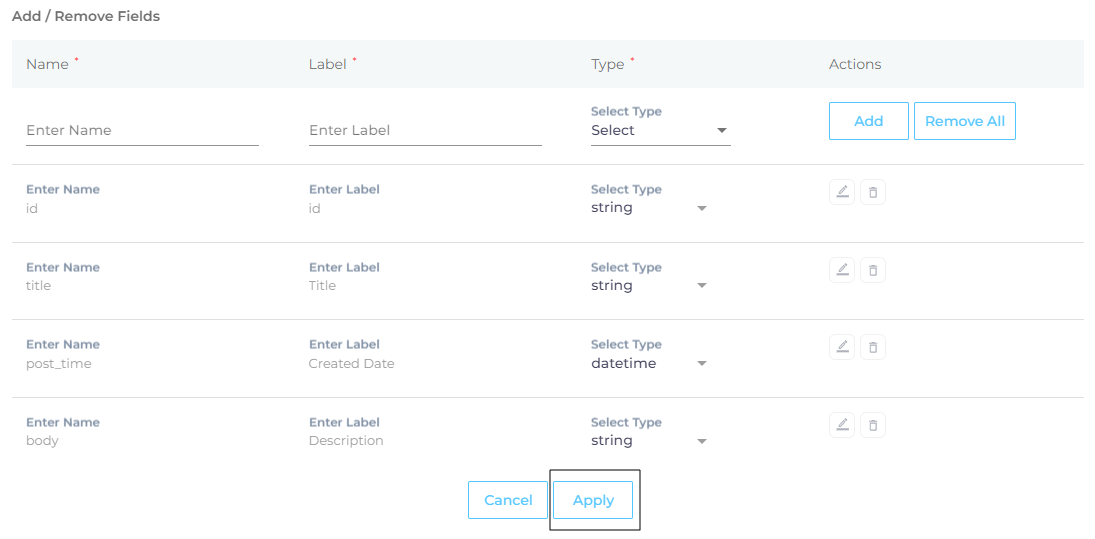
- Clicking Apply brings you back to By Channels where next to
 is
is  .
. 
-
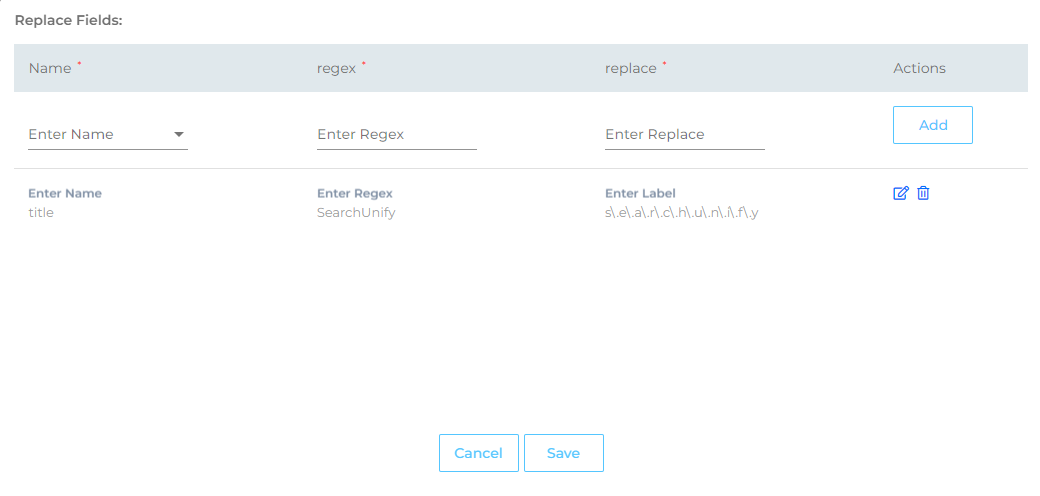
 is used to find and replace values in a field. Think of it this way. Your flagship product has recently been named from "SearchUnify" to "s.e.a.r.c.h.u.n.i.f.y". You want the search result titles to display s.e.a.r.c.h.u.n.i.f.y immediately.
  to the rescue. Click it, find title in Name, write the regular expression for the old product name in regex, and the regular expression for its replacement in replace. Click Add and then Save. Each instance of "SearchUnify" in title on the search results page will be swapped with "s.e.a.r.c.h.u.n.i.f.y". It's important to mention here that
  makes changes in the SearchUnify index, not YouTube. On clicking the end-users will continue to encounter good old "SearchUnify."
- Navigate to By Channels and use the index to find channels. CCTV is listed in C and SearchUnify in S. The search function can be used to find a channel from a long list.
- Check Enable and click Save.
Crawl Playlists Instead of Channels
An alternative method for working with YouTube is to index playlists instead of channels. To switch from By Channels to By Playlists, you need to contact support@searchunify.com. By Playlists offers greater flexibility in crawling, as it allows you to limit the search to videos within selected playlists.
Impact of crawling playlists:
-
When By Playlists is enabled, the By Channels tab will no longer be available.
-
Only playlists that belong to your channel can be crawled. Playlists saved from other channels cannot be crawled.
-
Short videos are eligible for crawling.

Related
After the First Crawl
Return to the Content Sources screen and click ![]() in Actions. The number of indexed documents is updated after the crawl is complete. You can view crawl progress by clicking
in Actions. The number of indexed documents is updated after the crawl is complete. You can view crawl progress by clicking ![]() (View Crawl Logs) in Actions.
(View Crawl Logs) in Actions.
Once the first crawl is complete, click ![]() in Actions to open the content source for editing, and set a crawl frequency.
in Actions to open the content source for editing, and set a crawl frequency.
-
In Choose a Date, click
 to fire up a calendar and select a date. Only the data created or updated after the selected date is indexed.
 -
The following options are available for the Frequency field:
-
When Never is selected, the content source is not crawled until an admin opts for a manual crawl on the Content Sources screen.
-
When Minutes is selected, a new dropdown appears where the admin can choose between three values: 15, 20, and 30. Picking 20 means that the content source crawling starts every 20 minutes.
-
When Hours is selected, a new dropdown is displayed where the admin can choose between eight values between 1, 2, 3, 4, 6, 8, 12, and 24. Selecting 8 initiates content crawling every 8 hours.
-
When Daily is selected, a new dropdown is displayed where the admin can pick a value between 0 and 23. If 15 is selected, the content source crawling starts at 3:00 p.m. (1500 hours) each day.
-
When Day of Week is selected, a new dropdown is displayed where the admin can pick a day of the week. If Tuesday is chosen, then content source crawling starts at 0000 hours on every Tuesday.
-
When Day of Month is selected, a new dropdown appears where the admin can select a value between 1 and 30. If 20 is chosen, then content source crawling starts on the 20th of each month.
It is recommended to pick a date between the 1st and 28th of the month. If 30 is chosen, then the crawler may throw an error in February. The error will be “Chosen date will not work for this month.”
-
When Yearly is selected, the content source crawling starts at midnight on 1 January each year.
Fig. The content source crawling starts at 00:00 on each Tuesday.
-
- Click Set to save the crawl frequency settings.
-
Click Save.
Known Issue
In Frequency Crawl, only the new videos are crawled. Any changes in the previously-crawled videos do not reflect in search results.
OAuth 2.0 Setup Pending
If you are an existing SearchUnify user and you migrate your instance to Q1 '21 or newer versions, your YouTube and Google Drive content sources will continue to work. However, you will see the following error on your YouTube and Google Drive content sources in case you haven't authenticated them with OAuth 2.0.

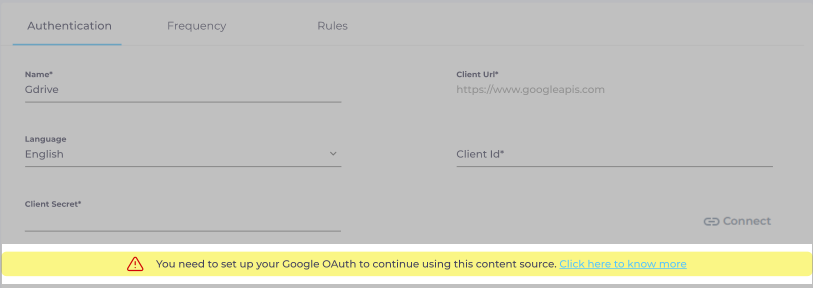
We recommend you set up OAuth 2.0 on your Google account and re-authenticate your content sources using the client ID and client secret.
Help Article - Google OAuth 2.0 Setup.


