

Use Microsoft Dynamics As a Content Source
This feature is not available in the SearchUnify Cloud Edition.
SearchUnify can index the data stored in Microsoft Dynamics. This article explains how to use your instance as a content repository.
Permissions: SearchUnify ignores Knowledge base level and cases level permissions.
Prerequisites
- Create an OAuth 2.0 Application in Microsoft Dynamics
- Create an Application User in Microsoft Dynamics
Establish a Connection
-
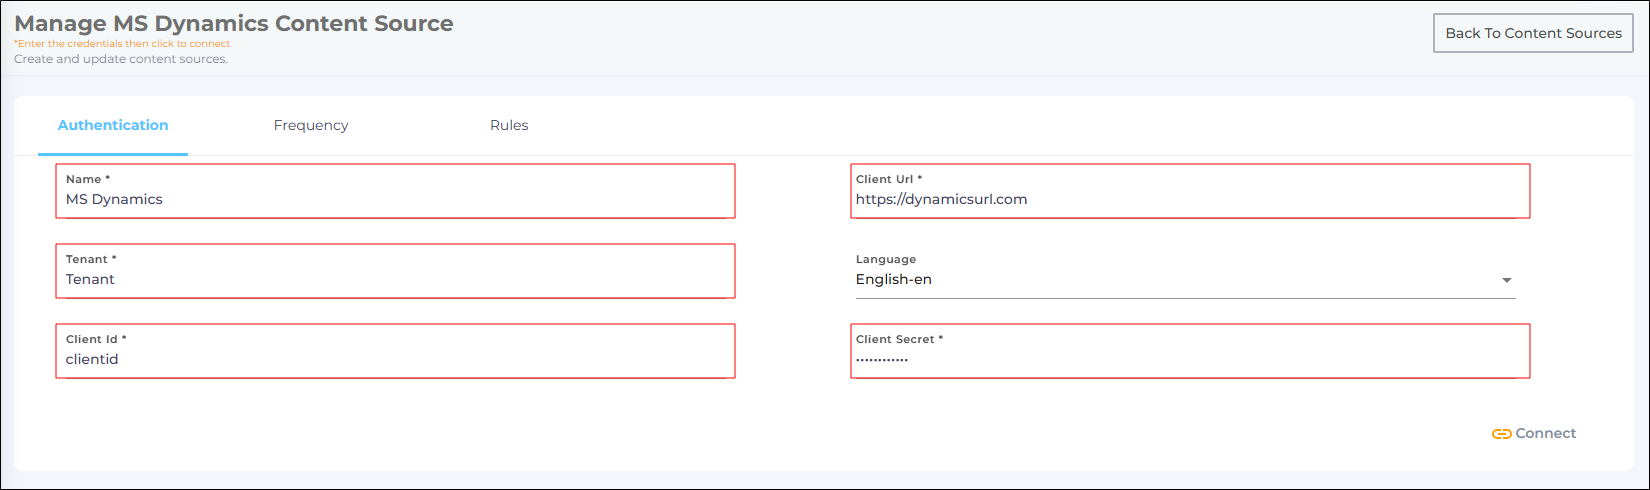
Navigate to Content Sources and click Add New Content Sources.

- Find Microsoft Dynamics from the search box and click Add.

-
Enter the following details:
-
Name: Give your content source a name.
-
Client URL: Enter the address of your Azure instance in Client URL.
-
Tenant ID, Client ID, and Client Secret were generated when you created an OAuth 2.0 app in Microsoft Dynamics. Refer to the Prerequisites section.
-
- Click Connect.
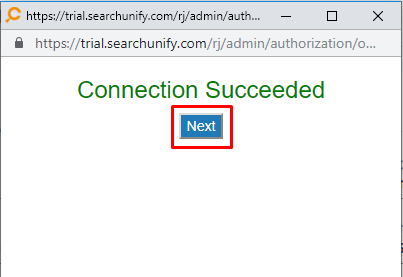
- A dialog will pop up. To complete authentication, select a Microsoft Account.
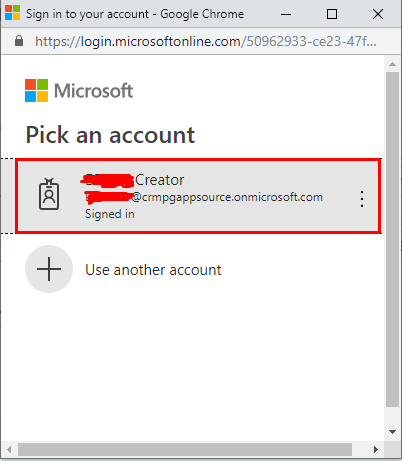
- Click Next.
Re-Connect
An admin can edit a Content Source for multiple reasons, including:
-
To reauthenticate
-
To fix a crawl error
-
To change frequency
-
To add or remove an object or a field for crawling
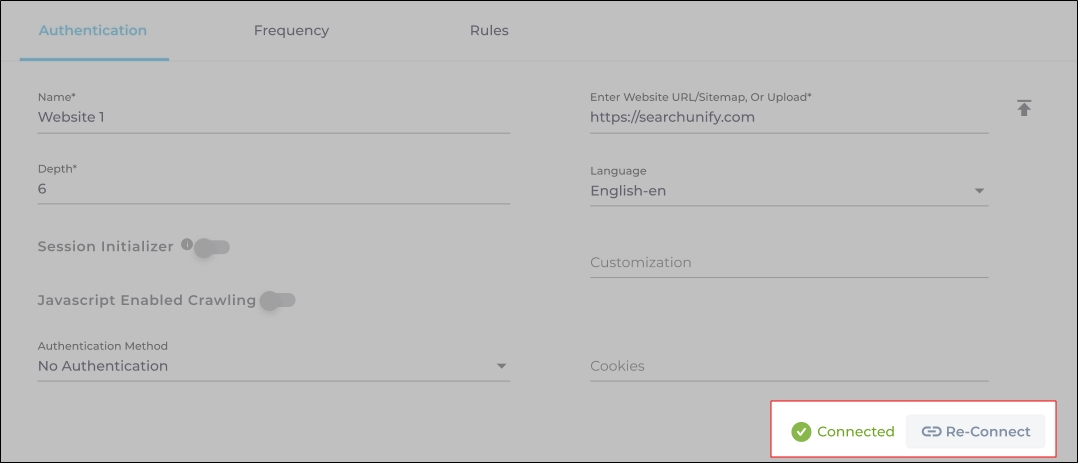
When a Content Source is edited, either a Connect or a Re-Connect button is displayed.
-
Case 1: When the Connect button is displayed:
-
When the Connect button is displayed if the Content Source authentication is successful. Along with the button, a message is displayed There are no crawl errors and the Content Source authentication is valid.
-
-
Fig. The Connect button is displayed on the Authentication tab.
-
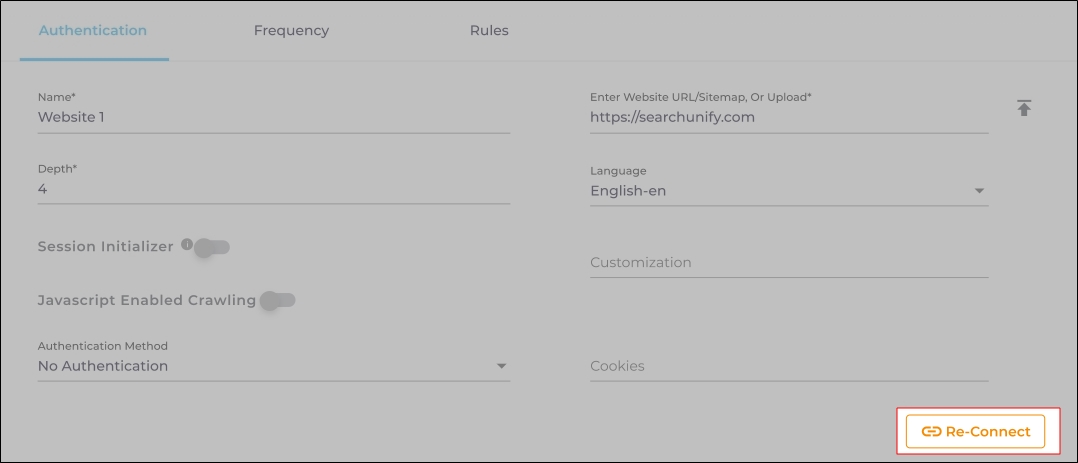
Case 2: When the Re-connect button is displayed:
-
The Re-connect button is displayed when the authentication details change or the authentication fails for any reason.
-
In both cases, the Content Source connection must be authenticated again. To reauthenticate a Content Source, enter the authentication details, and click Re-Connect.
-
-
Fig. The Re-Connect button is displayed on the Authentication tab.
Set Up Crawl Frequency
The first crawl is always performed manually after configuring the content source. In the Choose a Date field, select a date to start the crawl; only data created after the selected date will be crawled*. For now, leave the frequency set to its default value, Never, and click Set.

Fig. The Frequency tab when "Frequency" is set to "Never".
Select Types and Fields for Indexing
SearchUnify supports two Dynamics objects: incident and knowledgearticle by default.
-
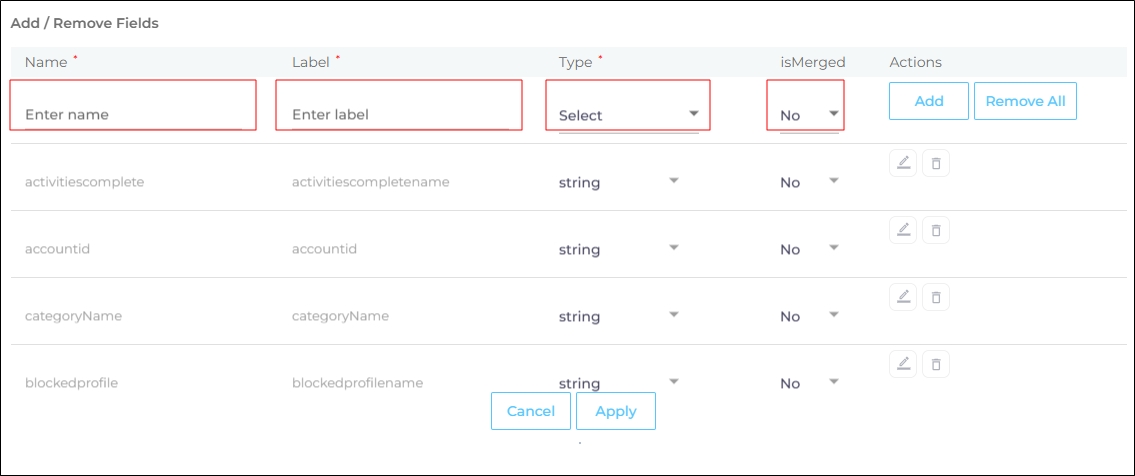
Click
 to view the object’s preconfigured fields. Select the fields you want to index.
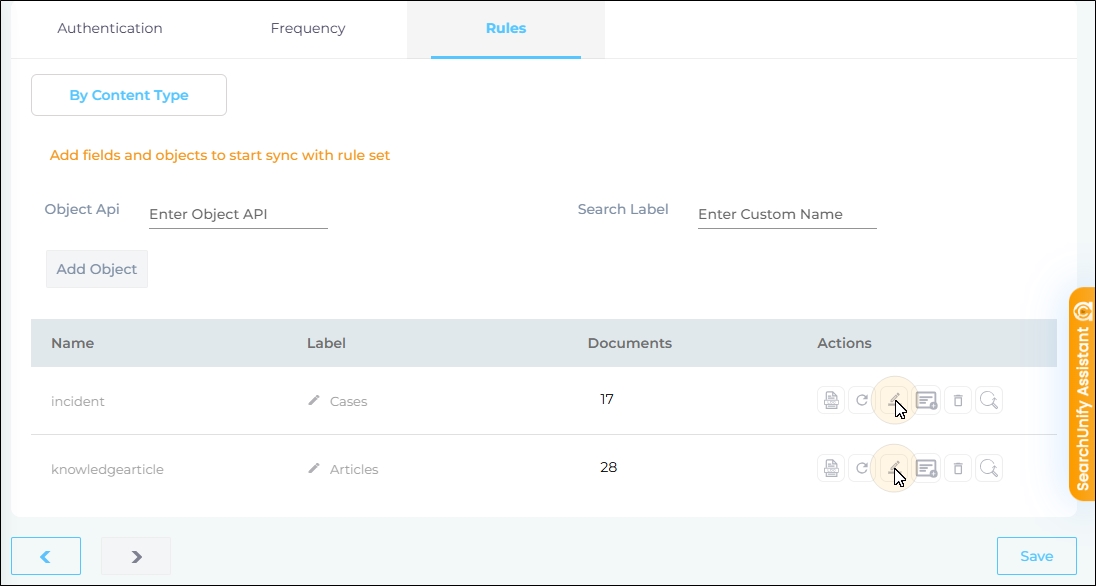
-
Add or remove the fields using the Add and Remove all buttons. Only the data stored in the added fields is indexed. All the fields visible on the screen are added for indexing.
-
Name: Select the fields to index.
-
Label: Give the field a frontend name.
-
Type: Pick the type of data stored in the field. Three values are available: (a) string, (b) datetime, and (c) integer.
-
isMerged: Select Yes if the field has been merged in Merge Facets. Else pick No. The default value is No.
Click Apply.
Note: The default settings are usually sufficient and there is rarely a need to manually pick fields for indexing or changing their Label, Type, or the status in the isMerged field.
-
-
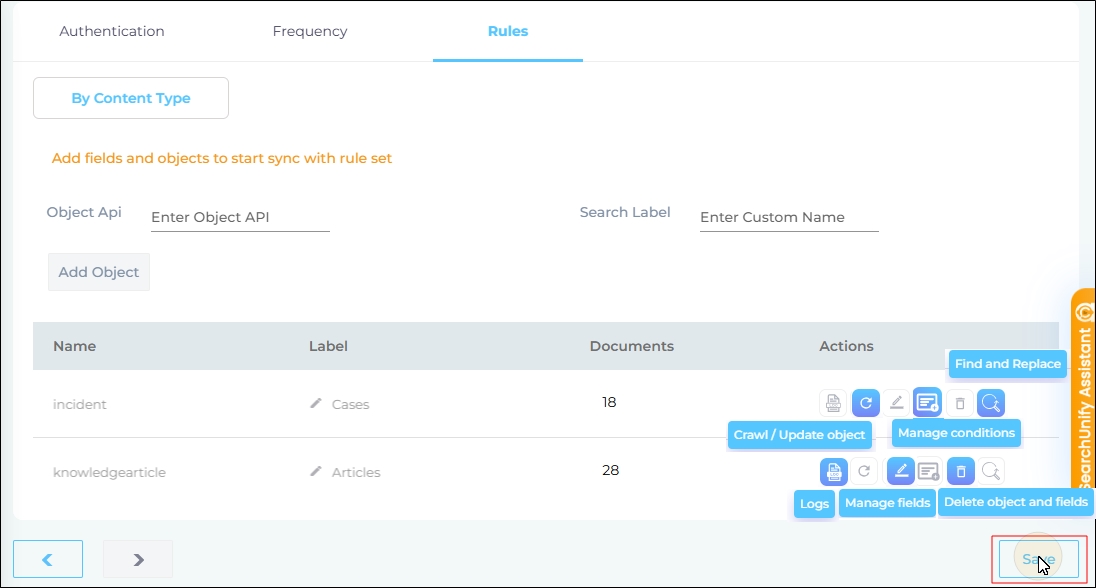
Other configurations available on the Rules screen are:
-
Logs: View object specific crawl logs.
-
Crawl/Update object: Recrawl the object. Use this function to recrawl an object, instead of the entire Microsoft Dynamics content source.
-
Manage fields: Select the fields for indexing. This configuration has been explained in the previous step.
-
Manage conditions: The functioning of this feature has been explained in Manage Conditions in Microsoft Dynamics.
-
Delete object and fields: Delete the object.
-
Find and replace: Find and replace text in search results. This configuration has been explained in the next section.
Click Save.
-
Find and Replace
Users on the Q2 '24 release or a later version will notice a new button next to each object on the Rules screen. It resembles a magnifying glass and is labeled "Find and Replace." You can use this feature to find and replace values in a single field or across all fields. The changes will occur in the search index and not in your content source.
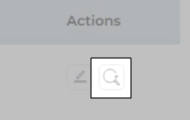
Fig. The "Find and Replace" button on the Rules tab in the Actions column.
Find and Replace proves valuable in various scenarios. A common use case is when a product name is altered. Suppose your product name has changed from "SearchUnify" to "SUnify," and you wish for the search result titles to immediately reflect this change.
-
To make the change, click
 .
. -
Now, choose either "All" or a specific content source field from the "Enter Name" dropdown. When "All" is selected, any value in the "Find" column is replaced with the corresponding value in the "Replace" column across all content source fields. If a particular field is chosen, the old value is replaced with the new value solely within the selected field.
-
Enter the value to be replaced in the Find column and the new value in the Replace column. Both columns accept regular expressions.
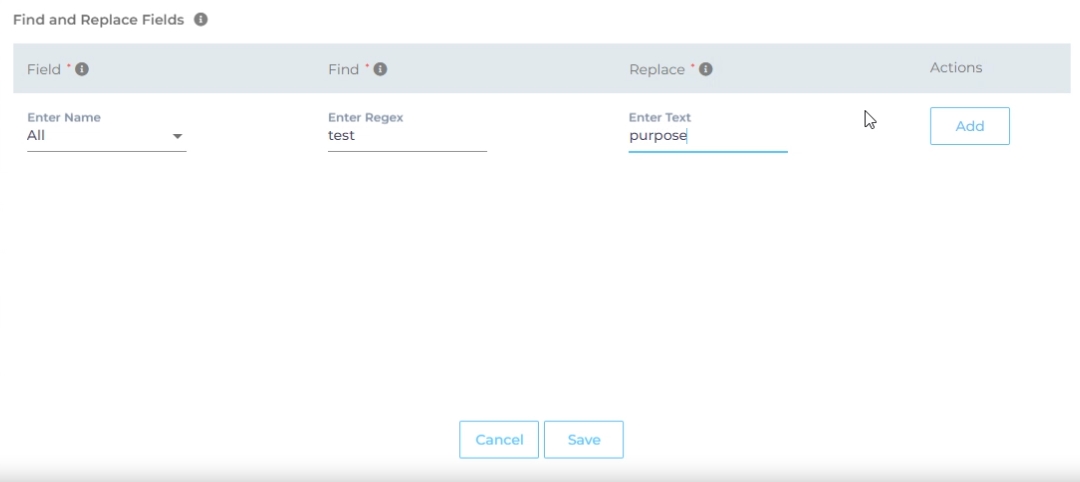
Fig. Snapshot of Find and Replace.
-
Click Add. You will see a warning if you are replacing a value in all fields.
-
Click Save to apply settings
-
Run a crawl for the updated values to reflect in the search results.
After the First Crawl
Return to the Content Sources screen and click ![]() in Actions. The number of indexed documents is updated after the crawl is complete. You can view crawl progress by clicking
in Actions. The number of indexed documents is updated after the crawl is complete. You can view crawl progress by clicking ![]() (View Crawl Logs) in Actions.
(View Crawl Logs) in Actions.
Once the first crawl is complete, click ![]() in Actions to open the content source for editing, and set a crawl frequency.
in Actions to open the content source for editing, and set a crawl frequency.
-
In Choose a Date, click
 to fire up a calendar and select a date. Only the data created or updated after the selected date is indexed.
-
The following options are available for the Frequency field:
-
When Never is selected, the content source is not crawled until an admin opts for a manual crawl on the Content Sources screen.
-
When Minutes is selected, a new dropdown appears where the admin can choose between three values: 15, 20, and 30. Picking 20 means that the content source crawling starts every 20 minutes.
-
When Hours is selected, a new dropdown is displayed where the admin can choose between eight values between 1, 2, 3, 4, 6, 8, 12, and 24. Selecting 8 initiates content crawling every 8 hours.
-
When Daily is selected, a new dropdown is displayed where the admin can pick a value between 0 and 23. If 15 is selected, the content source crawling starts at 3:00 p.m. (1500 hours) each day.
-
When Day of Week is selected, a new dropdown is displayed where the admin can pick a day of the week. If Tuesday is chosen, then content source crawling starts at 0000 hours on every Tuesday.
-
When Day of Month is selected, a new dropdown appears where the admin can select a value between 1 and 30. If 20 is chosen, then content source crawling starts on the 20th of each month.
It is recommended to pick a date between the 1st and 28th of the month. If 30 is chosen, then the crawler may throw an error in February. The error will be “Chosen date will not work for this month.”
-
When Yearly is selected, the content source crawling starts at midnight on 1 January each year.
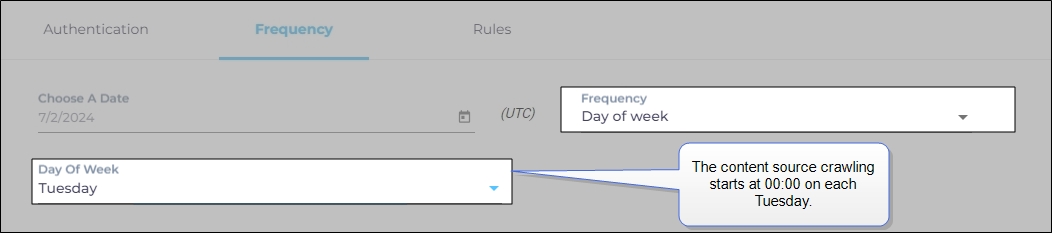
Fig. The content source crawling starts at 00:00 on each Tuesday.
-
- Click Set to save the crawl frequency settings.

-
Click Save.
Data Deletion and SU Index
Deleted team IDs are fetched through APIs between frequency crawls and removed from the SearchUnify index.