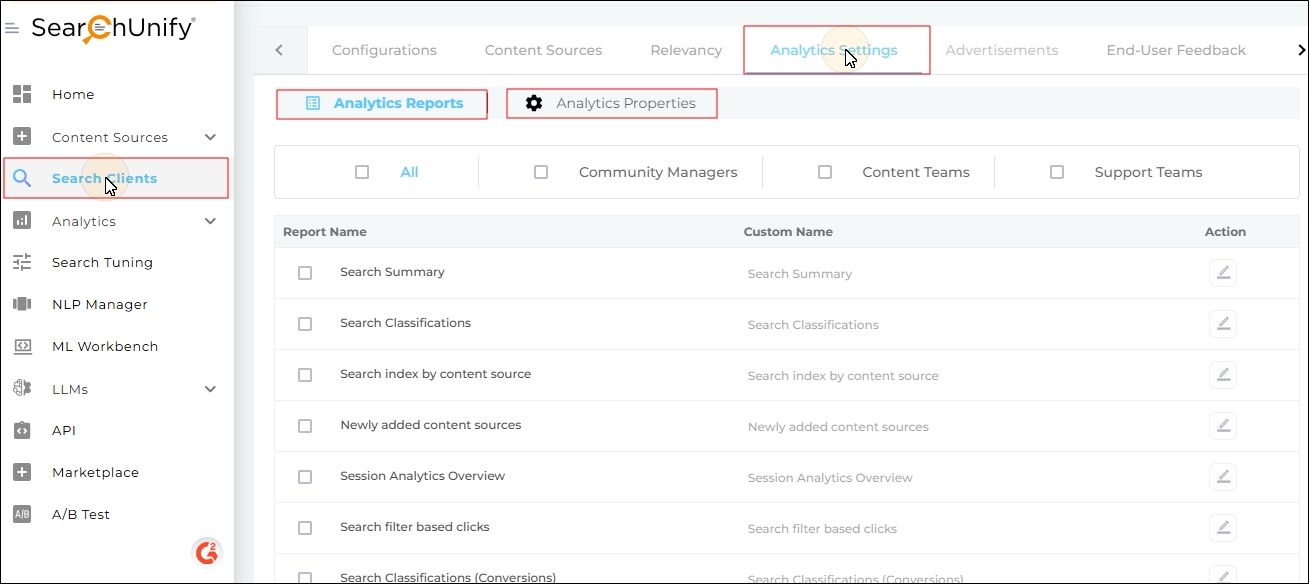
Turn on Search Analytics

Analytics Settings features more than 30 reports, neatly divided into three categories for Community Managers, Content Teams, and Support Teams. Checking a category matching your job profile is the fastest way to set up analytics. Those, who cannot relate to any category, can check out SearchUnify documentation on analytics to ascertain the reports they need.

NOTE.

You can cherry-pick reports from a category. It's possible to, let's say, check Community Managers and then remove a report or add a report.

Activate Search Analytics

  1. Open a search client for editing and navigate to Analytics Settings.

  2. Check the reports to turn them on. You can select the reports à la carte. For illustration, the first two reports have been checked. Alternatively, you can check All or select one from Community Managers, Content Teams, and Support Teams if any of those categories defines your job profile.

  3. Scroll down and Save.

Change Report Labels

There are pros and cons to altering the default report labels.

A big advantage is flexibility which enables you to attain internal consistency with the other platforms you use. If everyone around you calls a content source a "data repository" or a "server", then you can ease their transition to SearchUnify by renaming Search Index by Content Source to "Search Index by Data Repository" or "Search Index by Server".

A downside of custom labels is the difficulty you might have searching the official docs, participating in the community, or communicating with the SearchUnify support team. But it can be overcome if you stick to using Report Names instead of Custom Names during your communication with SearchUnify.

Now to the real work. To change a report's label:

  1. Click .

  2. Write a new name in the Custom Name column. For illustration, Search Summary has been renamed to "Search Overview". Then, click Save.

Track Case Deflection with Analytics Properties

When a user cannot find an answer from main search, they try to log a ticket. Most organizations have a separate page for accepting tickets. In the SearchUnify parlance, such pages are called Case Creation Pages.

SearchUnify can track deflection on a Case Deflection Page, if the page has been set up. To set up a page:

  1. Navigate to Analytics Properties.
  2. Enter the Case Creation Page URL in Support Page URL. Then toggle Show Stage 2 Deflection (Case Form Page) to the right and Save your settings.
  3. NOTE.

    You can enter a regex pattern in the Support Page URL field if your organization hosts more than one Case Creation Page and case deflection on each of them needs to be tracked.

Decide When Sessions Expire

A default search session expires if a user stays idle for 60 minutes. The default value can be changed.

  1. Enter any value between 1 and 60 in the Session Timeout field.

Map Session IDs with Emails

Search activity is captured and stored in files called sessions. Each session has an ID. You can connect each ID with an email.

  1. Install the Email Tracking addon. The instructions are on Map User IDs with Emails
  2. Toggle Email Tracking Enabled to the right.

Track Internal and External User Activity

The exact definition of internal and external users varies from organization to organization. Generally speaking anyone with an email address ending in @yourcompany.com is an internal user and everyone else is an external user. The support reps handling tickets in Salesforce are internal users and the customers logging those tickets are external users. You can go over internal and external users' search data individuality: how employees use search and how customers use search.

  1. Toggle Internal / External Email Tracking Enabled and then enter the domain which will distinguish internal users from external users in Domain Name. For illustration searchunify.com is used. Emails of type john@searchunify or jane@searchunify.com are considered internal users.

NOTE.

Internal and external user activity can only be monitored on gated platforms. If your search client is on a website which is open to the entire world, then enabling this feature will have no impact whatsoever on the analytics data.

Capture Direct Page Views in Session Journey

NOTE.

For Direct Page Views to work, a tracking script has to be inserted in your platform. Please talk with your customer support representative before activating Direct Page Views.

A user can get to an article in several ways; search is only one of them. Others include clicking on a bookmarked link, opening an article shared over email, or simply finding your way to an article from the trending list on home. You can measure Stage One and Cumulative Case Deflection from such Directly Viewed Articles as well.

To set it, you will have to first activate Direct PageViews. To start, go to Search Clients > Edit > Analytics Settings > Analytics Properties, turn on Show Stage 2 (Case Form Page) Deflection and enter the Support Page URL in the field above.

Turn on Add Direct Article View Journey and check Cumulative and Stage 1.

Finally, define the URL of your articles. The definition includes <SF_community_address/article/{{URL Field}}. A quicker way to fill the field is to simply use ./article.

To find the value for insertion, go to Search Clients > Edit > Content Sources > SF Content Source > Knowledge > Create HREF and drag URL Field to the blank box.

Direct Article views influence only Stage 1 Case Deflection. There is no impact on Stage Two Case Deflection and the report behaves identically, irrespective of whether Direct Article views are turned on or not. Another change, when Direct PageView is turned on, is in the Stage One and Cumulative Deflection tabs.

All sessions in which a user searched and clicked on a result or access a Direct View article and didn't visit support are considered Stage 1 Case Deflection with Direct PageViews. Only two scenarios are possible.

Another difference between Stage One Case Deflection and Stage One Case Deflection with Direct PageViews is the denominator used in the equation used to calculate deflection. In the first, the denominator is Search Sessions but in the second the denominator is Total Sessions. Although the symbol used to represent them is the same, .

In this diagram, Total Sessions is 31, Click Sessions with No Support Visit is 5, and Direct Article Views with No Support Visit is 1. Therefore,

Direct PageViews impact Cumulative Case Deflection as well where all the deflections in Stage 1 with Direct Article Views and Stage 2 are summed and divided by the Total Sessions.

Last updatedWednesday, April 10, 2024

Or, send us your review at help-feedback@searchunify.com