Configure Content Sources Linked to a Search Client
Adding and installing a search client are essential but not sufficient to set up search. The Edit function completes the trinity. In Edit, the Content Sources tab is arguably the most important one. It is here that you can connect content sources and search clients and configure much of what goes into the search results page, including filters, URLs, and icons.
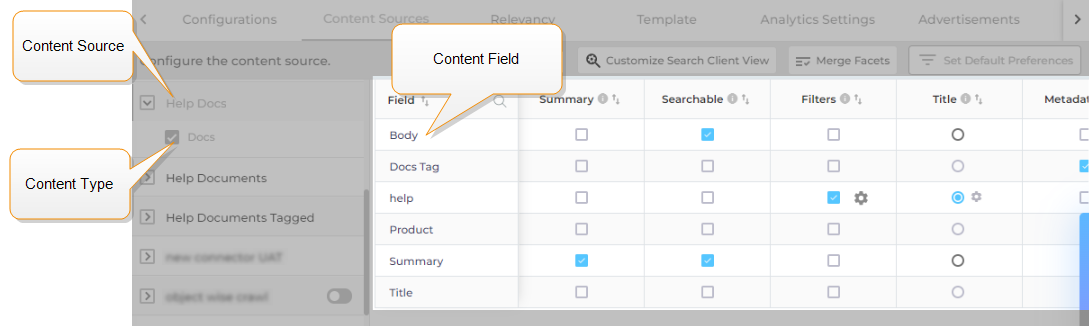
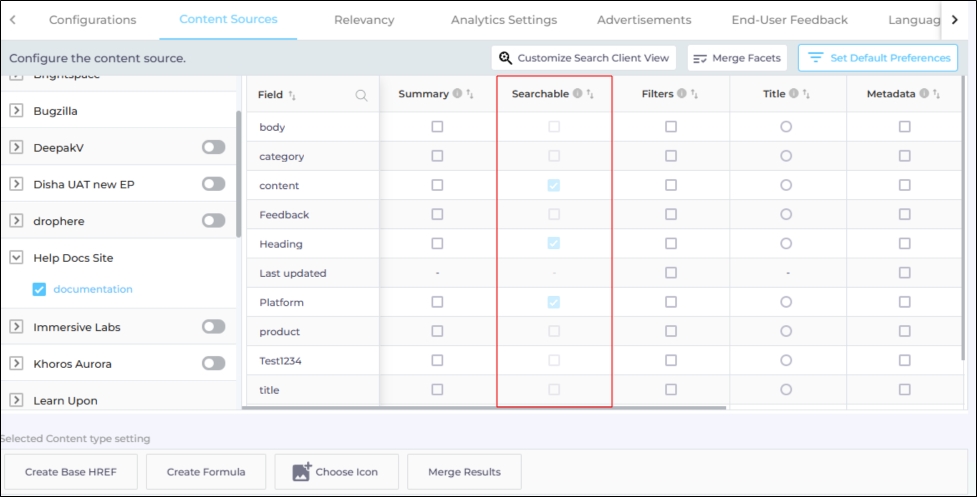
Content Sources provides many options for working with the content sources. All the content sources connected with the search client are highlighted here. This article defines role of each column on the content fields (object properties) screen.
Fig. A snapshot of the fields for the content source "Help Docs" and content type "Docs".
Get to Content Sources
A SearchUnify admin configures content sources for each search client individually.
FromSearch Clients, open a search client for configuration.
Go to Content Sources.
To view the content fields, click on a content source and then a content type. In the previous image, you can see the fields for the content source "Help Docs" and content type "Docs".
Remove a Content Source
To remove the results from a content source, uncheck all the content source objects. For example, no results will be returned from the content source "Demo" because all its objects have been unchecked.
Fig. A snapshot of the unchecked content source "Demo". No results from the unchecked content source will be displayed.
Content Fields and Columns
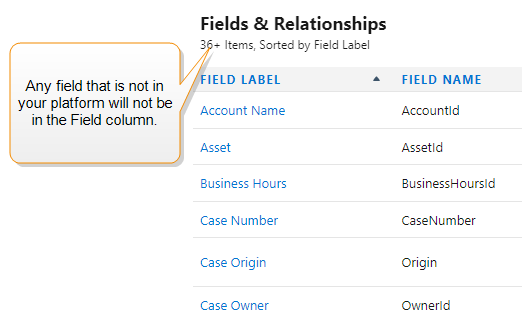
The first column, Field, lists all the content fields. The number of fields in a content source depends on two factors:
The platform's internal structure. If there's no field named url in your Salesforce org, then you will not see it in the column.
The crawl settings. If you didn't select a field named url while configuring the Salesforce content source, then you will not see the field in the column.
Next is a summary of all the columns.
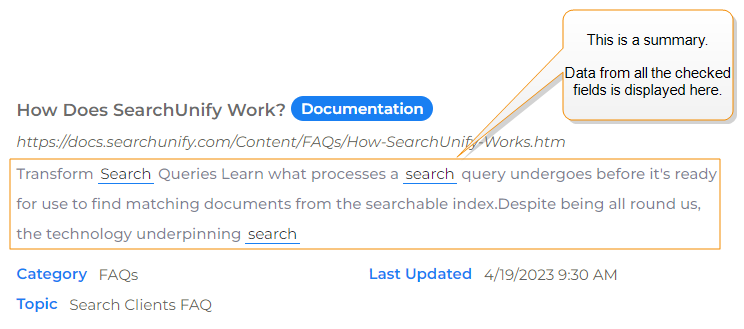
Summary
A summary is the text below the title on a search result. Data from the checked fields appears in result summaries.
You can multiple fields in search result summaries. In the default setup, data from multiple fields appears one after another until the maximum summary length is reached. This behavior can be changed from Set Default Preferences.
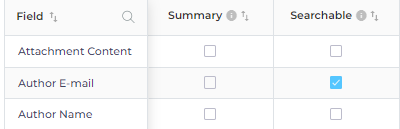
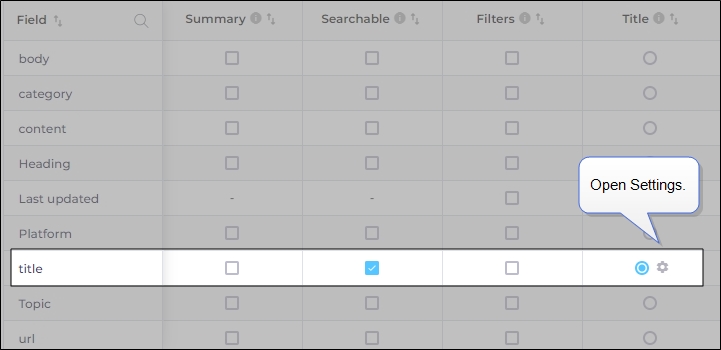
Searchable
A searchable field is where the search client looks for data. In the next image, Author Email is searchable but Author Name isn't. It means you cannot find a document through its Author Name because the search client looks for matches only in the Author Email field.
The column is disabled if Hybrid Search is turned on.
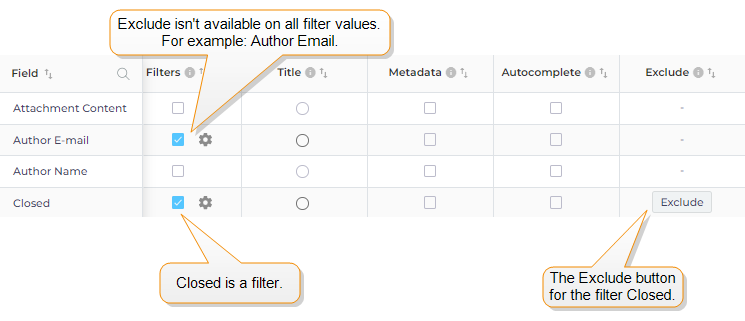
Filters
In scenarios with numerous search results, filters enable users to efficiently locate relevant information. Search filters help users narrow down a large number of matches and find exactly what they're looking for. To improve user experience, admins can configure filters on a Search Client. Two options are available:
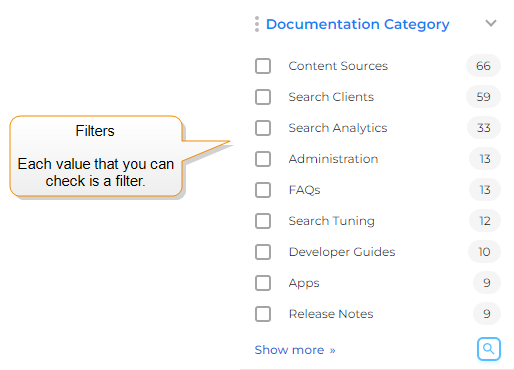
Advanced Facet Settings - These settings allow users to filter results by discrete metadata values, such as categories, author names, and tags. If a query returns a large number of results, users can select a filter value to display only the results that match the select value.
Fig. Snapshot of the filters configured in Advanced Facet Settings. Users can check a value to view results only from the selected category.
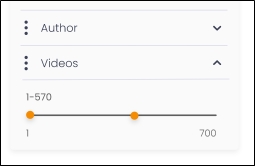
Range Slider - This slider can be configured to enable users to filter results across a number or date range. For example, the users can limit results to those published between February and October, or ticket IDs between 1000 and 2000. If a query returns a large number of results, users can define the maximum and minimum values within a range to display only the results that fall within that specified range.
Fig. A snapshot of the filters configured in Range Slider. The users have selected the range (1 - 570).
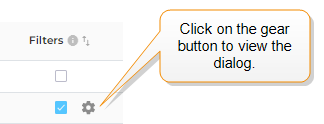
Advanced Facet Settings
This configuration offers clickable menus. To use it, select a field in the Filters column. A gear button appears immediately after selecting the field.
The Advance Facet Settings option is selected by default. It displays two dropdowns:
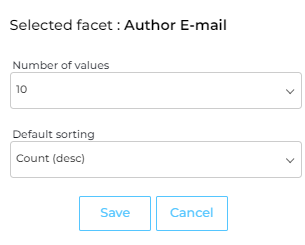
Number of Values
Default Sorting
Fig. Snapshot of Advance Facet Settings when the admin wants to display 10 facet values and they are displayed in the descending order.
NOTE.
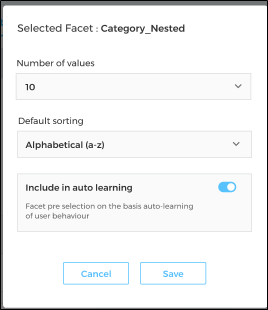
If you have toggled on Pre-Selection of Facets, you will see an additional option: Include in auto-learning.. Enabling this option displays search results that align with the end user’s previous facet selection patterns.
Fig. A snapshot of Advance Facet Settings when Pre-Selection of Facets is turned on.
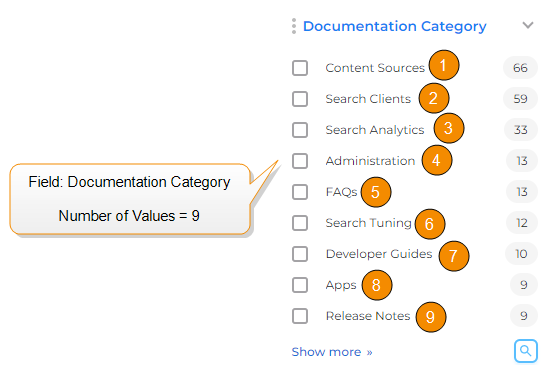
Number of Values controls how many field values are displayed on the search results page.
Fig. A snapshot of Filters when the Number of Values is set to 9.
Default Sorting offers four schemes:
Alphabetical (A-Z): Filters are displayed in an alphabetical order.
Alphabetical (Z-A): Filters are displayed in a reverse alphabetical order.
Count (desc): The filter value with the highest number of results for a query is displayed at the top. This is the default setting.
Count (asc): The filter value with the lowest number of results for a query is displayed at the top.
Sorting applies to all filter values, not just those visible on the search results page.
Range Filter
This configuration offers range sliders on fields that store time values and numbers. Using this feature on other fields will result in an error.
To use the Range Filter, go to the Filters column and select a field that stores time values or numbers. A gear button is displayed immediately after selecting the field.
NOTE.
While you can apply a Range Filter to a field without time values or numbers, the resulting range will be empty. Therefore, use it only on fields with time or numeric data.
Merge Facets doesn't work with Range Filter.
Fig. Snapshot of the settings icon in the Filters column.
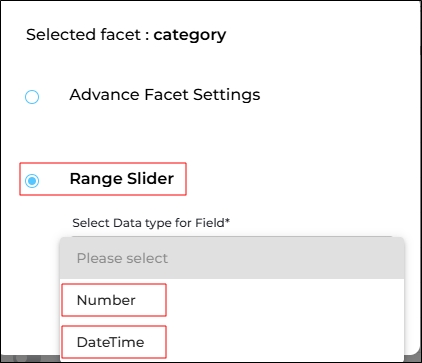
Select the Range Slider option and specify the type of data stored in the field. Two options are available:
Number: Select if the field stores numbers.
DateTime: Select if the field stores date or time values.
NOTE.
Although you can select both Number and DateTime for a field, only one range will be active at a time because a field can contain either numbers or time values, but not both. Applying the filter for the data type not present in the field will result in an empty range.
Fig. A snapshot of the datafields available in Range Slider.
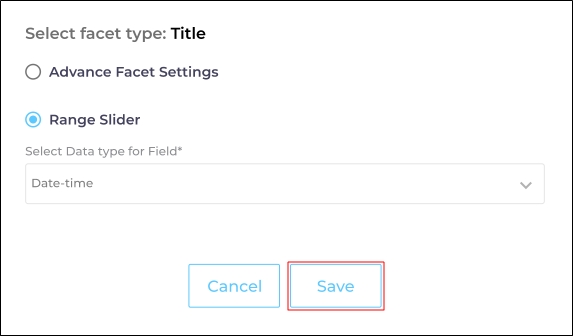
Click Save.
Fig. A snapshot of Range Slider when “Date-time” is selected as the file type.
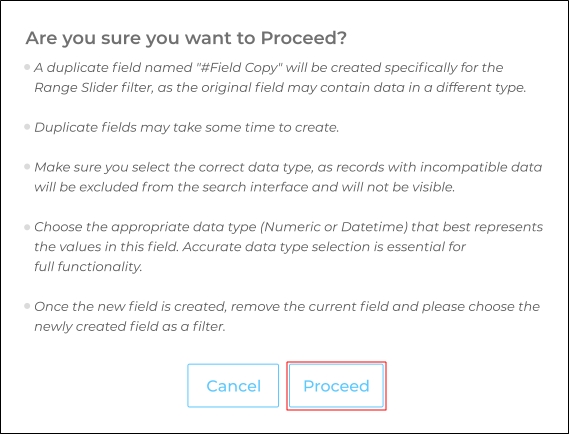
A message is displayed documenting the impact of the configuration on your instance. Click Proceed.
Fig. A snapshot of the messages that are displayed when Range Slider is selected in Filter.
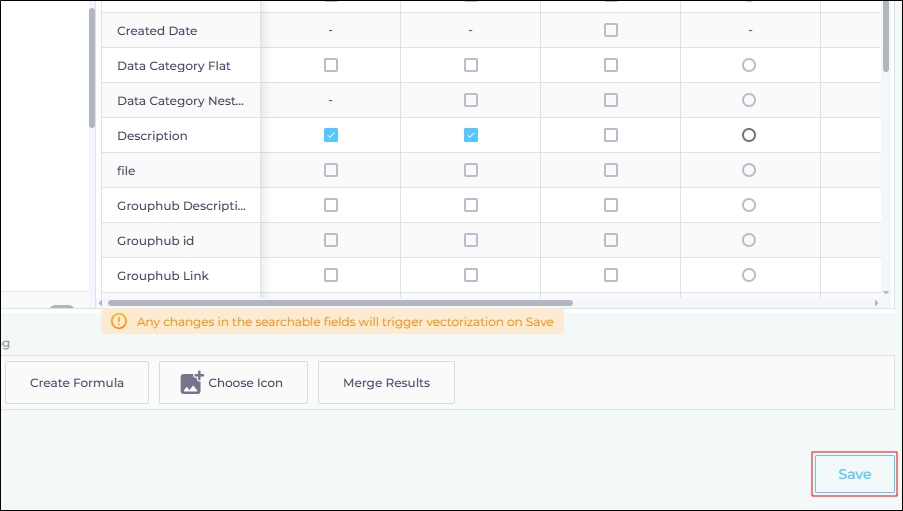
Save your settings.
Fig. A snapshot of the Save button.
Open the Search Client again for editing.
Go to the Content Sources tab.
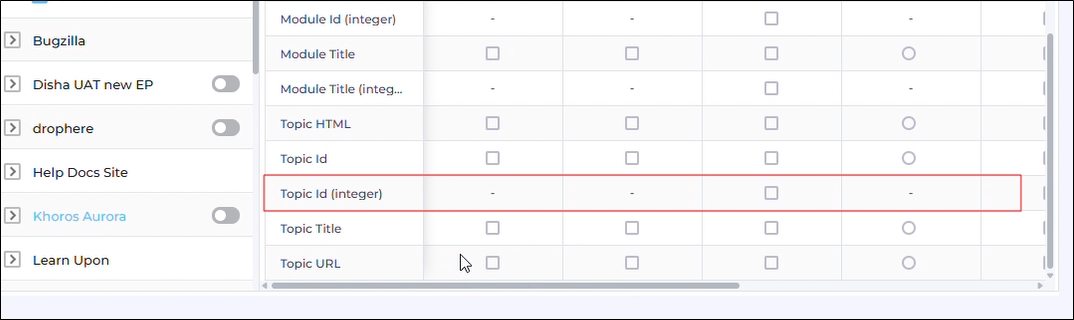
Expand the Content Source and locate the content field where the Range Slider has been configured.
Below it, you will see the same field, but with either "integer" or "datetime" in parentheses. This value depends on the data type selected during the Range Slider configuration.
Fig. A snapshot of the new field which is displayed while configuring the Range Slider.
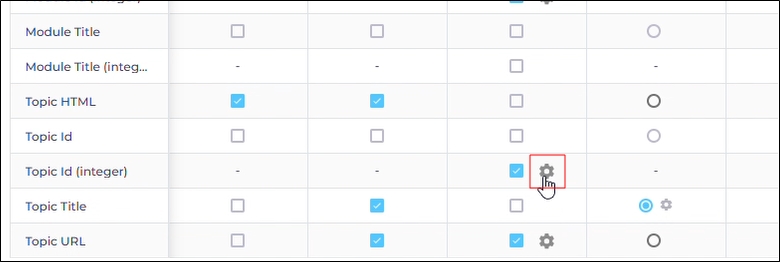
Click the Settings icon on the your_field (integer) in the Fields column.
Select Range Slider and click Save.
Save the settings. A range filter based on Topic Id is displayed on your Search Client, with minimum and maximum values automatically determined by the data in the field.
Fig. Snapshot of Range Slider on a search results page.
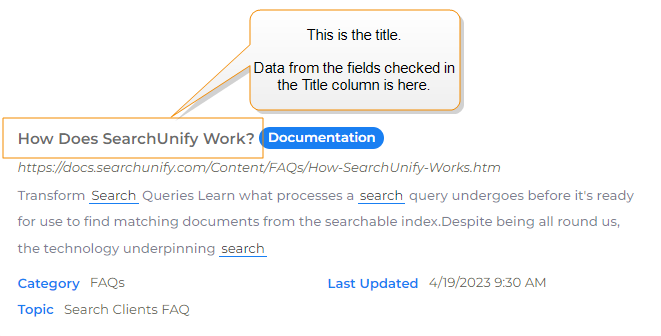
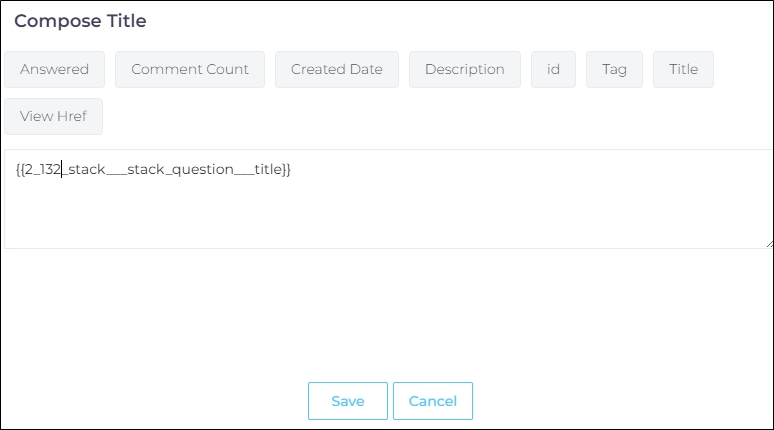
Title
The checked fields appear in the result titles on a search results page. As with Summary, it is possible to check multiple fields to assemble a Title.
To create a title from multiple fields, click on Settings next to a field.
Use the Compose Title screen to generate a title template.
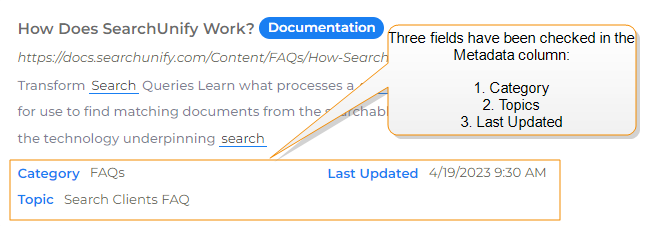
Metadata
The supplementary information sometimes accompanying search results is Metadata. It has a uniform appearance: {{field name}}: {{field value}}.
Autocomplete
Results are suggested the moment a user start typing in the search box. You can decide which fields those suggestions are based upon.
Exclude
Exclude is related to Filters. When a field is picked as a filter, the Exclude button appears for that field.
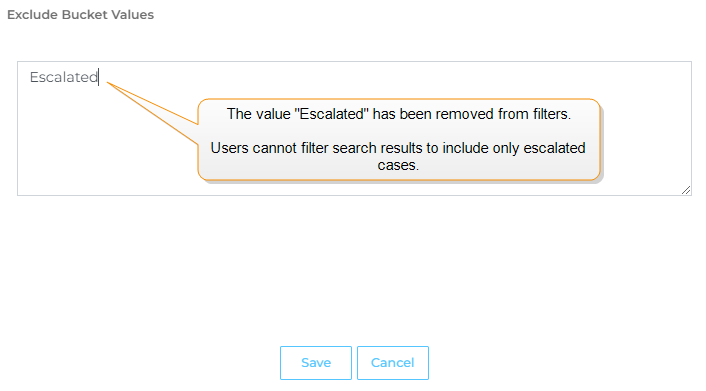
Click Exclude. Then enter the values that shouldn't appear in filters. Finally, click Save.
Enable Preview Search Results before configuring the Preview column. For more information, see Preview Search Results.
The Legacy is the default state of the Preview pane. In this state, the Preview pane provides a sneak peek into the document while maintaining the document's original look. The typefaces, images, and other multimedia elements are displayed in the Preview pane as they do in the document. The Legacy preview works only when:
The content source is either YouTube or Vimeo
The content source and the search client are hosted on the same domain.
If those conditions are met, then it’s recommended to use the Legacy view.
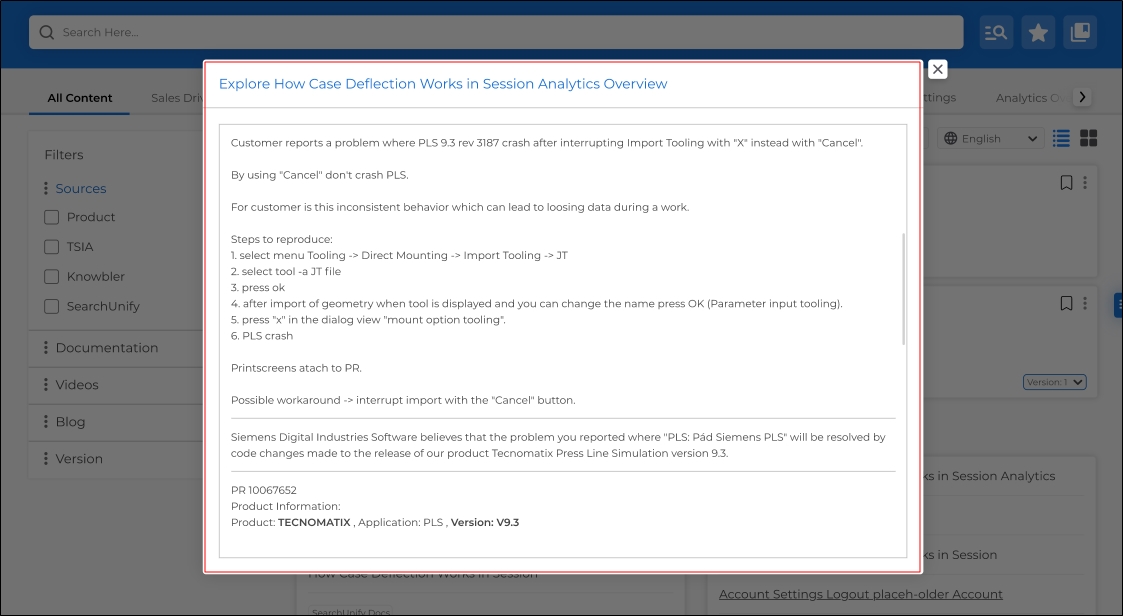
Admins can select an alternative view of the Preview pane, known as Plain Text. In this view, the focus is on the information. The images and other multimedia are excluded and the Preview is displayed simply as text.
Plain Text view supports result reviews when the content source and the search client are hosted on different domains.
Given below is an image of a document displayed in the Preview pane using the plain text view.
Fig. A snapshot of the Preview Pane in Plain Text view.
Select Legacy or Plain Text
Navigate to Search Clients > Edit > Content Sources.
Select a Content Source and a Content Type.
Click the settings icon on the Preview column.
In the Preview Configurations, select Legacy or Plain Text. If you have selected Plain Text, then move to the next section to configure it.
Click Proceed.
Fig. A snapshot of the Preview Configurations dialog.
Select Fields for the Preview Pane
This configuration is available when you have selected the Plain Text view in the previous section.
Navigate to Search Clients > Edit > Content Sources.
Select a Content Source and a Content Type.
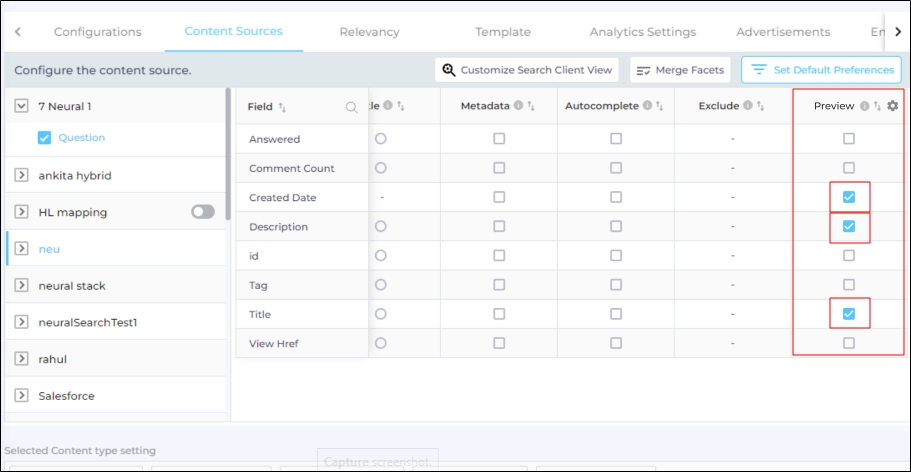
In the Preview column, select the fields to show in the Preview Pane.
Fig. A snapshot of the three fields selected for the Preview Pane in the Preview column.
Click Save.
Change Display Order in the Preview Pane
Navigate to Search Clients > Edit > Content Sources.
Select a Content Source and a Content Type.
Click the Settings icon on the Preview column displayed in the image of the above section.
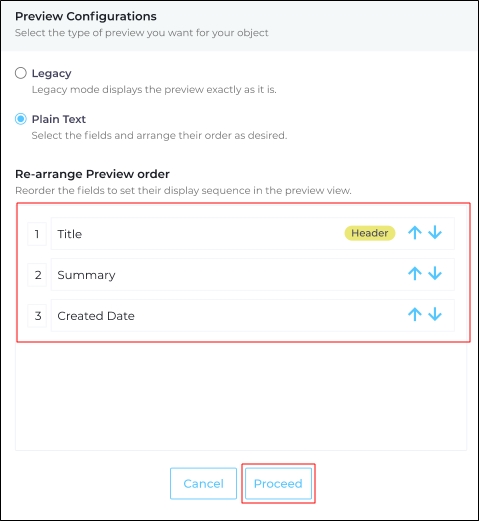
Use the arrows in the Re-arrange Preview Order to change the order of the fields. Also, the value in the first field is displayed as a header in the plain text preview.
Click Proceed.
Fig. A snapshot of the Re-arrange Preview Order.
Track Analytics
The checked fields are used to track conversions for auto-tuning and advanced reporting.