

Install a Search Client in Khoros
Installing a search client on Khoros boards helps you find discussions and posts faster. This article shares the instructions on installing the Khoros search client. To start, download your Khoros (Lithium) search client.
Prerequisites
-
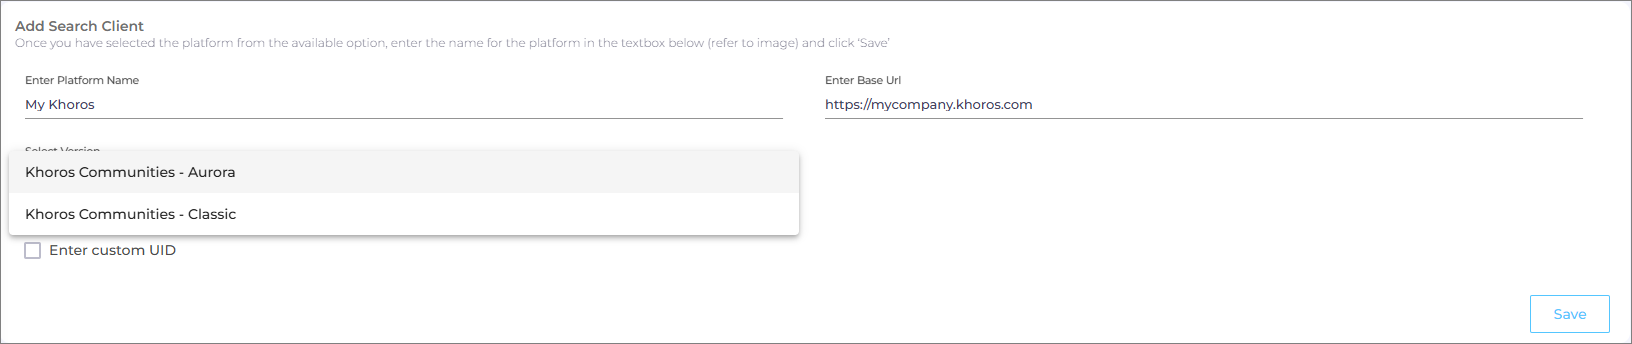
Create a Khoros Search Client.
Note: Make sure you select the right platform, Aurora or Classic, while creating a Khoros Search Client.
-
Configure the Khoros Search Client.
Download the Khoros Aurora Search Client.

The search client is downloaded as a zip file. The zip file was last updated in the Q2 '25 release, but clients on the Q4 '24 release or later releases can use it. The zip file contains a folder with four files:
-
auroraBannerEnabler.js: Used in the Analytics component to enable auto-suggestions on the banner search.
-
aurora-middleware.zip: Contains the essential and optional components for installation on Khoros.
-
auroraSpotlightEnabler.js: Used in the Analytics component to enable auto-suggestions on the spotlight search.
-
readme.txt: Contains script links and information about the following components
-
Analytics component: An essential component used to gather search analytics from your Khoros community.
-
Core component: An essential component that enables search functionality and allows you to view results.
-
Autocomplete component: An optional component that enables the autocomplete feature on the search bar. This component is not required if you're using auroraBannerEnabler.js and auroraSpotlightEnabler.js in the Analytics component.
-
Page Rating component: An optional component used to gather feedback on the search results page and content pages.
-
Articles Widget component: An optional component used to suggest related articles on the search results page and content pages.
The SearchUnify scripts make up for Khoros Aurora's lack of support for customizations on the banner and the header. Until Khoros supports search customizations out-of-the-box for these, you can use the SearchUnify scripts to implement autosuggestion for your Khoros search client.
-
Now let's install a SearchUnify search client on Khoros Aurora:
-
Log into your Aurora community instance.
-
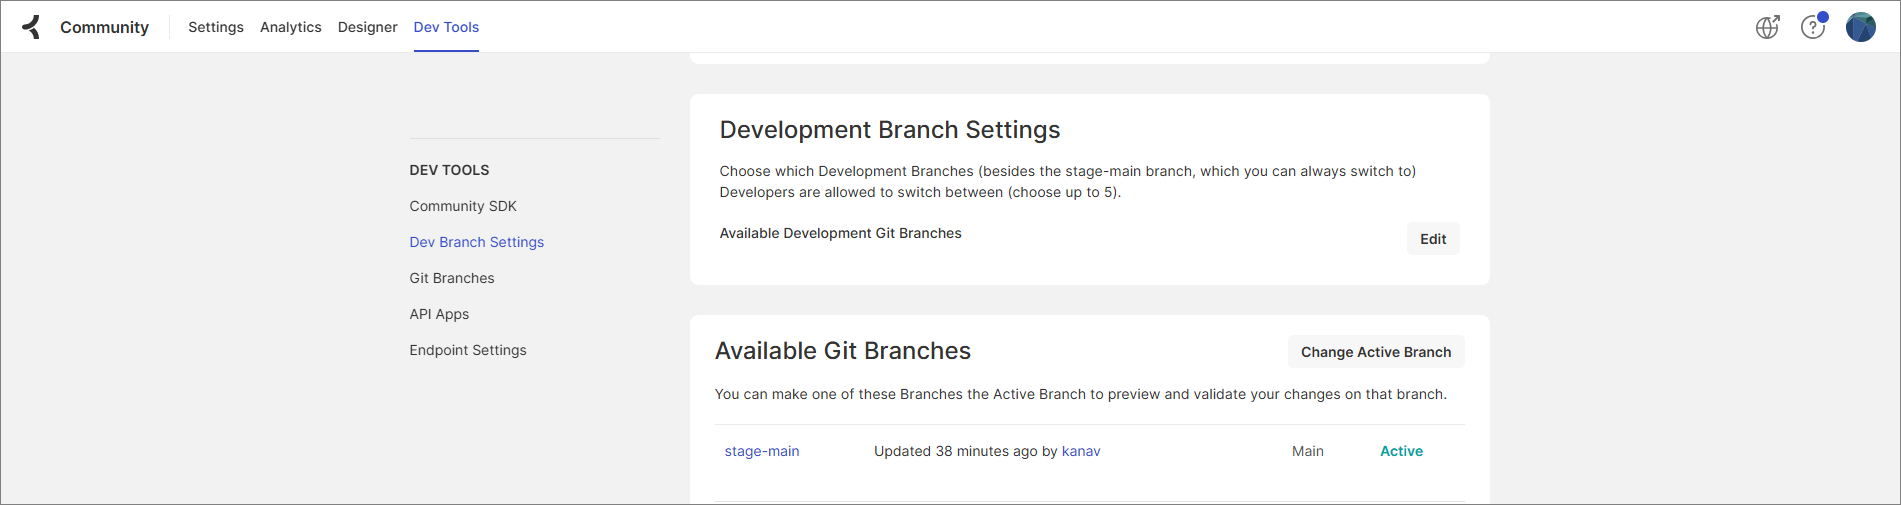
Click on the user profile icon and select Dev Tools.

-
Scroll down to the Available Git Branches and click on the active branch currently associated with your Aurora community.
-
Clone your Git repository on your local machine.
-
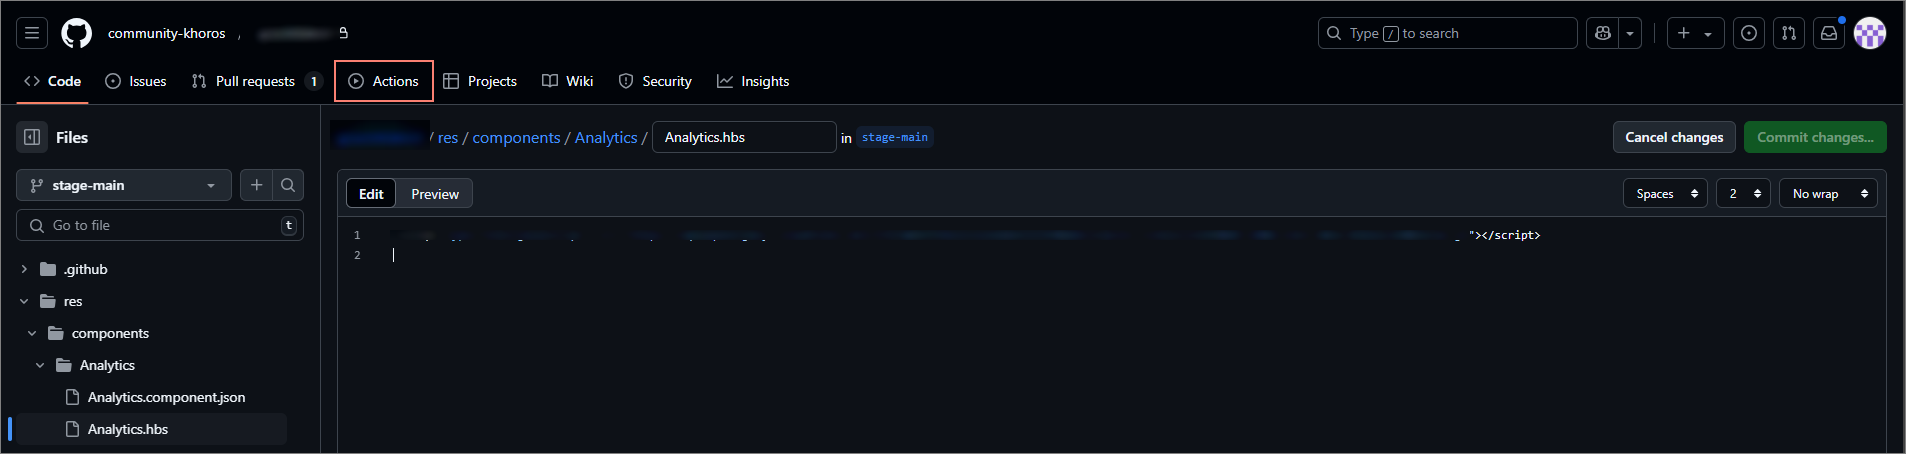
Review your Git repository and understand its structure. The contents of the cloned repository are in the “stage-main” branch. The folder consists of res and src folders which are used to keep “endpoints” and “component” respectively.
-
You need to navigate to your res folder and create five .hbs components (OR react components based on your preference but .hbs is preferred because of lightweight components) for five different SearchUnify components: Analytics, Auto-complete, Page Rating, Recommendations, and Searchunify.
-
Analytics - Provides SU configurations & tracks analytics | Required
-
Searchunify - Core SearchUnify application (search) | Required
-
Auto-complete - AutoComplete Box | Required
-
Page Rating - Feedback widget | Optional
-
Recommendations - Recommended Articles widget | Optional
The purpose of these components is to import different SearchUnify apps via scripts.
IMPORTANT.
-
The analytics component is a special component; it doesn’t have a UI.
-
Import the analytics component into the header section of a page.
-
All other components depend on the analytics component.
-
No other component will work if the analytics component hasn’t been configured and imported correctly.
-
-
The downloaded search client .zip contains a readme.txt file. Add the scripts given in the readme.txt file into their respective .hbs components. An alternative is to import the same scripts using react components.
There’s an aurora-middleware.zip file in the downloaded search client .zip file. You can refer to the res folder after extraction and take a look at the five components.
-
Once the components have been created, copy the scripts shared with you in the “readme.txt” file onto these newly created components one by one.
-
At this point, your components have been successfully updated, now let us focus on adding the searchunify’s endpoint.
-
Navigate to src > endpoints > searches in the zip extract and copy this endpoint to the same location in your repository.
-
Search for “accessToken” and replace the access token with the one provided in the readme.txt file.
-
Both the components and endpoints should be updated by this step. You should be able to commit these changes. After committing the changes, create pull requests for the same.
Note: These pull requests will be sent for a review per the Git hierarchy within your organizations. Once it is approved, proceed to deploying these components on your Khoros Aurora community.
-
After you commit any changes in any of the src folder files, a build is created in the Actions section of the Git repository.
Review if your last build was successful or not. There should be no error in the build.
If your last build failed, contact the SearchUnify support team to get it resolved.
-
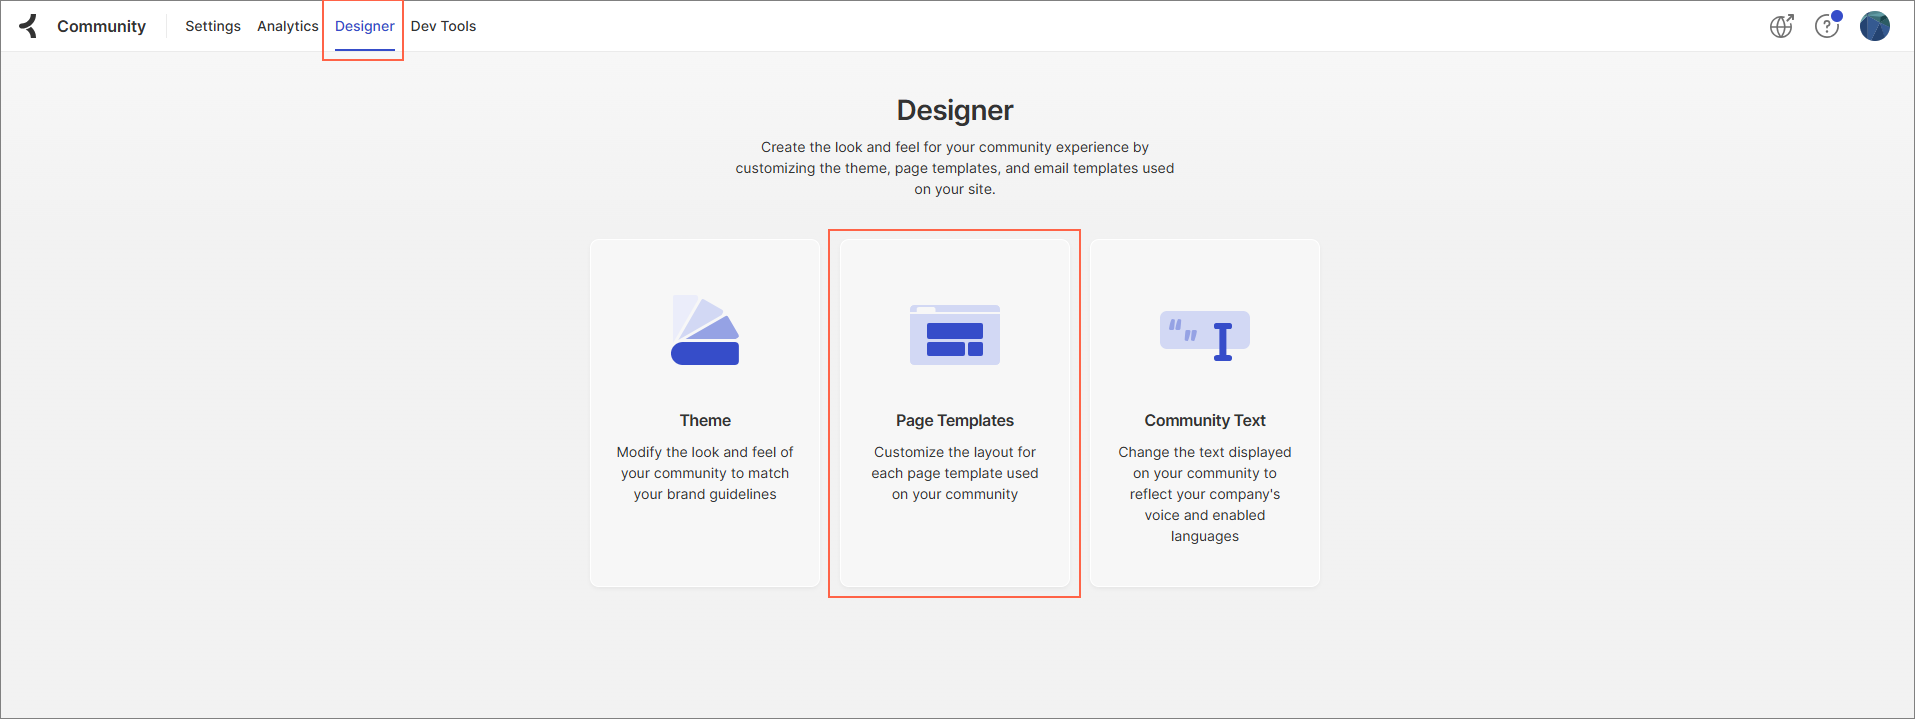
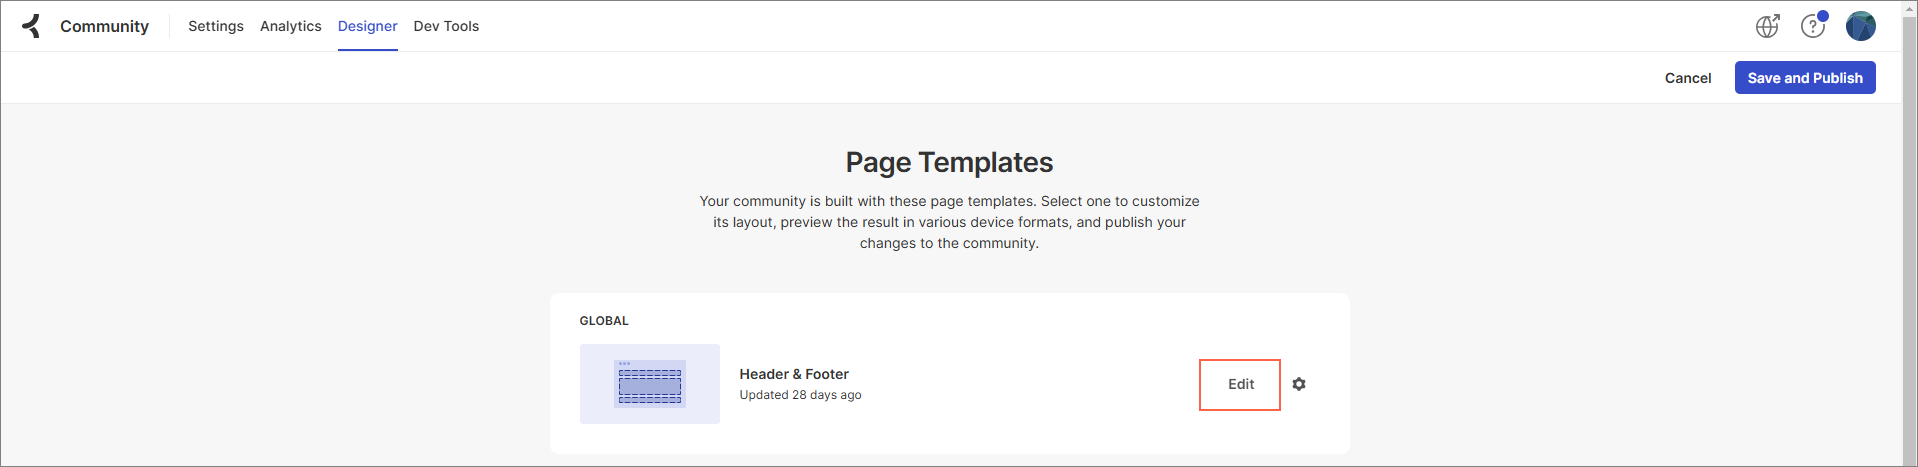
Now, go back to the Khoros Aurora community instance and navigate to the Designer tab and select Page Templates.
-
Click Edit on the page where you want to deploy the SearchUnify component.
-
Click on the
 icon where you want to add the SearchUnify components.
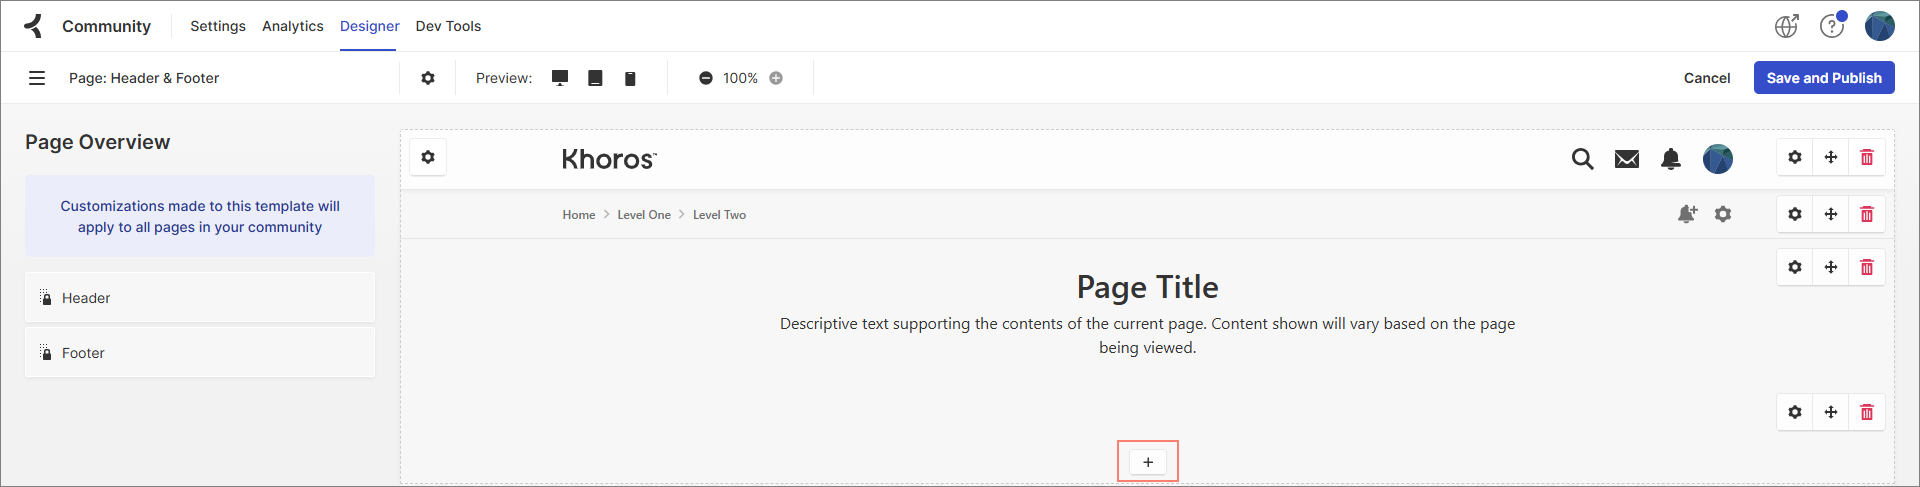
-
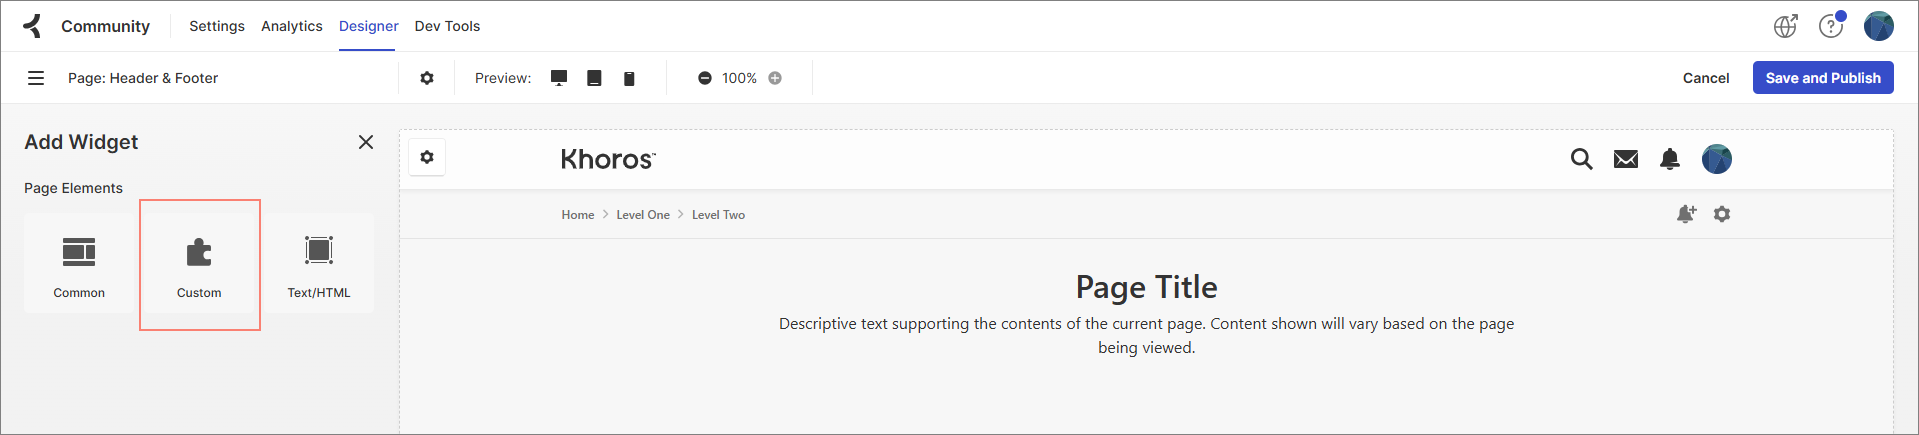
Select Custom.
-
You will see the list of components you added in Git.
-
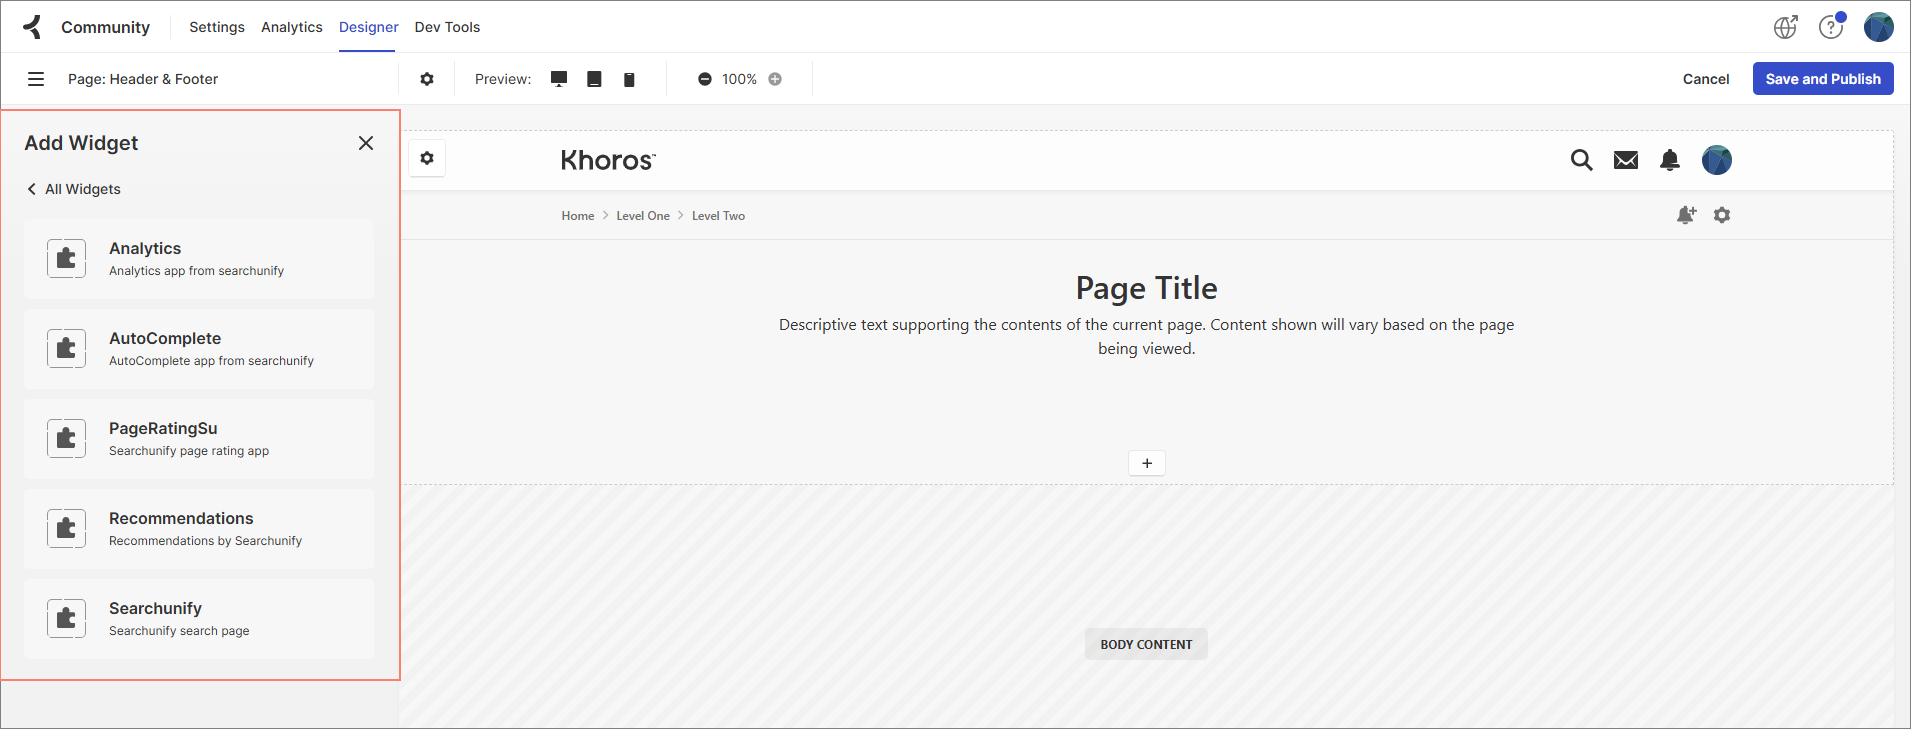
Double-click on the component to add it on the page. Add the “Analytics” component onto the header section first. This component is special and lacks UI. The component ensures that an.js is imported across the pages. Without an.js, no other component will work.
-
Now double click on the “AutoComplete” component (next image) to add it.
-
After dropping the component, click Save and Publish.
The following snapshot shows the SearchUnify's AutoComplete component deployed on a Khoros Aurora community page.
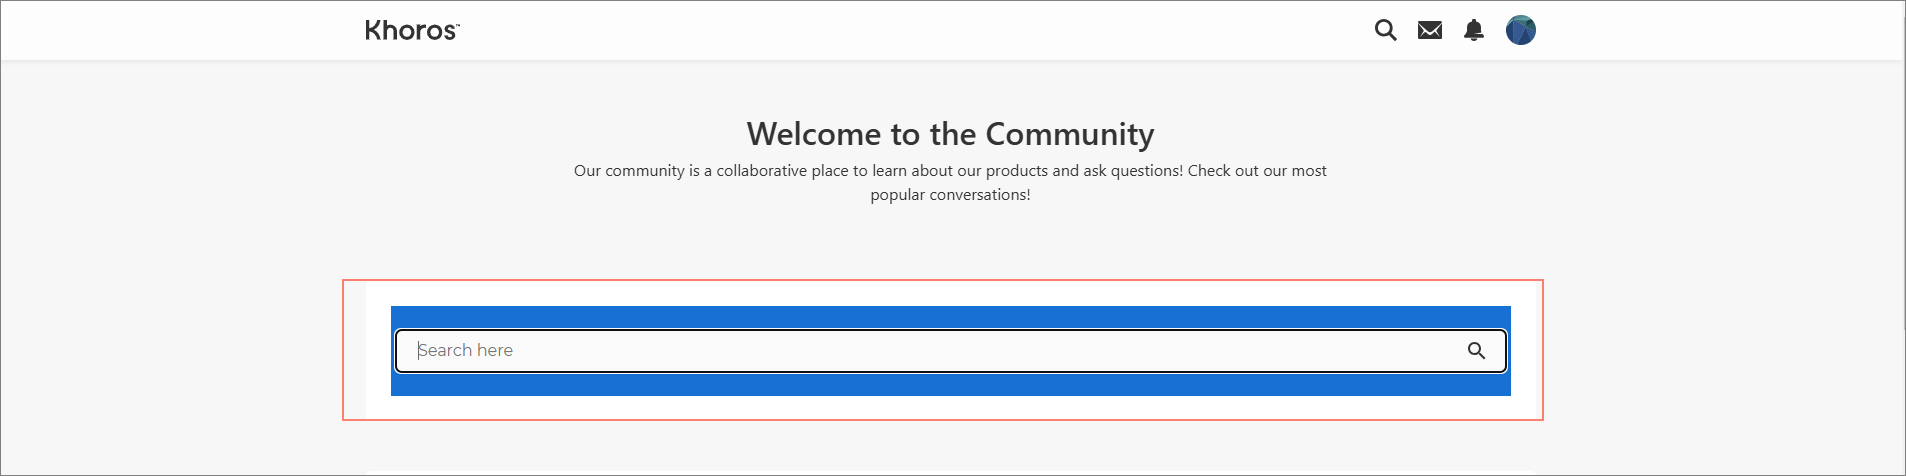
Similarly, you can add the other SearchUnify components to your Aurora Community as well based on your requirements.
Create New Endpoints
There are five endpoints that need to be created for different SearchUnify properties, including setting up the connection between Khoros and SearchUnify, to collect search analytics, and to provide search recommendations.
-
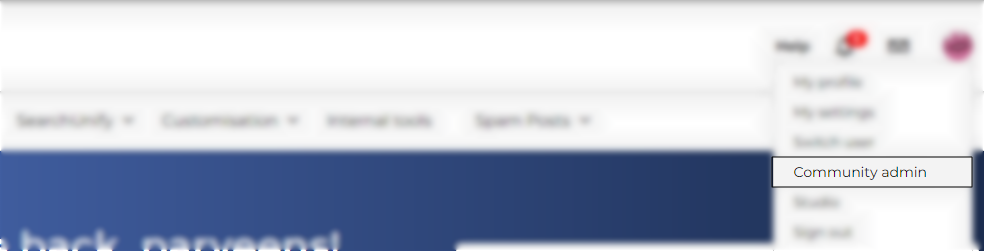
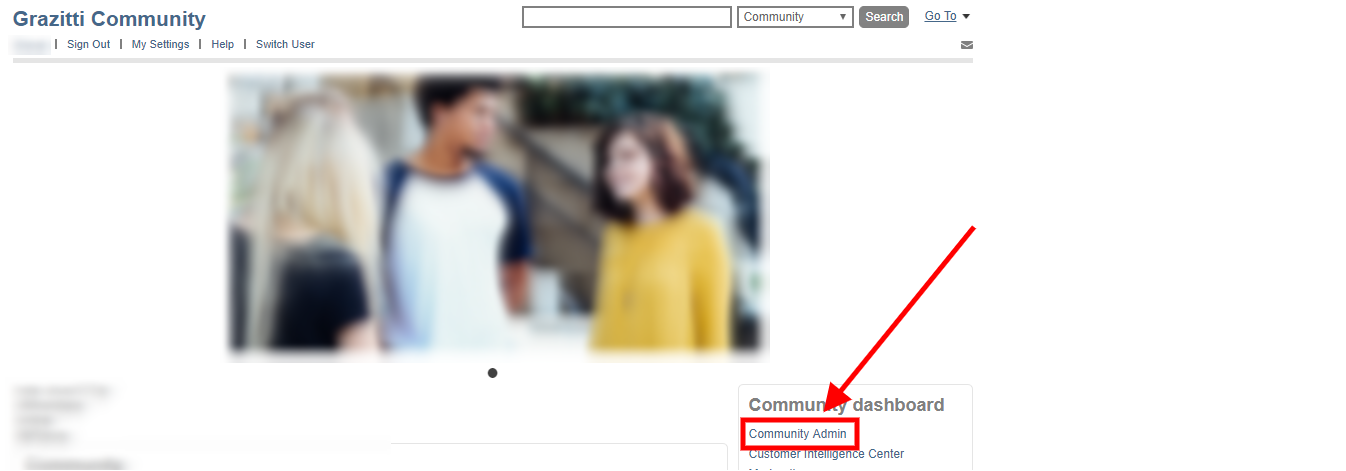
Sign into your Khoros community as an admin. Click on your profile icon and select Community admin.
-
Click Studio.
-
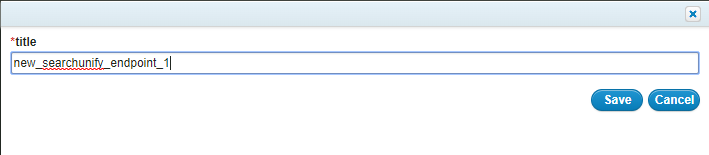
Navigate to Endpoints and click New Endpoint.
-
Give your endpoint a Title and click Save.
-
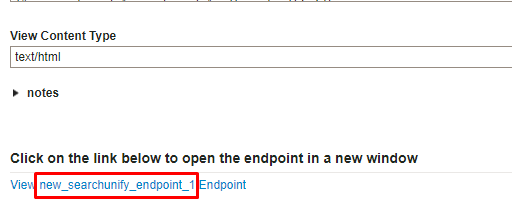
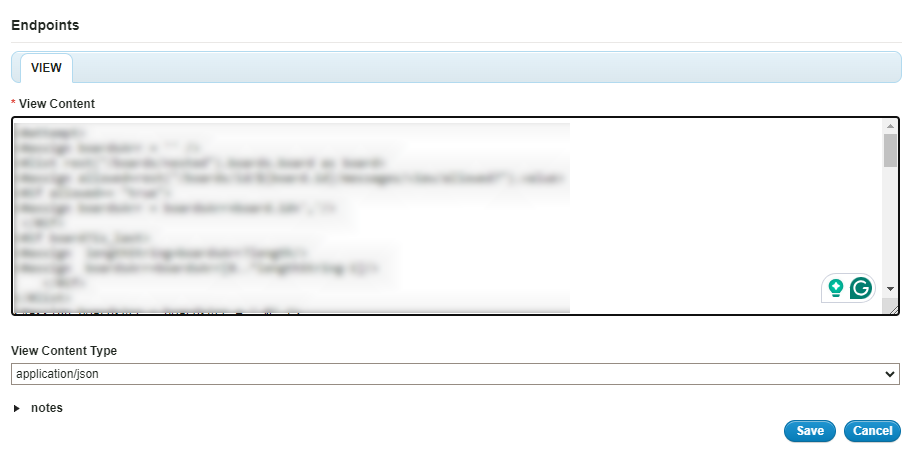
Open the
searchUnify_Endpointfile from the extracted search client files and copy its code. -
Paste the code in View Content and select application/json as View Content Type. Press Save.
-
Similarly, create four more endpoints and use the code from searchunify_live_counts, searchunify_Recommedations, searchUnify_GptEndpoint, and searchunify_saves_results_Endpoint respectively. Make sure to select application/json as View Content Type for all the endpoints.
-
Copy the names of the all the endpoints.


Create New Khoros Component
-
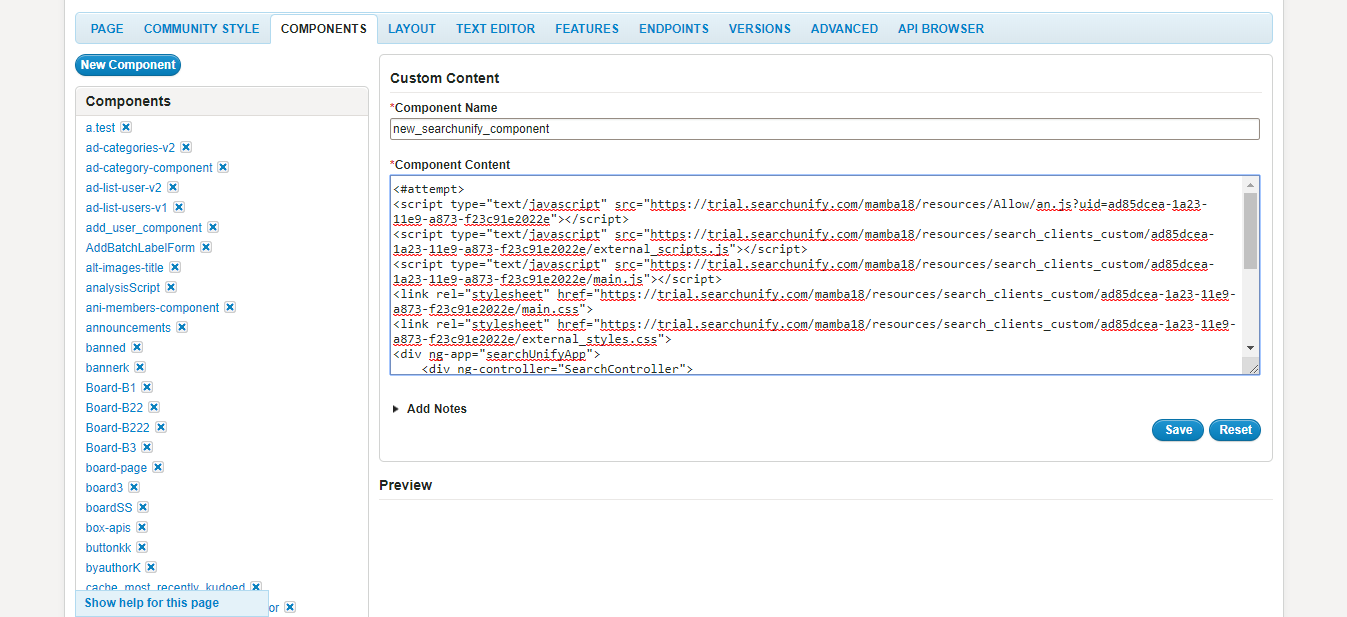
Navigate to Components and click New Component.
-
Give your component a name and click Create.
-
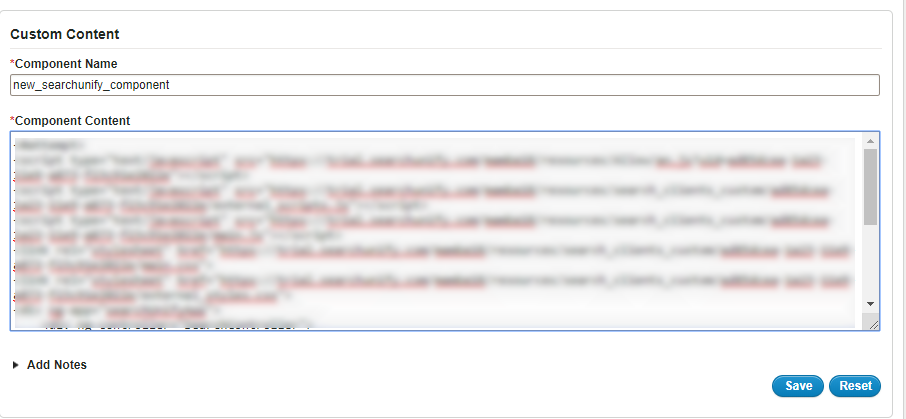
Open the
searchUnify_Componentfile from the extracted search client files and copy the code. -
Paste the code in Component Content.
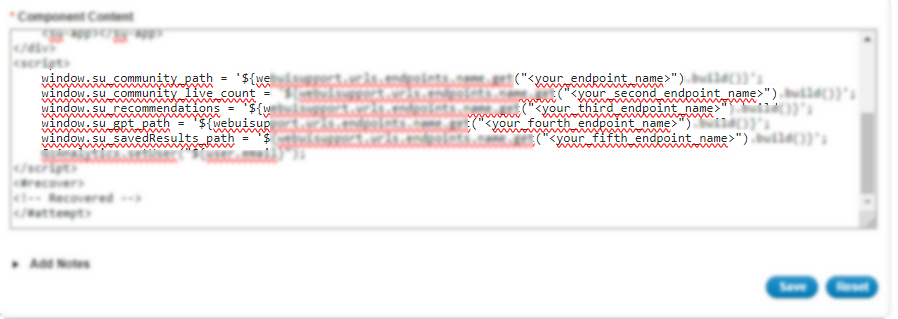
-
Scroll down the Component Content code and replace <your endpoint name> with respective endpoint names. For example, the name of the endpoint created with searchunify_Endpoint will go to the window.su_community_path.
NOTE. Make sure you remove the angle brackets (<>) from the endpoint names and paste the endpoint names in this format: ("endpoint_name").
-
After you have entered all the endpoint names, press Save.


Optional. Create a New Khoros Page
The Khoros component that you created is to be inserted into a Khoros page. You can select one of your existing community pages to host SearchUnify-powered search and search results, or create a new page. This section explains how to create a page in Khoros from scratch.
-
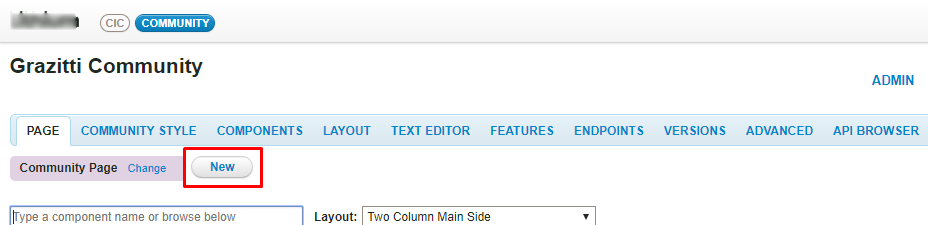
Navigate to Page, and click New.
-
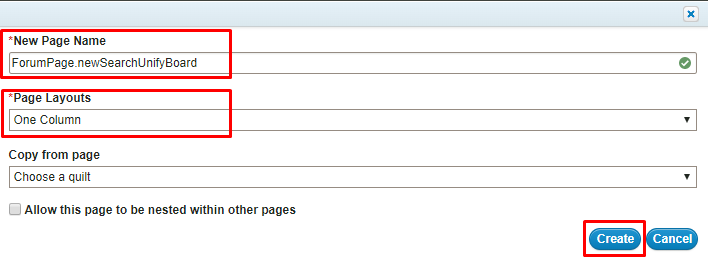
Enter a page name in New Page Name prefixed by
ForumPage., select a layout from the Page Layouts dropdown (we recommend using One Column), and click Create.
Whitelist Your SearchUnify Endpoint
Navigate to Admin > System, and click HTTP Client.
In the Alllowed domain names field, enter your Service Endpoint (your SearchUnify instance URL) given in the readnme.txt file . Finally, click Save.
Insert SearchUnify Component in a Khoros Page
-
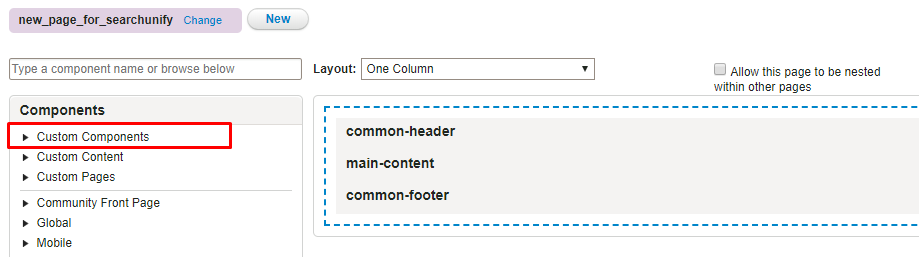
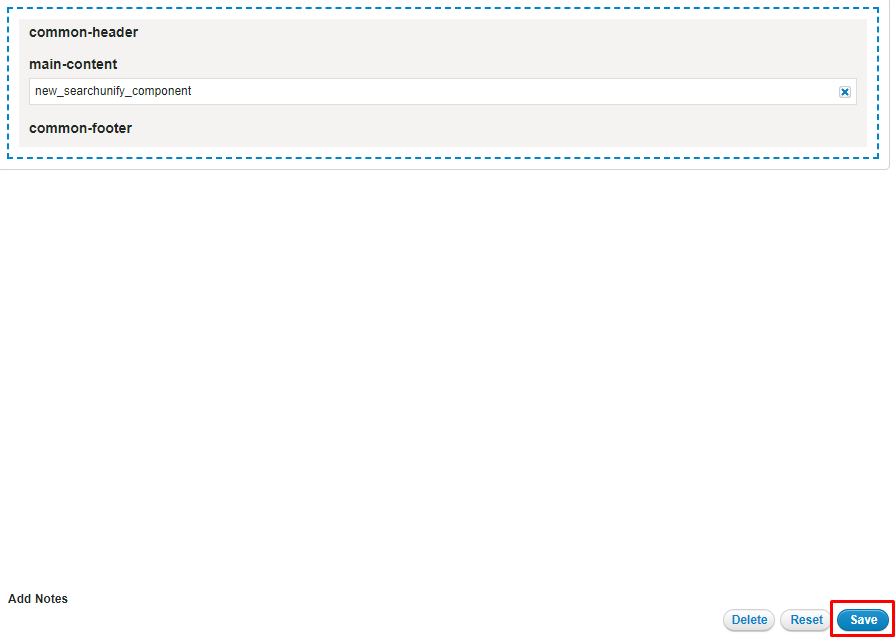
From Admin > Page, open the page on which you want to use the search component. You can select the new page that you created or an existing page.
-
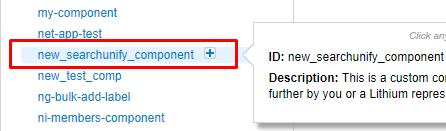
Expand Custom Components.
-
Click
 to add the component on the selected page.
 -
Drag the component to
main-contentand press Save.

Insert SearchUnify Page on a Khoros Board
-
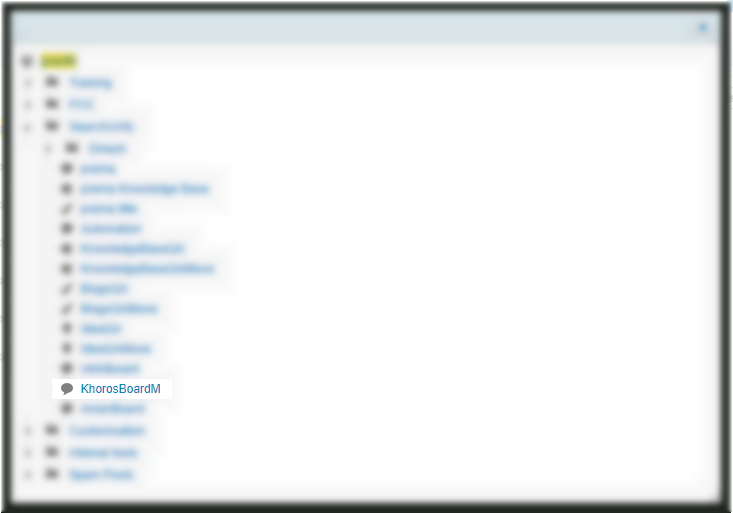
Navigate to Admin > Community Structure.
-
Click on Choose to select the Khoros Board on which you want to insert the page. For illustration, we selected the KhorosBoardM.
NOTE. Be sure to select only a Khoros board. No other Khoros object is supported in SearchUnify.
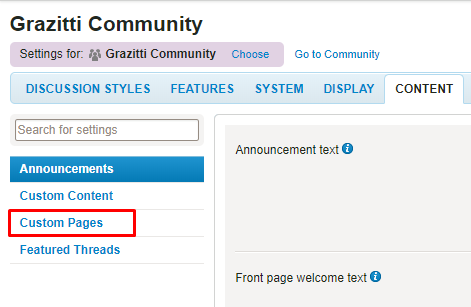
-
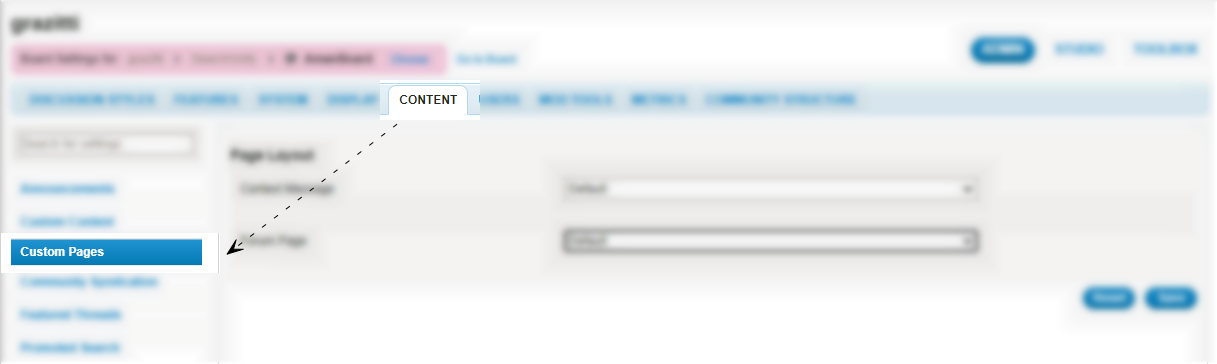
Navigate to Content > Custom Pages.
-
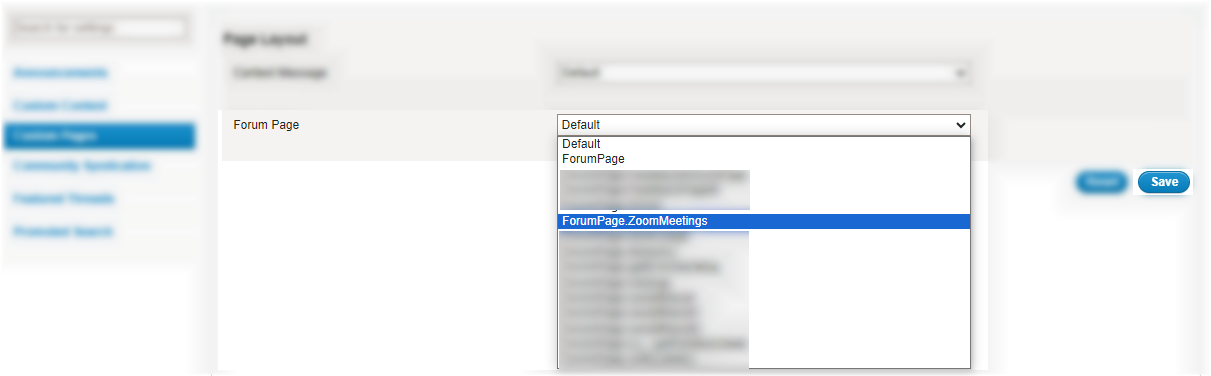
In the Forum Page dropdown, select the page on which you deployed the SearchUnify component (refer to the Insert SearchUnify Component in a Khoros Page section). And click Save.
-
Click Go to Board and you will land on the search page powered by SearchUnify.

